還記得我們昨天已經將新增鬧鐘的按鈕建好了嗎?,今天就要來對他動手動腳,讓他按下去有效果。
可以看到IPhone內建鬧鐘按下 + 按鈕後,會有一個新增鬧鐘的頁面由下往上跳出來。
這時候呢就要用到「Present」這個Function來讓畫面由下而上跳出來,啊你說跳就跳哦?誰知道要跳哪個畫面出來?
沒錯!所以在實作跳畫面之前,需要先建立一個畫面!我們就將它命名為:「AddAlarmViewController」
命名在寫程式很重要,無論是Function、變數、畫面,一個好的命名可以為使用者省掉很多讀Code的時間。
忘記怎麼新增畫面的話,可以去前幾篇文章幫我複(刷) 習(刷) 一(流) 下(量)。
新增完後讓我們回到「AlarmViewController」內,在「addAlarm」中加入以下程式碼:
@objc func addAlarm() {
        let vc = AddAlarmViewController()
        present(vc, animated: true, completion: nil)
    }
簡單說明一下上面的程式碼,首先我們建立了一個變數:「vc」,裡面裝著「AddAlarmViewController」
之後用 present() 將這個畫面由下往上跳出來。
present()總共有三個引數,其代表意義分別為:
所以我們這邊寫present(vc, animated: true, completion: nil)就意味著:
最後呢,我們再回到「AddAlarmViewController」內,將他的背景色更改一下:
class AddAlarmViewController: UIViewController {

    override func viewDidLoad() {
        super.viewDidLoad()
        self.view.backgroundColor = .systemBlue
    }
}
馬上執行程式看看會發生什麼事吧!
太~神~辣~ 相信各位看到自己做出這個效果一定很感動。
想當初我做出這個效果還到處去跟家人炫耀XD
現在讓我們讓畫面更像IPhone的鬧鐘吧,你可以看見IPhone的新增鬧鐘頁面也有Navigation Bar,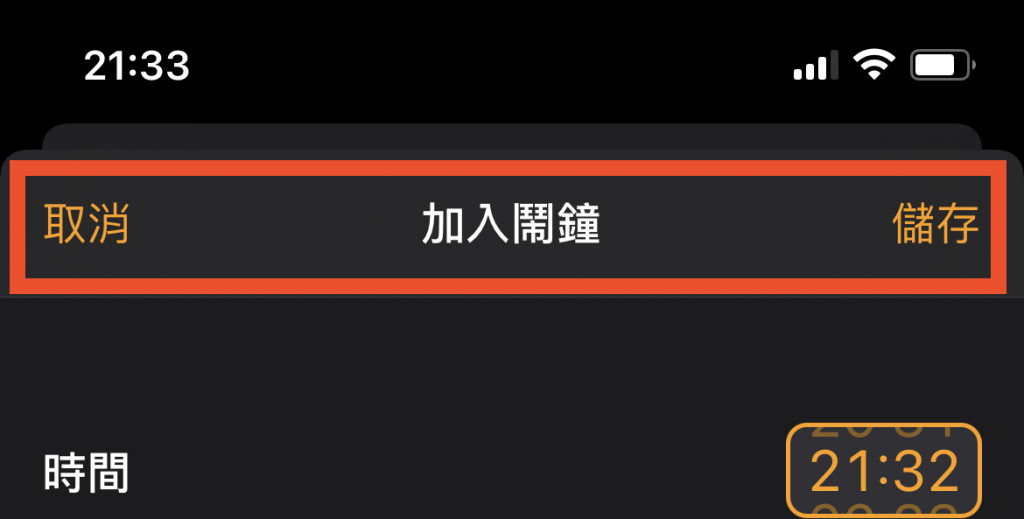
因此我們必須動點手腳讓這片藍色的畫面變得更像IPhone的新增鬧鐘畫面
首先先宣告一個變數「nv」,用來裝 變成NavigationController的「vc」畫面
因為要讓「vc」可以有Navigation Bar,因此必須讓 vc 變成 NavigationController
@objc func addAlarm() {
        let vc = AddAlarmViewController()
        let nv = UINavigationController(rootViewController: vc)
        present(nv, animated: true, completion: nil)
    }
然後再到「AddAlarmViewController」去設定他的Navigation Bar吧:
前幾天都有說過,各位可以挑戰看看 ,真的遇到困難再往下參考我的寫法唷!
class AddAlarmViewController: UIViewController {

    override func viewDidLoad() {
        super.viewDidLoad()
        self.view.backgroundColor = .black
        setNavigation()
    }

    func setNavigation() {
        // Set Navigatoin title
        self.title = "加入鬧鐘"

        //Set Navigation Title Color
        self.navigationController?.navigationBar.titleTextAttributes =  [.foregroundColor: UIColor.white]

        //Set Navigation Bar Background Color
        self.navigationController?.navigationBar.barTintColor = #colorLiteral(red: 0.1669761635, green: 0.1807887411, blue: 0.2008549854, alpha: 1)

        //Left Button
        let cancelButton = UIBarButtonItem(title: "取消",
                                         style: .plain,
                                         target: self,
                                         action: #selector(backToMain))
        cancelButton.tintColor = .orange
        self.navigationItem.leftBarButtonItem = cancelButton

        //Right Button
        let saveButton = UIBarButtonItem(title: "儲存",
                                        style: .plain,
                                        target: self,
                                        action: #selector(saveAlarm))
        saveButton.tintColor = .orange
        self.navigationItem.rightBarButtonItem = saveButton
    }

    @objc func saveAlarm() {

    }

    @objc func backToMain() {

    }
}
是不是真的很像了