前幾編文章裡,大家已經知道如何利用 Vaadin-on-Kotlin 簡單快速的新增、查詢資料庫並使用Grid顯示,也知道了如何驗證輸入資料的正確性。先祝大家中秋節愉快,今天輕鬆寫,來完成單一資料表的CRUD吧!
EditStudents.kt
package com.example.vok

import com.github.mvysny.karibudsl.v10.*
import com.vaadin.flow.router.BeforeEvent
import com.vaadin.flow.router.HasUrlParameter
import com.vaadin.flow.router.Route

@Route("edit-student", layout = MainLayout::class)
class EditStudent : KComposite(), HasUrlParameter<Long> {
    private val binder = beanValidationBinder<Student>()
    private var student: Student? = null
    private val root = ui {
        verticalLayout {
            h1("學生資料修改")
            textField("姓名 : "){
                bind(binder).bind(Student::name)
            }
            comboBox<Gender>("性別 : "){
                setItems(*Gender.values())
                bind(binder).bind(Student::gender)
            }
            datePicker("生日 : "){
                bind(binder).bind(Student::birthday)
            }
            numberField("身高"){
                bind(binder).bind(Student::height)
            }
            numberField("體重"){
                bind(binder).bind(Student::weight)
            }
            button("儲存"){
                onLeftClick {
                    val student = student!!
                    if (binder.validate().isOk && binder.writeBeanIfValid(student)){
                        student.save()
                        StudentView.navigateTo(student.id!!)
                    }
                }
            }
            routerLink(null, "返回", AllStudentsView::class)
        }
    }

    override fun setParameter(event: BeforeEvent?, studentId: Long?) {
        binder.readBean(Student.getById(studentId!!))
    }

    companion object{
        fun navigateTo(studentId: Long) = navigateToView(EditStudent::class, studentId)
    }
}
HasUrlParameter說明請參考d04binder和欄位綁定後,只要使用readBean() 方法讀取bean,畫面立即自動更新。
而在companion object navigateTo()方法則是提供外部快速跳轉本頁的"入口"。
JavaBeans是Java中一種特殊的類,可以將多個物件封裝到一個物件(bean)中。特點是可序列化,提供無參建構元,提供getter方法和setter方法存取物件的屬性。名稱中的「Bean」是用於Java的可重用軟體組件的慣用叫法。 -- 維基百科
AllStudentView.kt
        addColumn(NativeButtonRenderer("Show", {StudentView.navigateTo(it.id!!)}))
        addColumn(NativeButtonRenderer("Edit", {EditStudent.navigateTo(it.id!!)}))
NativeButtonRenderer()方法有2個參數,第一個是button顯示文字,第二個參數則是 clickListener
在單筆學生資料顯示頁加入修改連結。請打開StudentView.kt
private lateinit var editLink: RouterLink
editLink.setRoute(EditStudent::class, student.id!!)
editLink = routerLink(VaadinIcon.EDIT,null)
在此使用圖形連結,Vaadin提供了許多Icon,可直接使用 enum VaadinIcon取得圖示
routerLink(VaadinIcon.ARROW_LEFT, null, viewType = AllStudentsView::class)
執行結果如下 :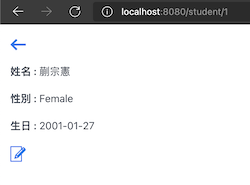
AllStudentView.kt
            addColumn(NativeButtonRenderer("Delete") {
                confirmDialog {
                    it.delete()
                    this.refresh()
                }
            })
第2行,按下Delete後,跳出確認框,預設訊息為 "Are you sure?",若欲自訂訊息,請改為 :
                confirmDialog(text = "是否確定刪除${it.name}的資料?") {
                    it.delete()
                    this.refresh()
                }
執行結果如下: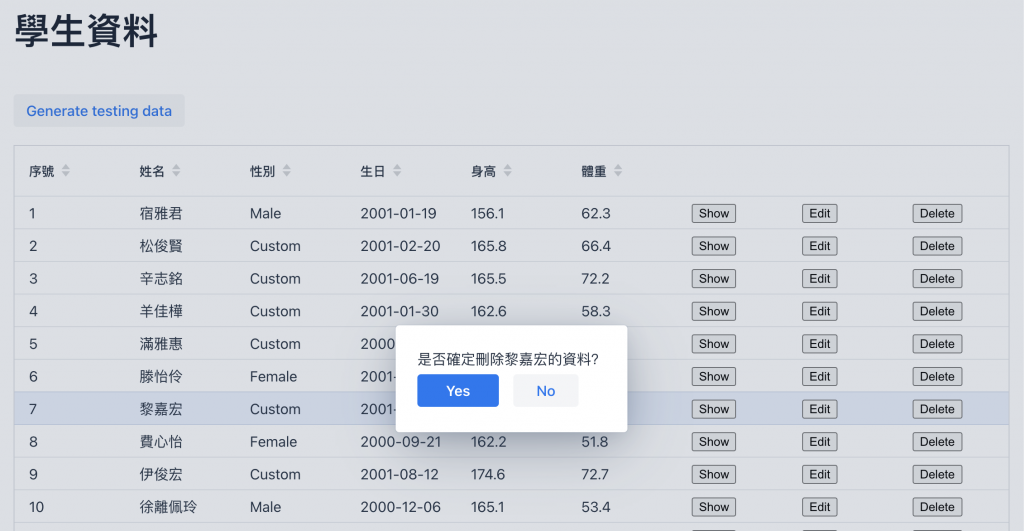
單一資料表的 CRUD 到本日告一個段落,是不是很簡單呢?
明天要開始進入自訂可重複使用的 Component了,明天見~
本日程式已上傳 GitHub


 iThome鐵人賽