Student.kt,加上欄位驗證data class Student(
override var id: Long? = null,
@field:NotNull
@field:Size(min = 2, max = 10)
var name: String? = null,
@field:NotNull
@field:Past
var birthday: LocalDate? = null,
var created: Date? = null,
@field:NotNull
var gender : Gender? = null,
@field:NotNull
@field:DecimalMin(value = "100.0")
@field:DecimalMax(value = "200.0")
var height: Double? = null,
@field:NotNull
@field:DecimalMin(value = "40.0")
@field:DecimalMax(value = "150.0")
var weight: Double? = null,
var student_id : String? = null
): KEntity<Long>{
companion object :Dao<Student, Long>(Student::class.java)
}
@Past表示日期需為過去的時間,多半用於生日
*請注意,文字長度不分中英文,若為欄位輸入為中文字請特別留意
            button("Save"){
                onLeftClick {
                    val student = Student()
                    if (binder.validate().isOk && binder.writeBeanIfValid(student)){
                        student.save()
                        StudentView.navigateTo(student.id!!)
                    }
                }
            }
binder.validate() 驗證bean是否正確,若有誤即在 bind 欄位下方出示錯誤原因,isOK方法回傳驗證的 boolan 值
執行結果如下 :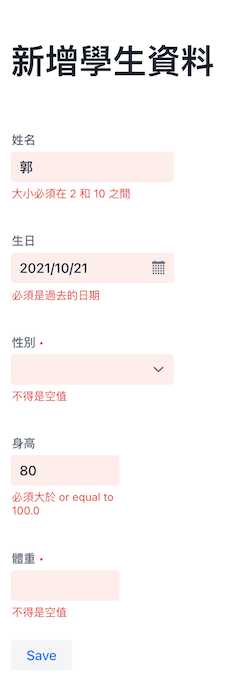
上圖中可看到一個很奇怪的訊息 必須大於 or equal to 100.0,一般人不會這麼說話,我們改一下提示訊息,請打開Student.kt,更改身高提示文字
    @field:NotNull
    @field:DecimalMin(value = "100.0", message = "需至少100公分以上")
    @field:DecimalMax(value = "200.0")
    var height: Double? = null,
此例中,身高和體重欄位,使用者可能會對單位感到疑惑,到底是公分還是公尺、公斤還是磅,除了可以在身高/體重後面加上文字提示外,以此為例我們直接在欄位上加上提示文字,請打開 CreateStudentView.kt,在欄位上加上 placehoder
            numberField("身高"){
                bind(binder).bind(Student::height)
                placeholder = "公分"
            }
            numberField("體重"){
                bind(binder).bind(Student::weight)
                placeholder = "公斤"
            }
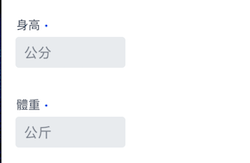
這樣就完成了
AllStudentsView.kt
package com.example.vok

import com.github.mvysny.karibudsl.v10.*
import com.github.vokorm.dataloader.dataLoader
import com.vaadin.flow.component.button.Button
import com.vaadin.flow.component.grid.Grid
import com.vaadin.flow.router.AfterNavigationEvent
import com.vaadin.flow.router.AfterNavigationObserver
import com.vaadin.flow.router.Route
import eu.vaadinonkotlin.vaadin10.vokdb.setDataLoader
import java.util.*

@Route("students", layout = MainLayout::class)
class AllStudentsView: KComposite(), AfterNavigationObserver {
    private lateinit var grid: Grid<Student>
    private val root = ui {
        verticalLayout {
            setSizeFull()
            h1("學生資料")
            grid = grid {
                isExpand = true
                setDataLoader(Student.dataLoader)
                addColumnFor(Student::id)
                addColumnFor(Student::name)
                addColumnFor(Student::gender).
                addColumnFor(Student::birthday)
                addColumnFor(Student::height)
                addColumnFor(Student::weight).
            }
        }
    }

    override fun afterNavigation(event: AfterNavigationEvent?) {
        grid.refresh()
    }
}
執行後開啟 http://localhost:8080/students 可顯示所有學生資料。這裡使用 Grid 元件顯示,Grid 支援 paging、lazy-loading,還能夠排序和過濾資料,是個功能強大的元件。
由於範例使用的 H2 database,重新啟動資料就消失了,確實有點困擾。這裡我們使用 JavaFaker 來產生測試資料。 請在 web/build.gradle.kts 加入依賴
dependencies {
    implementation("com.github.javafaker:javafaker:1.0.2")
}
    button("Generate testing data"){
        onLeftClick {
            val faker = Faker(Locale("zh-TW"))
            (1..20).forEach { i ->
                Student(
                    name = faker.name().fullName(),
                    birthday = LocalDateToDateConverter().convertToPresentation(faker.date().birthday(20, 21), null),
                    gender = Gender.values().random(),
                    height = faker.number().randomDouble(1, 155, 190),
                    weight = faker.number().randomDouble(1, 45, 80)
                ).save()
            }
            grid.refresh()
        }
    }
第3行,初始化Faker時指定語言,台灣使用之語言代碼為 zh-TW
第4行,產生20筆測試資料
第7行,使用Vaadin提供的方法 LocalDateToDateConverter().convertToPresentation() 做資料型態轉換,將faker 產生的 Date 轉換成 Student 需要的 LocalDate
第8行,性別直接取 Gender enum 隨機值
第9~10行,給予適當區間取小數一位的隨機值
第11行,最後別忘了儲存Student Entity
第13行,待資料產生後,更新grid
最後,再給資料加上標題。開啟 AllStucentsView.kt,加上setHeader() method chaining,最後會回傳加上標題文字的column。
                addColumnFor(Student::id).setHeader("序號")
                addColumnFor(Student::name).setHeader("姓名")
                addColumnFor(Student::gender).setHeader("性別")
                addColumnFor(Student::birthday).setHeader("生日")
                addColumnFor(Student::height).setHeader("身高")
                addColumnFor(Student::weight).setHeader("體重")
執行結果如下。畫面中可看到標題旁有上下三角圖符號,點選符號可用該列資料排序。下圖採身高由高而低排序: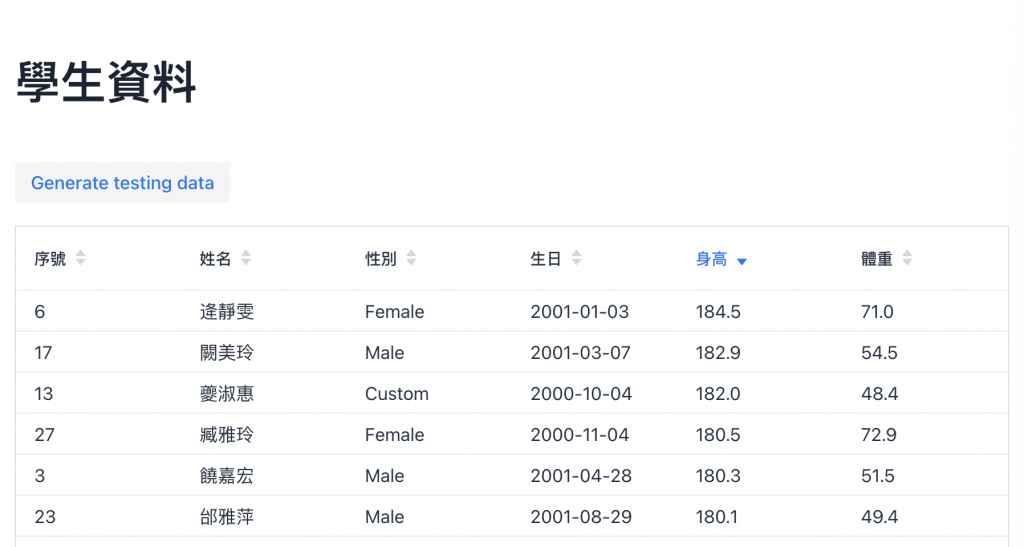
本日範例程式已上傳 Github


 iThome鐵人賽