本系列文已改編成書「Arduino 自造趣:結合 JavaScript x Vue x Phaser 輕鬆打造個人遊戲機」,本書改用 Vue3 與 TypeScript 全面重構且加上更詳細的說明,
在此感謝 iT 邦幫忙、博碩文化與編輯小 p 的協助,歡迎大家前往購書,鱈魚在此感謝大家 (。・∀・)。
若想 DIY 卻不知道零件去哪裡買的讀者,可以參考此連結 。( •̀ ω •́ )✧
現在有資料,只差介面了。
雖然每個視窗功能都不同,但是視窗外框功能都一樣,所以我們建立 base-window.vue 組件透過 slot 保留彈性,其他特定功能的卡片只要引入 base-window.vue 並透過 slot 就可以加入不同的功能。
預期長這樣: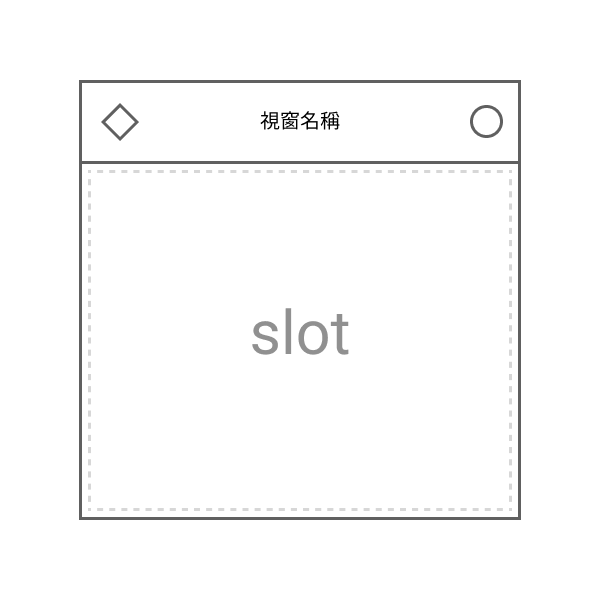
base-window.vue 功能需求:
title bar
視窗內容可以任意抽換。
使用 slot 實現。
建立 src\components\base-window.vue。
src\components\base-window.vue <template lang="pug">
.base-window(
  @click.stop='handleClick',
  :style='style',
  :class='classes',
  @touchstart.stop,
  @contextmenu.stop
)
  q-bar.base-window-header-bar(v-touch-pan.prevent.mouse='handleMove')
    q-icon(:name='headerIcon', :color='color')
    q-space
    .base-window-title.text-shadow {{ title }}
    q-space
    q-btn(
      @click='handleClose',
      icon='r_close',
      dense,
      flat,
      rounded,
      color='grey-5'
    )
  .base-window-body(:class='bodyClass')
    slot
樣式部分預期設計 Focus 效果,利用陰影呈現高低落差,所以在 quasar.variables.sass 建立陰影樣式變數。
src\styles\quasar.variables.sass
// ...

$unfocus-shadow: 0 0px 20px rgba(#000, 0.05), 0 2.8px 2.2px -30px rgba(0, 0, 0, 0.02),0 6.7px 5.3px -30px rgba(0, 0, 0, 0.028),0 12.5px 10px -30px rgba(0, 0, 0, 0.035),0 22.3px 17.9px -30px rgba(0, 0, 0, 0.042),0 41.8px 33.4px -30px rgba(0, 0, 0, 0.05),0 100px 80px -30px rgba(0, 0, 0, 0.07)
$focus-shadow: 0 0px 20px rgba(#000, 0.05),0 2.8px 2.2px rgba(0, 0, 0, 0.02),0 6.7px 5.3px rgba(0, 0, 0, 0.028),0 12.5px 10px rgba(0, 0, 0, 0.035),0 22.3px 17.9px rgba(0, 0, 0, 0.042),0 41.8px 33.4px rgba(0, 0, 0, 0.05),0 100px 80px rgba(0, 0, 0, 0.07)

@import '~quasar-variables-styl'
src\components\base-window.vue <style scoped lang="sass">
@import '@/styles/quasar.variables.sass'

.base-window
  position: fixed
  min-width: 200px
  min-height: 100px
  overflow: hidden
  transition-duration: 0.5s
  transform: translateZ(0px)
  transition-timing-function: cubic-bezier(0.83, 0, 0.17, 1)
  box-shadow: $unfocus-shadow
  border-radius: $border-radius-m
  background: rgba(white, 0.8)
  backdrop-filter: blur(4px)
  &.moving
    transition: top 0s, left 0s, transform 0.5s, box-shadow 0.5s

  .base-window-header-bar
    height: auto
    padding: 20px
    padding-bottom: 14px
    cursor: move
    background: none
    color: $grey-8
    .base-window-title
      font-size: 14px
      user-select: none
      margin: 0px
      position: relative
      font-weight: 900
      transition-duration: 0.4s
      letter-spacing: 1px

  .base-window-body
    position: relative
src\components\base-window.vue <script>
export default {
  name: 'BaseWindow',
  components: {},
  props: {
    // 視窗起始位置
    pos: {
      type: Object,
      default() {
        return {
          x: 0,
          y: 0,
        };
      },
    },

    // 可以額外增加 class
    bodyClass: {
      type: String,
      default: '',
    },

    // title bar 文字
    title: {
      type: String,
      default: 'title',
    },

    // title bar icon 名稱
    headerIcon: {
      type: String,
      default: 'r_dashboard',
    },

    // title bar icon 顏色
    headerIconColor: {
      type: String,
      default: 'blue-grey-4',
    },
  },
  data() {
    return {
      // 目前視窗移動量
      offset: {
        x: 0,
        y: 0,
      },

      status: {
        isMoving: false,
      },
    };
  },
  computed: {
    style() {
      const xSum = this.offset.x;
      const ySum = this.offset.y;

      const style = {
        zIndex: this.zIndex,
        top: `${ySum}px`,
        left: `${xSum}px`,
      };

      return style;
    },
    classes() {
      const classes = [];

      if (this.status.isMoving) {
        classes.push('moving');
      }

      return classes;
    },
  },
  watch: {},
  created() {
    this.offset.x = this.pos.x;
    this.offset.y = this.pos.y;
  },
  mounted() {},
  methods: {
    handleClick() {},
    handleClose() {},

    /** 處理拖動事件
     *
     * 使用 Quasar v-touch-pan 指令實現
     *
     * [參考資料](https://v1.quasar.dev/vue-directives/touch-pan)
     */
    handleMove({ isFinal, delta }) {
      // console.log(`[ handleMove ] delta  : `, delta);
      this.status.isMoving = !isFinal;

      // 累加每次移動變化量。
      this.offset.x += delta.x;
      this.offset.y += delta.y;
    },
  },
};
最後回到 app.vue,直接將 base-window 加入 HTML 看看效果。
src\app.vue
<template lang="pug">
.screen
  .info.font-orbitron(v-if='firmwareName')
    | {{ firmwareName }} - v{{ ver }}

  dialog-system-setting

  base-window(:pos='{ x: 50, y: 50 }')
</template>

<style lang="sass">
// ...
</style>

<script>
// ...

import BaseWindow from '@/components/base-window.vue';

export default {
  name: 'App',
  components: {
    'dialog-system-setting': DialogSystemSetting,
    'base-window': BaseWindow,
  },
	// ...
};
</script>

看起來真不錯 (≖‿ゝ≖)✧
接下來實際建立一個真正的視窗。
在 Vuex 中建立 window 模組,儲存目前顯示視窗與視窗相關數值。
設計 Window 資料格式
component:組件名稱
不同的視窗組件名稱。
id:視窗 ID
唯一 ID,用於識別視窗。
focusAt:聚焦時間
判斷視窗重疊關係
src\store\modules\window.store.js
/**
 * 管理視窗相關資料
 */

/**
 * @typedef {import('vuex').Module} Module
 *
 * @typedef {import('@/types/type').Window} Window
 */

/** @type {Module} */
const self = {
  namespaced: true,
  state: () => ({
		/** @type {Window[]} */
    list: [],
  }),
  mutations: {
  },
  actions: {
  },
  getters: {
  },
  modules: {
  },
};

export default self;
並在 Vuex 引入。
import Vue from 'vue';
import Vuex from 'vuex';

Vue.use(Vuex);

import core from './modules/core.store';
import board from './modules/board.store';
import window from './modules/window.store';

export default new Vuex.Store({
  // ...
  modules: {
    core, board, window
  },
});
接著增加「新增、刪除視窗」的功能。
每個視窗要建立一個專屬的 ID,所以先我們在 utils 新增 getRandomString()
/** 取得隨機長度字串
 * @param {number} len 指定字串長度
 * @param {String} [charSet] 指定組成字符
 * @return {string}
 */
export function getRandomString(len = 5, charSet = 'ABCDEFGHIJKLMNOPQRSTUVWXYZabcdefghijklmnopqrstuvwxyz0123456789') {
  let randomString = '';
  for (let i = 0; i < len; i++) {
    const randomPoz = Math.floor(Math.random() * charSet.length);
    randomString += charSet.substring(randomPoz, randomPoz + 1);
  }
  return randomString;
}
回到 src\store\modules\window.store.js
/** @type {Module} */
const self = {
  // ...
  mutations: {
		/** 新增視窗 */
    add(state, component) {
      /** @type {Window} */
      const window = {
        component,
        key: getRandomString(),
        focusAt: dayjs().valueOf(),
      }

      state.list.push(window);
    },
    /** 刪除視窗 */
    remove(state, id) {
      /** @type {Window[]} */
      const windows = state.list;

      const targetIndex = windows.findIndex((window) =>
        window.id === id
      );
      if (targetIndex < 0) {
        console.error(`[ window.store remove ] window 不存在,id : `, id);
        return;
      }

      windows.splice(targetIndex, 1);
    },
  },
  // ...
};

export default self;
接著建立範例視窗 src\components\window-example.vue
<template lang="pug">
base-window(
  :pos='pos',
  body-class='c-col p-20px pt-20px',
  title='範例視窗'
)
</template>

<style lang="sass">
</style>

<script>
import BaseWindow from '@/components/base-window.vue';

export default {
  name: 'WindowExample',
  components: {
    'base-window': BaseWindow,
  },
  props: {
    pos: {
      type: Object,
      default() {
        return {
          x: 0,
          y: 0,
        };
      },
    },
  },
  data() {
    return {
      id: this.$vnode.key,
    };
  },
  computed: {},
  watch: {},
  created() {},
  mounted() {},
  methods: {},
};
</script>
最後我們回到 app.vue,新增以下功能。
window-example.vue 組件addWindow(),向 Vuex 提交新增視窗src\app.vue <script>
/**
 * @typedef {import('@/script/modules/port-transceiver').default} PortTransceiver
 * @typedef {import('@/types/type').Window} Window
 */

// ...

import WindowExample from '@/components/window-example.vue';

export default {
  name: 'App',
	components: {
    'dialog-system-setting': DialogSystemSetting,
    'window-example': WindowExample,
  },
  // ...
	computed: {
    ...mapState({
      /** @type {PortTransceiver} */
      portTransceiver: (state) => state.core.transceiver,

      ver: (state) => state.board.info.ver,
      firmwareName: (state) => state.board.info.firmwareName,

			/** @type {Window[]} */
      windows: (state) => state.window.list,
    }),
  },
	// ...
  methods: {
    // ...
    addWindow(name) {
      this.$store.commit('window/add', name);
    },
  },
};
在 pug 中增加「新增視窗用的右鍵選單」並「顯示目前所有視窗」。
src\app.vue <template lang="pug">
.screen
  .windows
    component(
      v-for='(window, i) in windows',
      :is='window.component',
      :key='window.id',
      :pos='{ x: (i + 1) * 30, y: (i + 1) * 30 }'
    )

  .info.font-orbitron(v-if='firmwareName')
    | {{ firmwareName }} - v{{ ver }}

  dialog-system-setting

  // 右鍵選單
  q-menu(context-menu, content-class='border-radius-s')
    q-list.min-w-260px
      q-item(@click='addWindow("window-example")', clickable, v-close-popup)
        q-item-section
          | 新增「範例視窗」
可以任意新增視窗了!
可以看到現在就算點擊視窗,也不會改變視窗堆疊的順序,這樣沒辦法看到最先生成的視窗內容,來著手加入調整重疊順序功能吧!
預期功能
我們先透過 provide / inject 將視窗的 id 注入至所有子組件中。
src\components\window-example.vue <script>
import BaseWindow from '@/components/base-window.vue';

export default {
  name: 'WindowExample',
  // ...
  data() {
    return {
      id: this.$vnode.key,
    };
  },
  provide() {
    return {
      id: this.id,
    };
  },
  // ...
};
src\components\base-window.vue <script>
export default {
  name: 'BaseWindow',
  // ..
  inject: ['id'],
  // ..
  created() {
    if (!this.id) {
      throw new Error(`父組件必須透過 provide / inject 提供 id 數值`);
    }

    this.offset.x = this.pos.x;
    this.offset.y = this.pos.y;
  },
  // ..
};
接著在 src\store\modules\window.store.js 新增 focus 相關功能。
/**
 * 管理視窗相關資料
 */

// ...

/** @type {Module} */
const self = {
  namespaced: true,
  state: () => ({
    /** @type {Window[]} */
    list: [],

    focusId: null,
  }),
  mutations: {
    // ...

    /** 設目前 Focus 視窗 */
    setFocus(state, id) {
      state.focusId = id;

      /** @type {Window[]} */
      const windows = state.list;

      const target = windows.find((window) =>
        window.id === id
      );
      if (!target) {
        return;
      }

      target.focusAt = dayjs().valueOf();
    },
  },
  // ...
};

export default self;
並於 base-window.vue 新增 focus() Method
src\components\base-window.vue <script>
export default {
  name: 'BaseWindow',
  // ...
  methods: {
    foucs() {
      this.$store.commit('window/setFocus', this.id);
    },

    handleClick() {
      this.foucs();
    },

		/** 處理拖動事件
     *
     * 使用 Quasar v-touch-pan 指令實現
     *
     * [參考資料](https://v1.quasar.dev/vue-directives/touch-pan)
     */
    handleMove({ isFirst, isFinal, delta }) {
      // 拖動時讓視窗 focus
      if (isFirst) {
        this.foucs();
      }

      // ...
    },
    // ...
  },
};
試試看 Vuex 有沒有儲存目前 focus 視窗的 ID。

成功!接下來就是最關鍵的一步,以 focusAt 為依據,計算每個視窗的 z-index 達成自動調整重疊效果。
src\store\modules\window.store.js 在 getters 加入 zIndexMap
/**
 * 管理視窗相關資料
 */

/**
 * @typedef {import('vuex').Module} Module
 *
 * @typedef {import('@/types/type').Window} Window
 */

import { cloneDeep } from 'lodash-es';
import dayjs from 'dayjs';

import { getRandomString } from '@/script/utils/utils';

/** @type {Module} */
const self = {
  namespaced: true,
  // ...
  getters: {
		/** Window 對應的 z-index
     *
     * 視窗 ID 與 z-index 以 key-value 對應
     * @example
     * map['abcds']: 1
     * map['gr56w']: 2
     */
    zIndexMap: (state) => {
      /** @type {Window[]} */
      const windows = cloneDeep(state.list);

      windows.sort((a, b) => a.focusAt > b.focusAt ? 1 : -1);

			return windows.reduce((map, window, index) => {
        map[window.id] = index;
        return map;
      }, {});
    },
  },
};

export default self;
接著在 base-window.vue 中提取 getters zIndexMap,用來取得自身 z-index
src\components\base-window.vue <script>
export default {
  name: 'BaseWindow',
  // ...
  computed: {
    zIndex() {
      const zIndexMap = this.$store.getters['window/zIndexMap'];
      return zIndexMap?.[this.id] ?? 0;
    },

    style() {
      const xSum = this.offset.x;
      const ySum = this.offset.y;

      const style = {
        zIndex: this.zIndex,
        top: `${ySum}px`,
        left: `${xSum}px`,
      };

      return style;
    },
    // ...
  },
  // ...
};
嘗試看看堆疊有沒有變化。

接著加點視窗 focus 樣式,讓效果看起來酷一點 (´,,•ω•,,)
src\components\base-window.vue <script>
export default {
  name: 'BaseWindow',
  // ...
  computed: {
    // ...
    classes() {
      const classes = [];

      if (this.isFoucs) {
        classes.push('focused');
      }

      if (this.status.isMoving) {
        classes.push('moving');
      }

      return classes;
    },

    isFoucs() {
      return this.$store.state.window.focusId === this.id;
    },
  },
  // ...
};
src\components\base-window.vue <style scoped lang="sass">
@import '@/styles/quasar.variables.sass'

.base-window
  position: fixed
  min-width: 200px
  min-height: 100px
  overflow: hidden
  transition-duration: 0.5s
  transform: translateZ(0px)
  transition-timing-function: cubic-bezier(0.83, 0, 0.17, 1)
  box-shadow: $unfocus-shadow
  border-radius: $border-radius-m
  background: rgba(white, 0.8)
  backdrop-filter: blur(4px)
  &.focused
    background: rgba(white, 0.98)
    transform: translateY(-2px)
    box-shadow: $focus-shadow
    .base-window-header-bar .base-window-title
      letter-spacing: 2px
      transition-delay: 0.2s
      transition-timing-function: cubic-bezier(0.34, 1.56, 0.64, 1)

  // ...
並在 app.vue 加入去除 focus 的事件,讓滑鼠點到桌面時,所有視窗會取消 focus。
src\app.vue <template lang="pug">
.screen(@click='handleClick')
  // ...
src\app.vue <script>
// ...

export default {
  name: 'App',
  // ...
  methods: {
    handleClick() {
      this.$store.commit('window/setFocus', null);
    },
		// ...
  },
};

最後就是關閉視窗功能了,由於我們已經在 window.store.js 完成刪除功能(remove())。
所以只要完成 base-window.vue 預留的 handleClose() 即可。
src\components\base-window.vue <script>
export default {
  name: 'BaseWindow',
  // ...
  methods: {
    // ...
    handleClose() {
      this.$store.commit('window/remove', this.id);
    },
		// ...
  },
};
一行完成!ヽ(●`∀´●)ノ

好像太快了.. ( ・ิω・ิ),那就來幫視窗出現與消失加上動畫吧!
新增集中動畫樣式的 sass 檔案。
src\styles\animation.sass
.fade-right-enter-active, .fade-right-leave-active
  transition-duration: 0.4s
  pointer-events: none
.fade-right-enter, .fade-right-leave-to
  transform: translateX(5px) !important
  opacity: 0 !important

.fade-up-enter-active, .fade-up-leave-active
  transition-duration: 0.4s
  pointer-events: none
.fade-up-enter, .fade-up-leave-to
  transform: translateY(-5px) !important
  opacity: 0 !important

.opacity-enter-active, .opacity-leave-active
  transition-duration: 0.4s
  pointer-events: none
.opacity-enter, .opacity-leave-to
  opacity: 0 !important

.list-complete-enter-active, .list-complete-leave-active, .list-complete-move
  transition-duration: 0.4s
  pointer-events: none
.list-complete-enter, .list-complete-leave-to
  opacity: 0 !important
  transform: translateY(30px) !important
.list-complete-leave-active
  position: absolute !important

@keyframes bounce
  40%
    transform: scale(1.2)
  60%
    transform: scale(0.9)
  80%
    transform: scale(1.05)
  100%
    transform: scale(1)

@keyframes jelly-bounce
  40%
    transform: scale(0.5, 1.5)
  60%
    transform: scale(1.3, 0.7)
  80%
    transform: scale(0.9, 1.1)
  100%
    transform: scale(1, 1)
並在 src\main.js 引入 animation.sass
import Vue from 'vue';
import App from './app.vue';
import router from './router/router';
import store from './store/store';
import './quasar';
import i18n from './i18n';

import '@/styles/global.sass';
import '@/styles/animation.sass';
import 'windi.css';

Vue.config.productionTip = false;

new Vue({
  router,
  store,
  i18n,
  render: (h) => h(App),
}).$mount('#app');
最後在 app.vue 中把原本的 .windows div 換成 transition-group
src\app.vue <template lang="pug">
.screen(@click='handleClick')
  transition-group.windows(name='fade-up', tag='div')
    component(
      v-for='(window, i) in windows',
      :is='window.component',
      :key='window.id',
      :pos='{ x: (i + 1) * 30, y: (i + 1) * 30 }'
    )

  // ...

完成了!✧*。٩(ˊᗜˋ*)و✧*。
大家可以自行加入更酷的漸入漸出動畫喔
以上我們成功完成視窗的基本功能了,接下來終於要進入我們硬體整合的部分了!
(電子助教:我終於可以登場了嗎... (›´ω`‹ ))
以上程式碼已同步至 GitLab,大家可以前往下載:

