本篇大綱:click、hover、mouseover、mousemove
由於 D3.js 是操作DOM元素去建構圖表,因此DOM元素能使用的觸發事件,D3也一樣能夠使用~我們現在就來看看該怎麼使用d3的事件,以及有哪些事件可以用吧!
想觸發d3.js的事件要使用的 API 是 selection.on( ),這個方法一樣歸納在selection之下,因為我們要先選定節點,才能將事件綁定到這個節點上。
selection.on( ) 能使用所有DOM元素原生的事件,而一般來說最常用的有:
這些事件能結合上一篇介紹的 .transition( ) 做出各種有趣的效果,例如:
click:點擊方塊時,它會移動位置並改變顏色// html
<svg class="event"></svg>
// js
// rect
d3.select('.event')
.append('rect')
.attr('class', 'rect')
.attr('width', 30)
.attr('height', 30)
.attr('fill', 'blue')
.append('rect')
// 加上事件
d3.select('.rect')
.on('click', function(){
d3.select(this)
.transition()
.attr('cursor', 'pointer')
.attr('fill', 'green')
.attr('transform', 'translate(250, 0)')
})

mouseover、mouseleave:滑鼠滑過時改變位置與顏色,滑鼠離開時回到原本狀態// html
<div class="chartContainer">
<div class="box1">
<p>aa</p>
<p>aa</p>
<p>aa</p>
<p>aa</p>
</div>
</div>
// js
// hover (mouseover / mouseleave)
d3.selectAll('p')
.on('mouseover', function () {
d3.select(this)
.style("color", "red")
.transition()
.style('cursor', 'pointer')
.style("transform", "translate(50px)");
})
.on("mouseleave", function () {
d3.select(this).style("color", "black")
.transition().style("transform", "translate(0)");
});

但光是會使用DOM的事件還不夠,大部分的時候一個完整的圖表會包含許多DOM元素,我們需要知道各別DOM元素在圖表中的位置,才能正確選定想操作的DOM元素,例如:
這個時候,我們就要運用 d3.pointer( ) 這個方法了
以前想取得DOM節點的座標軸時,可以根據不同事件去找對應的方法,例如:使用 d3.mouse、d3.touch、 d3.touches、d3.clientPoint 等等;但後來 d3 在第六版時進行了一些調整,把這些方法全部合併到 d3.pointer,再透過帶入參數的方式去指定想觸發的事件,想更深入了解的人可以看看這個 v5~v6 Migration Guide
現在,我們一樣先來看到 d3.pointer( )的官方文件介紹
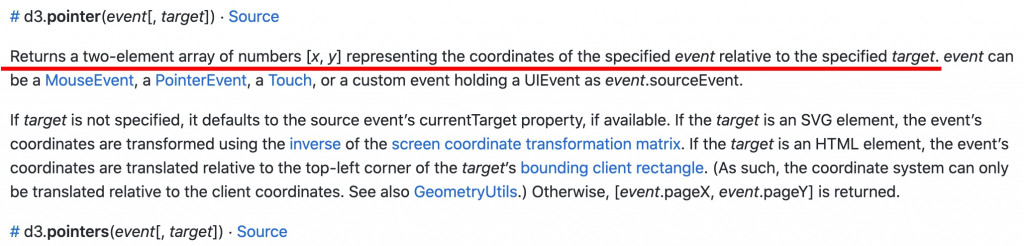
d3.pointer(事件, target) 這個方法會根據所帶入的事件,返還指定target的 [x,y]座標軸,我們就可以透過這個座標軸去抓到指定的DOM元素。
先來個小範例看看要怎麼使用吧!
範例:滑鼠移動時,顯示目前滑鼠所在的座標軸
首先,我們先建立svg視窗大小,接著綁定 mousemove 的事件
// html
<h5 class="mt-5">3. pointer()找出目前滑鼠所在 X Y 軸座標</h5>
<div class="position"></div>

// js
// 先建立svg並設定大小
const svg = d3.select('.position').append('svg');
svg.attr('width', 500)
   .attr('height', 500);

// 設定svg滑鼠事件
svg.on('mousemove', function () {

});
接著我們使用 d3.pointer()的方法帶入目前事件與要操作的 node 結點,並把返還的數值console出來看看
// 設定svg滑鼠事件
svg.on('mousemove', function () {
   let pt = d3.pointer(event, svg.node())
	 console.log(pt)
});
返還的數值是一個陣列,內含的兩筆資料分別代表X跟Y軸的座標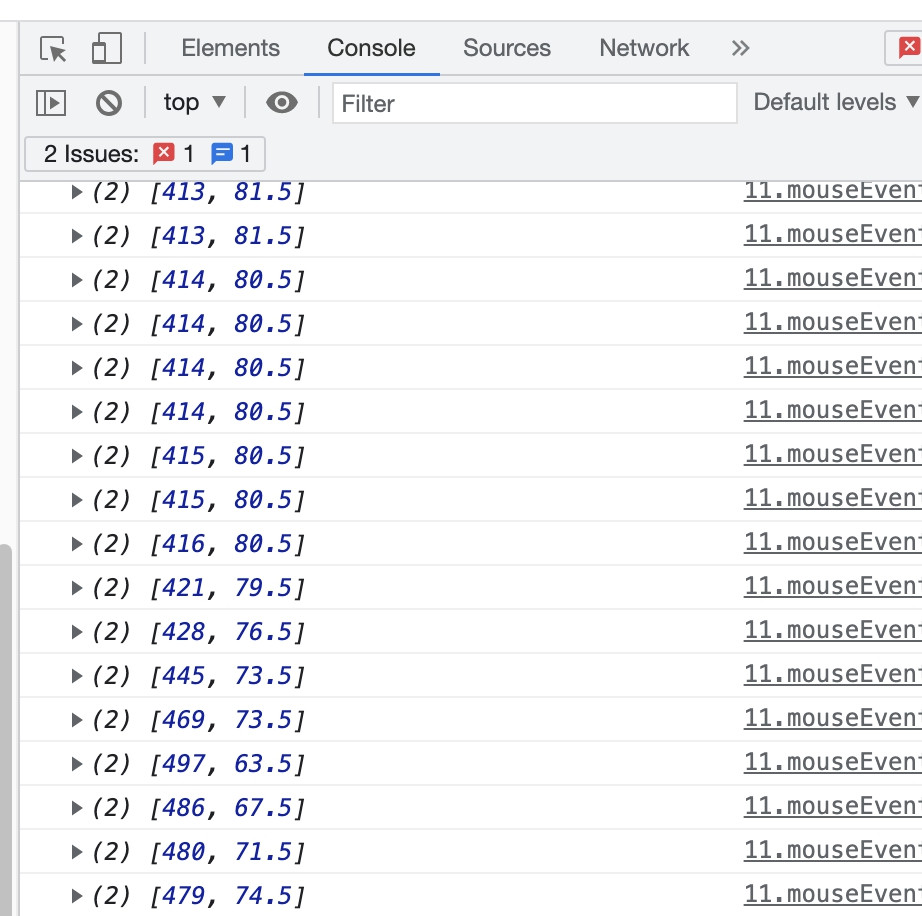
最後我們簡單設定一個 tooltip 來呈現滑鼠當下的座標軸吧!詳細的tooltip設定下一篇會講解,這邊大家就稍微看一下程式碼就好~
//pointer()、tooltip
let txt = svg.append("text");
svg.on('mousemove', function () {
        //d3.pointer 會回傳陣列[X,Y]
        let pt = d3.pointer(event, svg.node())
        txt.attr('x', pt[0]) //取[x]
            .attr('y', pt[1]) //取[Y]
            .text(`X:${parseInt(pt[0])} | Y:${parseInt(pt[1])}`)
        console.log(pt)
    });
結果如下~滑鼠移動到哪,就會顯示當下的座標軸
這下就可以玩很多花樣啦~我們結合d3的畫面、事件、座標軸、動畫來玩玩看看吧!
// html
<div class="combined"></div>

//js
const data = [130, 210, 90, 250]
const combined = d3.select('.combined')
                  .append('svg')
                  .attr('width', 500)
                  .attr('height', 300);

const dots = combined.selectAll('circle')
                     .data(data)
                     .enter()
                     .append('circle')
                     .attr('cx', d=>d)
                     .attr('cy', (d,i)=>(i+1)*60)
                     .attr('r', '15')
                     .attr('fill', 'blue')
                     .attr('cursor', 'pointer')

// 綁定事件
dots.on('mouseover', function(){
    let pt = d3.pointer(event, event.target)
    d3.select(this)
      .attr('fill', 'red')
      .transition()
      .attr('cx', pt[0]+100)

});

是不是很有趣呢?d3 的事件部分就講到這邊,之後的圖表就能搭配事件跟動畫,做出一連串酷炫的效果啦~
這邊附上本章的程式碼與圖表 Github 、 Github Page,需要的人請自行取用~