年輕人不要看到標題就興奮好嗎?
以目前前後端分離的趨勢,前端及後端工程師勢必會由兩個人以上來擔任,那後端工程師做出的API要能清楚地表達給前端工程師勢必就很重要,Swagger是一套依照檔案裡特定的註解轉化成可互動的RESTful API文件的套件。
下載套件
composer require "darkaonline/l5-swagger"
發布其他資源
php artisan vendor:publish --provider "L5Swagger\L5SwaggerServiceProvider"
雖然該套件會自動搜尋全部檔案並找到特定註解來生成文件,也就代表說註解可以寫在任何地方,例如Controller、Service、Model層等等地方,但為了方便管理還是為其生成專屬資料夾,Swagger的全部設定會放在config的l5-swagger.php裡,但今天先全部使用預設值即可
創建文件專屬資料夾Mkdir app/Docs
創建基本檔案
touch app/Docs/Info.php
touch app/Docs/Security.php
touch app/Docs/Server.php
填入資料對應資料
Info
<?php
/**
 * @OA\Info(
 *      version="1.0.0",
 *      title="Iron man",
 *      description="",
 *      @OA\Contact(
 *          email="your@email.com"
 *      )
 * )
*/
Security
<?php
/**
 * @OA\SecurityScheme(
 *      securityScheme="Authorization",
 *      in="header",
 *      type="http",
 *      scheme="bearer",
 *      name="Authorization"
 * )
 */
Server
<?php
/**
 * @OA\Server(
 *       url = "http://127.0.0.1:8080",
 *       description="local"
 * )
 * @OA\Server(
 *       url = "http://xx.xx.xx.xx:80",
 *       description="ec2"
 * )
*/
先利用Day19的案例來寫第一個範例
先開啟本機服務php artisan serve
列表功能
GET method
Url = http://domain:8000/api/messages
建立Message專屬檔案
touch app/Docs/Message.php
填入對應資料
<?php
/**
 * @OA\Get(
 *      path="/api/messages",
 *      tags={"Message"},
 *      summary="List Message",
 *      security={{"Authorization":{}}},
 *      @OA\Response(
 *          response=200,
 *          description="success",
 *          @OA\MediaType(
 *              mediaType="application\json",
 *              @OA\Schema(
 *                  example={
 *                      {
 *                          "id" : 751,
 *                          "member": "Mr. Keven Quigley",
 *                          "message": "Ipsam hic consectetur consectetur autem ut.",
 *                          "created_at": "2021-09-29T08:41:27.000000Z"
 *                      },
 *                      {
 *                          "id": 753,
 *                          "member": "Miss Jacky Effertz",
 *                          "message": "Amet minima enim mollitia ducimus.",
 *                          "created_at": "2021-09-29T08:41:27.000000Z"
 *                      }
 *                  }
 *              )
 *          )
 *      )
 * )
 */
下指令建立文件
php artisan l5-swagger:generate
生成的檔案會在storage/api-docs/api-docs.json
這個檔案是不需要被git紀錄的
所以在laravel/.gitignore檔案裡添加/storage/api-docs
此時可以打開瀏覽器至http://127.0.0.1:8000/api/documentation即可看到文件,如果不想要每次都要手動下指令建立文件的話也可以在.env檔的地方添加設定
L5_SWAGGER_GENERATE_ALWAYS=true
如此一來每次文件被開啟時套件都會自動編譯一次

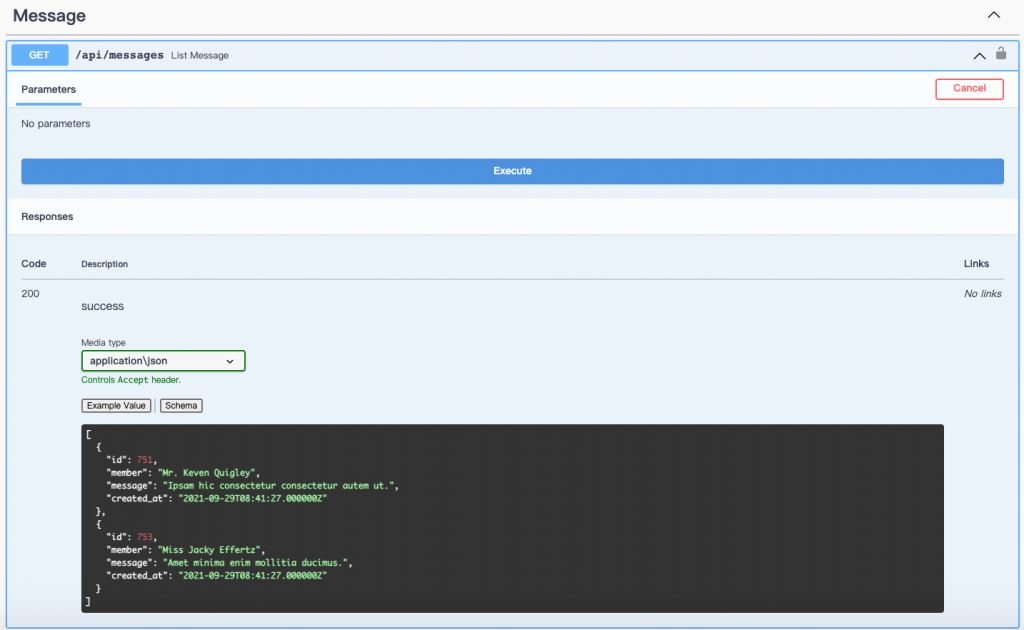
左邊Servers的地方可以切換環境,例如在Git Flow就會有local、dev、release、master等環境
如果有需要登入驗證,例如JWT驗證方式等等即可登入一次後將Token填入在右邊的Authorize
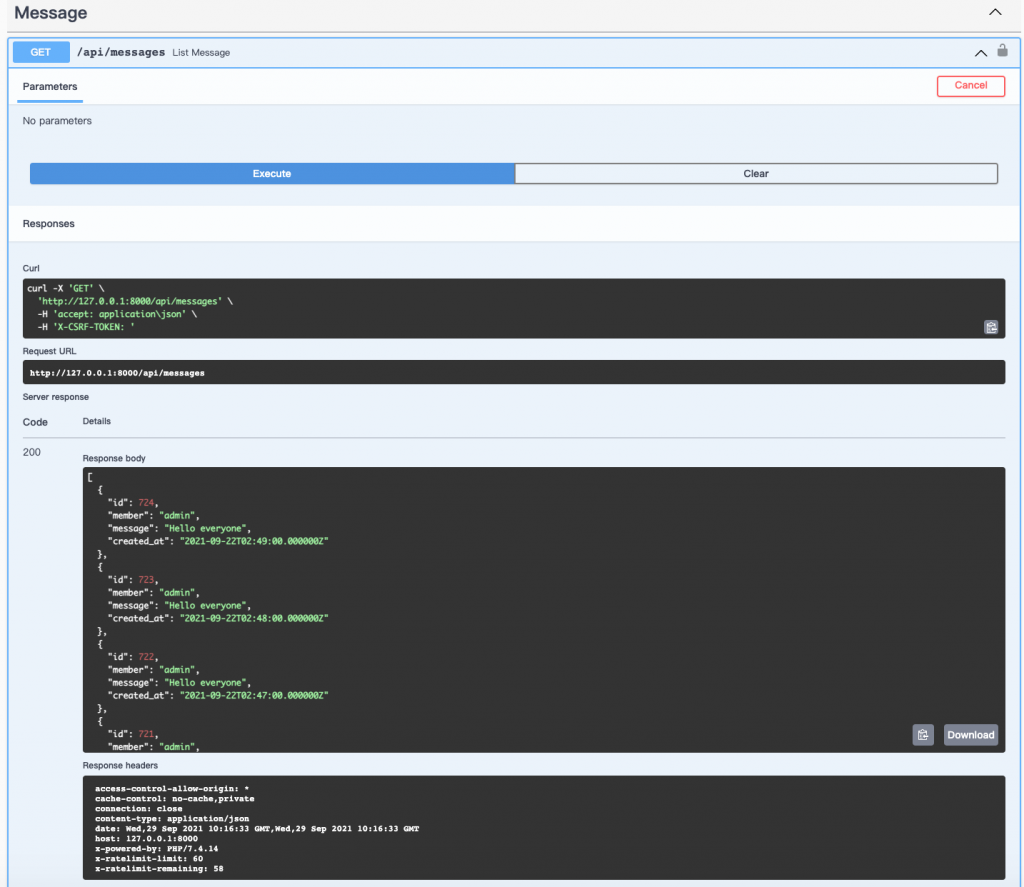
接著就可以看到利用tags分類的API了,以List Message為例,會直接看到已經先寫好的example範例格式,但更方便是的是可以點擊右上角的Try it out後點選Execute,套件會模擬前端call API,下方的Response Body變成真實的資料庫資料,有時有些環境問題在本機測試時不會有問題,但利用Swagger這種方式會發現一些原本沒注意到的Bug,所以在寫好文件要交給前端工程師前請自行測試一下API是否能夠串接。


接著就把全部的CRUD都寫完吧,因為是同一系列的功能,都寫在Message.php裡即可,一樣的功能使用一個的tags屬性,method、path、summary記得要變更。
create
/**
 * @OA\Post(
 *      path="/api/messages",
 *      tags={"Message"},
 *      summary="Create Message",
 *      security={{"Authorization":{}}},
 *      @OA\RequestBody(
 *          @OA\MediaType(
 *              mediaType="application/json",
 *              @OA\Schema(
 *                  @OA\Property(
 *                      property="member",
 *                      type="string"
 *                  ),
 *                  @OA\Property(
 *                      property="message",
 *                      type="string"
 *                  ),
 *                  example={
 *                      "member" : "kkk",
 *                      "message" : "very good"
 *                  }
 *              )
 *          )
 *      ),
 *      @OA\Response(
 *          response=200,
 *          description="success"
 *      )
 * )
 */
detail
/**
 * @OA\Get(
 *      path="/api/messages/{id}",
 *      tags={"Message"},
 *      summary="Get Message by Id",
 *      security={{"Authorization":{}}},
 *      @OA\Parameter(
 *          name="id",
 *          required=true,
 *          in="path",
 *          @OA\Schema(
 *              type="integer",
 *              example="300"
 *          )
 *      ),
 *      @OA\Response(
 *          response=200,
 *          description="success",
 *          @OA\MediaType(
 *              mediaType="application\json",
 *              @OA\Schema(
 *                  example={
 *                      "id": 764,
 *                      "member": "verycow",
 *                      "message": "first test",
 *                      "created_at": "2021-09-29T14:11:34.000000Z",
 *                      "updated_at": "2021-09-29T14:11:34.000000Z"
 *                  }
 *              )
 *          )
 *      )
 * )
 */
update
/**
 * @OA\Put(
 *      path="/api/messages/{id}",
 *      tags={"Message"},
 *      summary="Update Message",
 *      security={{"Authorization":{}}},
 *      @OA\Parameter(
 *          name="id",
 *          required=true,
 *          in="path",
 *          @OA\Schema(
 *              type="integer",
 *              example="300"
 *          )
 *      ),
 *      @OA\RequestBody(
 *          @OA\MediaType(
 *              mediaType="application/json",
 *              @OA\Schema(
 *                  @OA\Property(
 *                      property="member",
 *                      type="string"
 *                  ),
 *                  @OA\Property(
 *                      property="message",
 *                      type="string"
 *                  ),
 *                  example={
 *                      "member" : "kkk",
 *                      "message" : "very good again"
 *                  }
 *              )
 *          )
 *      ),
 *      @OA\Response(
 *          response=200,
 *          description="success"
 *      )
 * )
 */
delete
/**
 * @OA\Delete(
 *      path="/api/messages/{id}",
 *      tags={"Message"},
 *      summary="Delete Message",
 *      security={{"Authorization":{}}},
 *      @OA\Parameter(
 *          name="id",
 *          required=true,
 *          in="path",
 *          @OA\Schema(
 *              type="integer",
 *              example="300"
 *          )
 *      ),
 *      @OA\Response(
 *          response=200,
 *          description="success"
 *      )
 * )
 */
比較重要的差異是有些資料是帶在Url上的,就要使用Parameter的方式來帶入,如果是Body裡面的就使用RequestBody,雖然使用這個套件會需要非常多的空白鍵或是tab,但我覺得能把文件整理漂亮讓下一位使用者能舒舒服服的繼承比較重要
今天的介紹就到這邊結束了,謝謝觀看的各位,請記得按讚分享開啟小鈴鐺,你的支持會讓按讚數+1。
