上一篇建置好最原始的專案檔,接下來要開始來開發社區網站。
首先,因為對vue.js還只是初學而已,一開始當然是來搜尋看看有沒有其他人分享的網站架構可以參考?
配合這次的主題,就來搜尋vue.js 購物網站
找到了幾篇可以直接參考的實作分享,好像都是由某教學網站延伸的實作,
這次就跟著這些教學範例實作囉
範例中都是使用Vue及Firebase進行建置,而Vue是使用bootstrap4為前端框架,我自己是習慣用bootstrapVue,由於沒有那麼熟悉Vue開發,中間遇到蠻多困難的,接下來分享是我自己跟著範例實作及調整成鐵人賽網頁架構的過程。
主要是follow第一篇文章進行,並調整成規劃的樣子,測看看囉!!
先照著範例做
調整App.vue,也按照自己想要的改了一些東西。
<template>
  <div id="app">
    <router-view/>
  </div>
</template>

<script>

</script>

<style>

#app {
  font-family:'cwTeXYen', Avenir, Helvetica, Arial, sans-serif;
  -webkit-font-smoothing: antialiased;
  -moz-osx-font-smoothing: grayscale;
  color: #2c3e50;
}
</style>
import Vue from "vue";
import Router from "vue-router";

import Home from "./components/Home.vue";
import User from "./components/User.vue";


import Profile from "./components/Profile.vue";
import Orders from "./components/Orders.vue";
import MProducts from "./components/MProducts.vue";

Vue.use(Router);

const router =  new Router({
  mode: "history",
  base: process.env.BASE_URL,
  routes: [
    {
      path: "/",
      name: "home",
      component: Home
    },
    {
      path: "/about",
      name: "about",
      component: () =>
        import("./components/About.vue")
    },
    {
      path: "/products",
      name: "products",
      component: () =>
        import("./components/Products.vue")
    },
    {
      path: "/stores",
      name: "stores",
      component: () =>
        import("./components/Stores.vue")
    },
    {
      path: "/news",
      name: "news",
      component: () =>
        import("./components/News.vue")
    },

  ]
});

export default router;
<template>
  <div class="about">
    <div class="container">
        <h1 class="text-center p-5">About Us</h1>
    </div>
  </div>
</template>
<template>
  <div class="news">
    <div class="container">
        <h1 class="text-center p-5">News</h1>
    </div>
  </div>
</template>
<template>
  <div class="products">
    <div class="container">
        <h1 class="text-center p-5">Our Products</h1>
    </div>
  </div>
</template>
<template>
  <div class="stores">
    <div class="container">
        <h1 class="text-center p-5">Stores Information</h1>
    </div>
  </div>
</template>
這邊照著範例走,因為對Vue不夠熟悉,感覺能跑就是好程式,後來才做大改,主要是因為作者是bootstrap4 ,而我是用bootstrapVue,有些地方有些問題,無法跳出我的頁面,但目前功能不影響,就先放一樣的程式碼囉,之後再來調整。
Vue.component('Navbar',require('./components/Navbar.vue').default);
<template>
  <div class="navbar">
      <nav class="navbar custom-nav fixed-top navbar-expand-lg navbar-light bg-light">
        <button class="navbar-toggler" type="button" data-toggle="collapse" data-target="#navbarSupportedContent" aria-controls="navbarSupportedContent" aria-expanded="false" aria-label="Toggle navigation">
            <span class="navbar-toggler-icon"></span>
        </button>

        <div class="collapse navbar-collapse" id="navbarSupportedContent">
            <ul class="navbar-nav mr-auto">
            <li class="nav-item active">
              <router-link to="/" class="nav-link">Home</router-link>
            </li>
            <li class="nav-item">
              <router-link to="/about" class="nav-link">About</router-link>
            </li>
            <li class="nav-item">
              <router-link to="/products" class="nav-link">Products</router-link>
            </li>
            <li class="nav-item">
              <router-link to="/news" class="nav-link">News</router-link>
            </li>
            <li class="nav-item">
              <router-link to="/stores" class="nav-link">Stores</router-link>
            </li>
            </ul>
        </div>
    </nav>
  </div>
</template>

<script>
export default {
  name: 'Navbar',
  props: {
    msg: String
  },
}
</script>

<style scoped lang="scss">
  @media (min-width: 992px) {
    .navbar.custom-nav{
      padding-top:16px;
      padding-bottom:16px;
      background-color: #7DA79D !important;
    }
   }
</style>
<Navbar></Navbar>
弄完重啟網站後就有瀏覽列囉
看看成果吧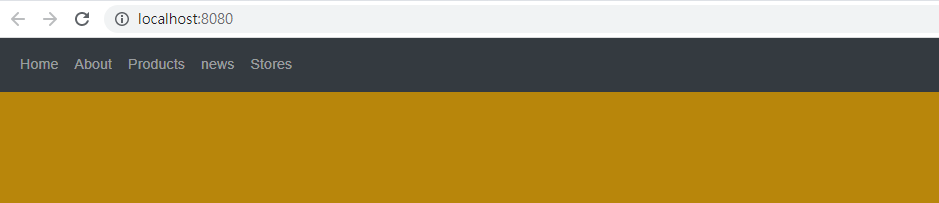
明天來用首頁的設計囉~~


 iThome鐵人賽