前一篇提到了在Windows VM中安裝Azure DevOps Agent,步驟非常的簡單,不過Azure DevOps Agent也可以在Container內執行,這一篇就來看看如何在Windows Container內執行Azure DevOps Agent。(如果需要Windows Server安裝Docker的方式請看這篇文章)
首先,在Windows Container的部份有些基本的知識需要了解,那就是Windows Container區分不同的基底映像類型(Base Image),分為Windows、Windows Server、Windows Server Core、Nano Server四種,越前面的映像檔大小所佔的容量越大,包含的功能越多,越後面的則越小,所包含的功能也越少。(參考官方文件:中文/英文)
另外就是Windows Container的隔離模式(Isolation Modes),分為Process和Hyper-V隔離這兩種,在Windows Server上執行的Windows Container預設以Process隔離方式執行,在Windows 10執行的Windows Container則預設以Hyper-V隔離方式執行。(參考官方文件:中文/英文)
在上面這兩個不同的差異之下,選擇建立Windows Container Image就會有很多的選擇,這牽涉到執行Container的主機(Host)所使用的是哪一個版本的OS,不同版本之間的相容性會有所差異,例如:Windows Server 2019與Windows Server 20H2這兩個版本的OS相容性:
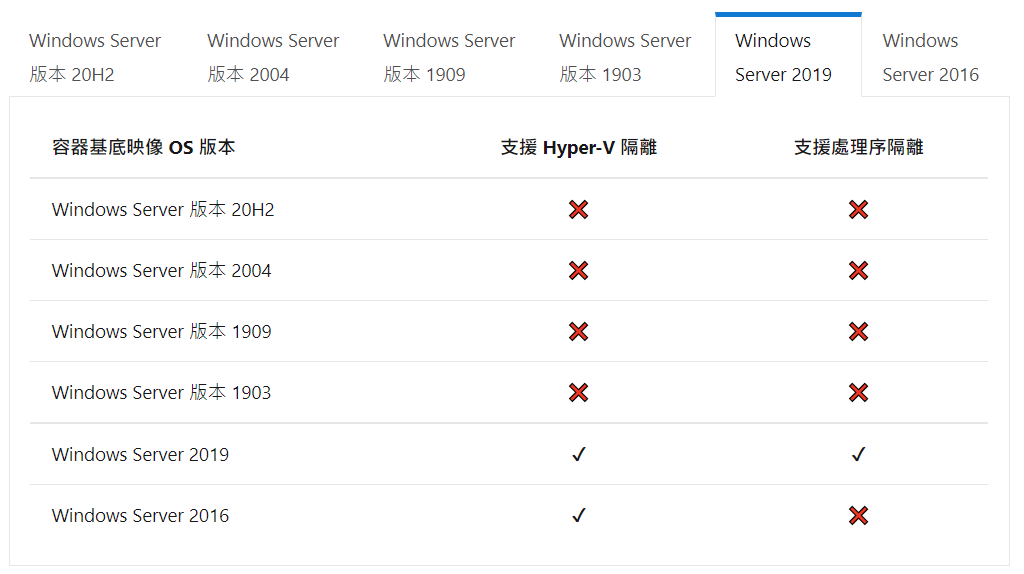
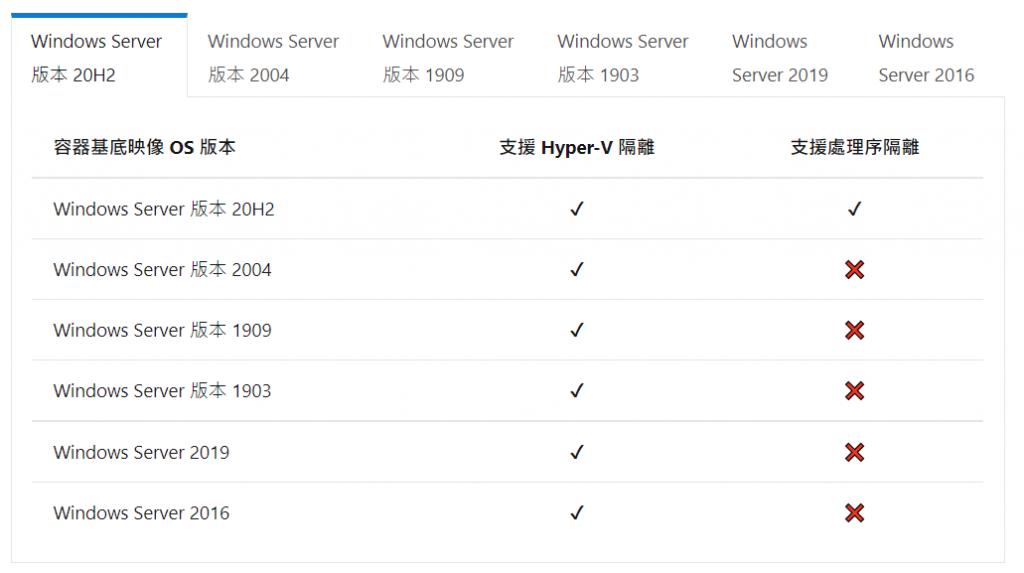
從上面兩張圖可以看到Windows Server 2019的Host可以支援以Windows Server 2019為基底的Container Image以Process隔離模式執行,若是以Hyper-V隔離模式執行,則是可以支援Windows Server 2019以下的版本。同樣的,Windows Server 20H2的Host可以支援同為Windows Server 20H2的Image以Process隔離模式執行,Hyper-V的隔離模式則是與Host相同版本以下的都能夠支援。
換成是Windows 10作為Host的話,支援性又有不同的差異:
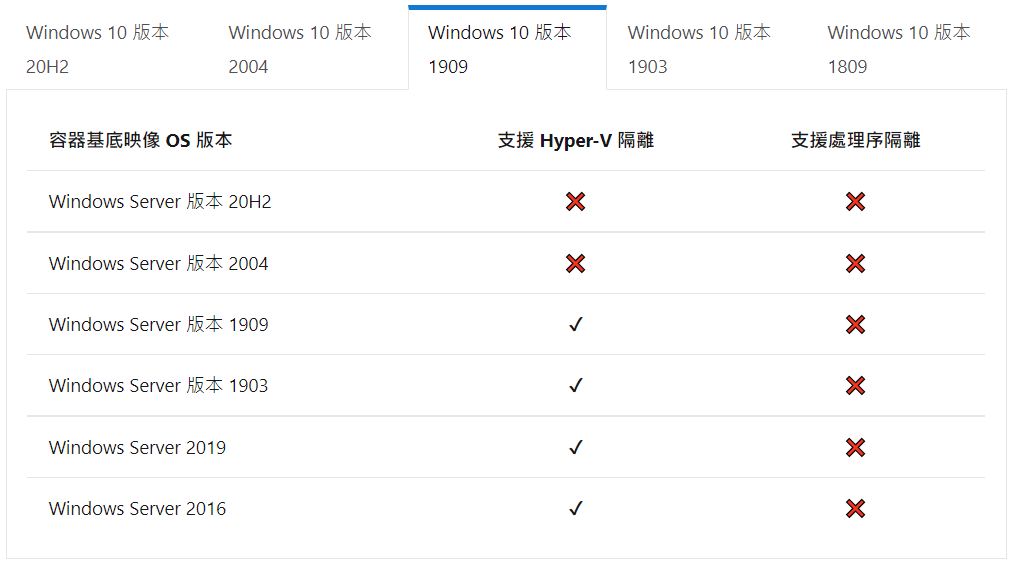
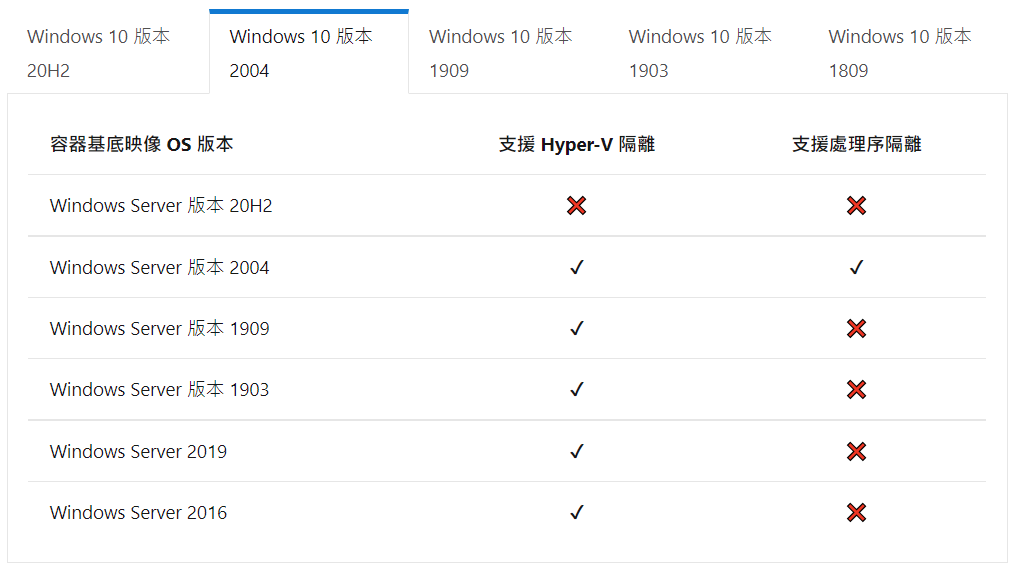
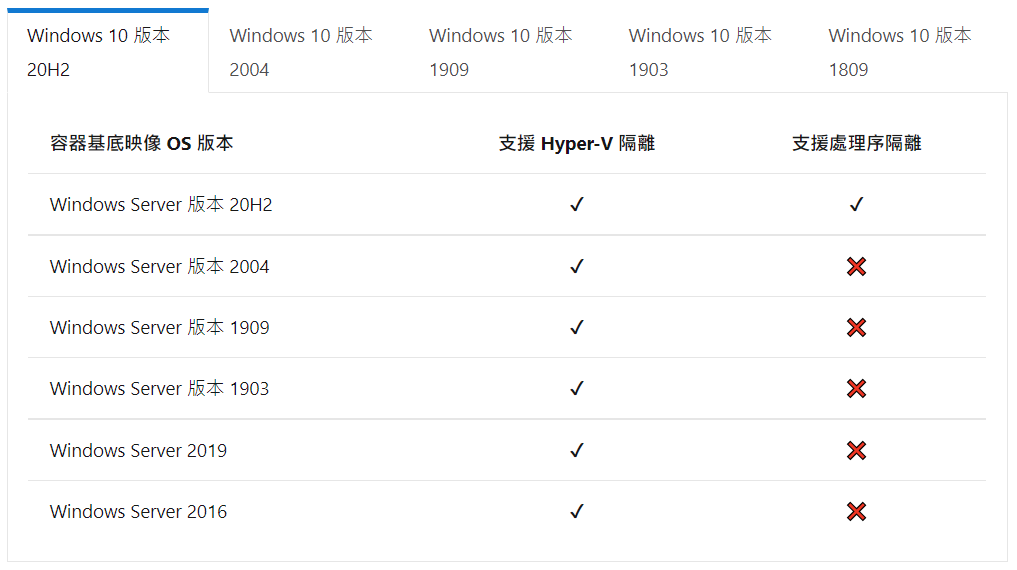
Windows 10的部份可以從上面三張圖看到一點點差異,就是Windows 10的1909版本並不能支援Windows Server任何版本為基底映像檔以Process隔離模式執行,Windows 10的2004版本之後才開始支援與Windows Server相對應的版本映像檔以Process隔離模式執行,但是以Hyper-V隔離模式執行的話則是支援相同版本以下的OS映像檔。
有點複雜,對吧?
簡單來說,要能夠支援以Process隔離模式執行,必須是Container Base Image和Host為相同版本的OS,若是以Hyper-V隔離模式執行,則必須挑選Host OS版本以下製成的Container Image,也就是說Windows Server 2016的選擇性非常少,只能使用同為Windows Server 2016為基底製作的映像檔,越新的OS版本則支援以Hyper-V隔離模式執行的Container Image選擇越多。
更多Windows Container版本相容性的部份可以參考官方文件的說明(中文/英文)。
回到Azure DevOps Agent,上面說了那麼多,主要是必須考量Agent要執行的任務需要多大的支援與資源,若是只需要能夠以dotnet sdk建置專案,那麼選擇任何一個OS版本的Image應該都可以,只要能夠在Image裡面安裝dotnet sdk即可。
以dotnet sdk這個例子來說,在官方文件「在 Docker 中執行自我裝載的代理程式」所提到的Dockerfile範例是使用Windows Server Core 2019的基底映像檔,裡面並沒有安裝dotnet sdk:
FROM mcr.microsoft.com/windows/servercore:ltsc2019

WORKDIR /azp

COPY start.ps1 .

CMD powershell .\start.ps1
所以要讓Agent可以執行dotnet build的任務,可以選擇使用上面的範例,在Dockerfile中再另外加入安裝dotnet sdk的內容,或是從Docker hub上另外找微軟官方製作的dotnet sdk映像檔,找到對應的Container Repository與Image tag,例如:「mcr.microsoft.com/dotnet/sdk:5.0-windowsservercore-ltsc2019」這個就是同樣以Windows Server Core 2019為基底的Image,並且安裝了dotnet 5.0 sdk。
從官方文件「在 Docker 中執行自我裝載的代理程式」 中的範例可以看得出來,在Container中執行Azure DevOps Agent的關鍵在於下面這段PowerShell內容,將它複製之後以start.ps1儲存在與Dockerfile相同的位置即可:
if (-not (Test-Path Env:AZP_URL)) {
  Write-Error "error: missing AZP_URL environment variable"
  exit 1
}

if (-not (Test-Path Env:AZP_TOKEN_FILE)) {
  if (-not (Test-Path Env:AZP_TOKEN)) {
    Write-Error "error: missing AZP_TOKEN environment variable"
    exit 1
  }

  $Env:AZP_TOKEN_FILE = "\azp\.token"
  $Env:AZP_TOKEN | Out-File -FilePath $Env:AZP_TOKEN_FILE
}

Remove-Item Env:AZP_TOKEN

if ((Test-Path Env:AZP_WORK) -and -not (Test-Path $Env:AZP_WORK)) {
  New-Item $Env:AZP_WORK -ItemType directory | Out-Null
}

New-Item "\azp\agent" -ItemType directory | Out-Null

# Let the agent ignore the token env variables
$Env:VSO_AGENT_IGNORE = "AZP_TOKEN,AZP_TOKEN_FILE"

Set-Location agent

Write-Host "1. Determining matching Azure Pipelines agent..." -ForegroundColor Cyan

$base64AuthInfo = [Convert]::ToBase64String([Text.Encoding]::ASCII.GetBytes(":$(Get-Content ${Env:AZP_TOKEN_FILE})"))
$package = Invoke-RestMethod -Headers @{Authorization=("Basic $base64AuthInfo")} "$(${Env:AZP_URL})/_apis/distributedtask/packages/agent?platform=win-x64&`$top=1"
$packageUrl = $package[0].Value.downloadUrl

Write-Host $packageUrl

Write-Host "2. Downloading and installing Azure Pipelines agent..." -ForegroundColor Cyan

$wc = New-Object System.Net.WebClient
$wc.DownloadFile($packageUrl, "$(Get-Location)\agent.zip")

Expand-Archive -Path "agent.zip" -DestinationPath "\azp\agent"

try
{
  Write-Host "3. Configuring Azure Pipelines agent..." -ForegroundColor Cyan

  .\config.cmd --unattended `
    --agent "$(if (Test-Path Env:AZP_AGENT_NAME) { ${Env:AZP_AGENT_NAME} } else { ${Env:computername} })" `
    --url "$(${Env:AZP_URL})" `
    --auth PAT `
    --token "$(Get-Content ${Env:AZP_TOKEN_FILE})" `
    --pool "$(if (Test-Path Env:AZP_POOL) { ${Env:AZP_POOL} } else { 'Default' })" `
    --work "$(if (Test-Path Env:AZP_WORK) { ${Env:AZP_WORK} } else { '_work' })" `
    --replace

  Write-Host "4. Running Azure Pipelines agent..." -ForegroundColor Cyan

  .\run.cmd
}
finally
{
  Write-Host "Cleanup. Removing Azure Pipelines agent..." -ForegroundColor Cyan

  .\config.cmd remove --unattended `
    --auth PAT `
    --token "$(Get-Content ${Env:AZP_TOKEN_FILE})"
}
接著就是準備我們要用的Dockerfile,這邊我以dotnet 5.0 sdk的Windows Server Core 2022映像檔為基底,它裡面包含了PowerShell與dotnet 5.0 sdk,並且我還要額外在Image裡面安裝Docker。若是需要dotnet core 3.1與其它OS基底映像檔的部份可以到Docker hub的頁面上去尋找相關的Tag:
FROM mcr.microsoft.com/dotnet/sdk:5.0-windowsservercore-ltsc2022

#在這底下加入要額外裝在Docker Image內的程式

SHELL ["powershell", "-Command", "$ErrorActionPreference = 'Stop'; $ProgressPreference = 'SilentlyContinue';"]

RUN Install-PackageProvider -Name NuGet -MinimumVersion 2.8.5.201 -Force
RUN Install-Module -Name DockerMsftProvider -Repository PSGallery -Force -verbose
RUN Install-Package -Name docker -ProviderName DockerMsftProvider -Force -verbose -ErrorAction SilentlyContinue; exit 0

#===========================================

WORKDIR /azp

COPY start.ps1 .

CMD powershell .\start.ps1
準備好Dockerfile和start.ps1這兩個檔案之後,執行下面的指令建立映像檔:
docker build -t devopsagent .
完成Build Image的動作之後,透過下面的指令建立一個名為azure-agent的Container:
docker run --name azure-agent -d -v \.\pipe\docker_engine:\.\pipe\docker_engine -e AZP_URL=[AzureDevOpsURL] -e AZP_TOKEN=[AzureDevOpsPAT] -e AZP_AGENT_NAME=[AzureDevOpsAgentName] IMAGE:TAG
指令中比較特別的地方是透過mount的方式將host的docker轉給container內使用,也就是「-v .\pipe\docker_engine:.\pipe\docker_engine」這段,其它的除了IMAGE:TAG是根據上面的docker build所指定的Repository與Tag(預設為latest)之外,環境變數的部份則參考下面這張表:
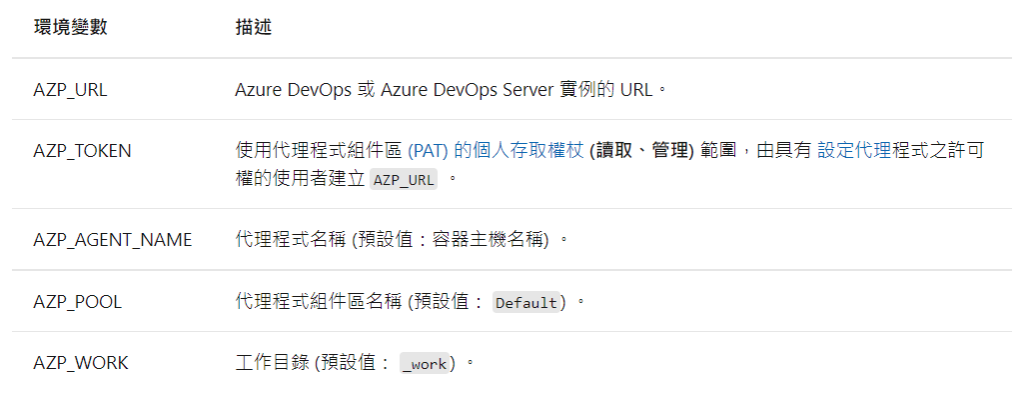
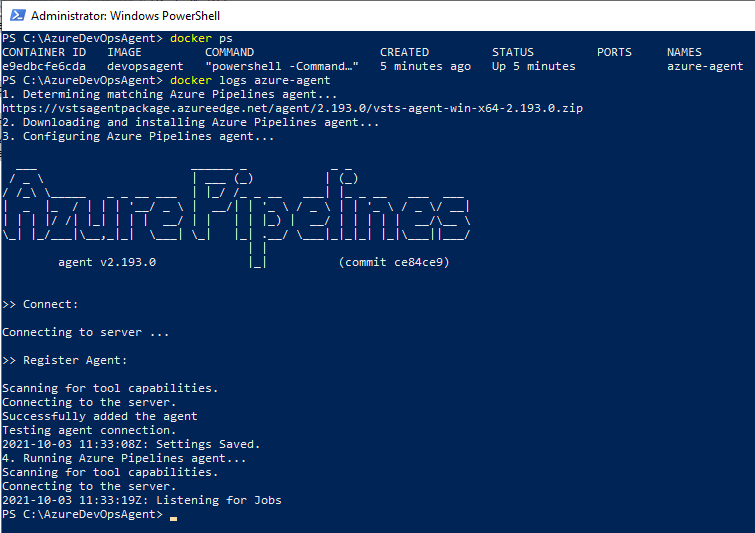
五個環境變數中的最後兩個AZP_POOL、AZP_WORK是選擇性的,只有前三個是必須的,執行之後的結果如下:
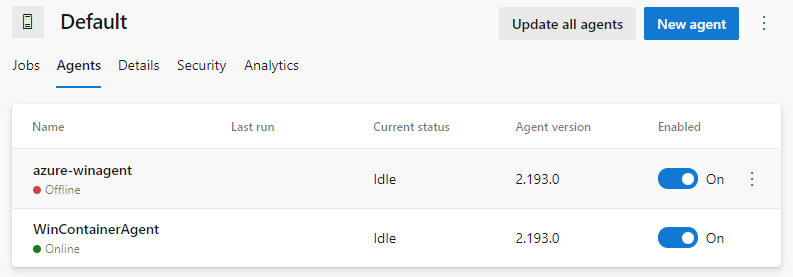
從Azure DevOps中的Agent Pools列表中可以看到這個Agent:
進入查看Capabilities的部份也可以看到幾個比較不一樣的資訊,像是ComputerName是Docker產生的隨機名稱,還有docker的資訊:
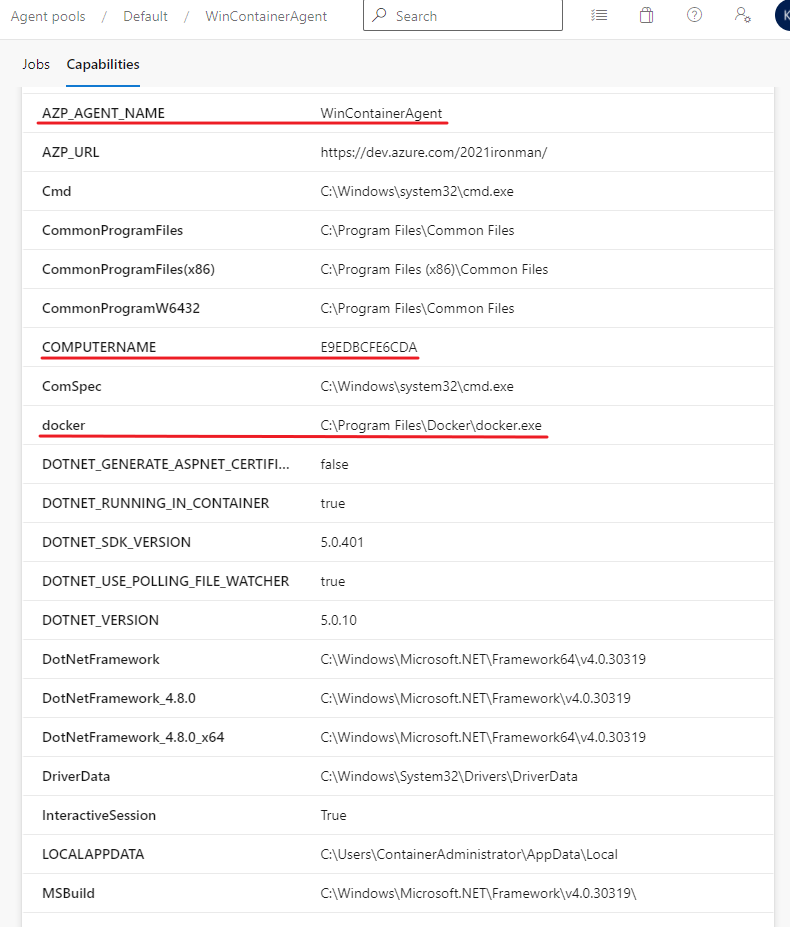
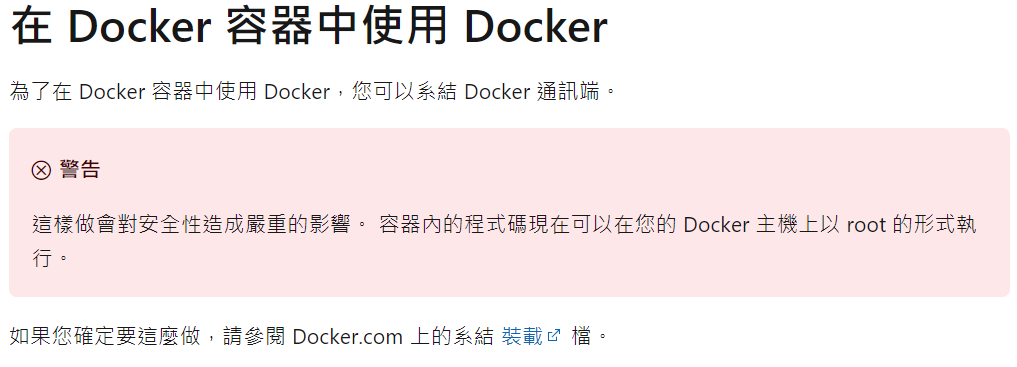
至於為什麼需要將host的docker提供給Container中的docker使用,這部份則是為了讓Container中的docker可以共用host上的docker,從Container中的Agent執行docker build所產生的docker image也會儲存在host的docker images裡面,並且可以代替host執行docker run建立新的Container。不過這麼做也是有安全性的風險的,官方就有提出警告,是否要這麼做則是可以自行思考決定:
會在這篇文章中這麼做的原因,純粹是為了提供Windows環境將docker轉給Container內使用的指令使用方式,因為這部份在微軟的文件頁面上似乎沒有提到(我忘了之前從哪裡看到的)。
