最近兩篇都是講 navigation component,入面為了示範設定 navigation 我們已經預先準備了兩頁的 Fragment class 和 layout XML,這樣我們之後就不用再跳去設定 navigation 的東西。現在開始會開始正式實作 app 的界面部分。我們會由車站列表頁開始實作,現在看看完成品:
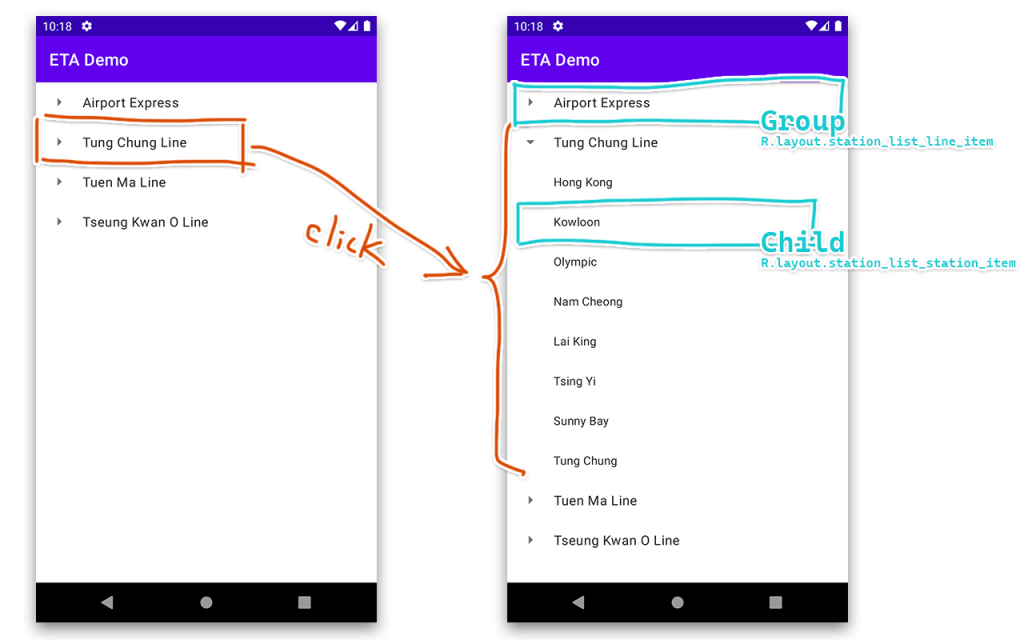
這頁基本上就是一個 RecyclerView,當用戶點擊路綫時就會展開其車站,再點擊車站就會開啟抵站時間頁面。如果想做到縮放車站名的話,最簡單的方法就是當路綫名是一種 view type、車站名是另一種 view type,只需要準備好一個 List 交予 ListAdapter 讓它幫我們 render 就可以了。而路綫名旁邊的三角形 icon 會隨着車站名是否展開來決定顯示那一款 icon。這個亦可以在那個 List 時順帶提供給 ListAdapter 知道就可以了。
ListAdapter 是 RecyclerView.Adapter 的 subclass,特色是它已經為我們準備了 AsyncListDiffer 計算更新列表時那些 list item 如何處理(例如更換現有項目、刪除項目還是中途插入一個新項目之類)和 submitList(List)(提交要顯示的 List)。我們只需要準備一個 DiffUtil.ItemCallback 和一些平時 RecyclerView.Adapter 都會做的東西(ViewHolder class、onCreateViewHolder 、getItemViewType、onBindViewHolder)就可以了,其餘那些 notifyDataSetChanged、在 RecyclerView.Adapter 準備一個 List field 來儲存現在顯示的內容之類我們都不用處理,因為 ListAdapter 已經幫我們做好了。
由於我們開始實作 UI 的部分,lifecycle 和其他 UI 的 dependency 是不能缺的。
implementation "com.google.android.material:material:$materialVersion"
implementation "androidx.constraintlayout:constraintlayout:$constraintLayoutVersion"
implementation "androidx.activity:activity-ktx:$activityKtxVersion"
implementation "androidx.fragment:fragment-ktx:$fragmentKtxVersion"
implementation "androidx.lifecycle:lifecycle-runtime-ktx:$lifecycleVersion"
implementation "androidx.lifecycle:lifecycle-viewmodel-ktx:$lifecycleVersion"
implementation "androidx.lifecycle:lifecycle-viewmodel-savedstate:$lifecycleVersion"
implementation "androidx.lifecycle:lifecycle-livedata-ktx:$lifecycleVersion"
我們首先要寫的是表示列表內容的 data class。我們會用 sealed interface 包住兩個 data class:Group 是路綫名、Child 是車站名。路綫和車站我們仍會以 enum 表示,直到要顯示一刻才會轉做 String。 Group 的 isExpanded 就是用來表示那個路綫是否被展開,而 Child 要有 Line 和 Station 是因為當我們點擊車站名時,要提供這兩樣東西才能進入抵站時間頁。
sealed interface StationListItem {
    data class Group(
        val line: Line,
        val isExpanded: Boolean,
    ) : StationListItem

    data class Child(
        val line: Line,
        val station: Station,
    ) : StationListItem
}
DiffUtil.ItemCallback做好了 StationListItem 後,我們就可以做 DiffUtil.ItemCallback。這個 class 就是 ListAdapter 能夠不用我們 call notifyDataSetChanged、notifyItemChanged 之類的 method 都能做到那些動畫的原因。DiffUtil 背後是用了 Eugene W. Myers 的 difference algorithm 來計算兩條 List 之間的變動,代你 call 了那些 notifyItemChanged、notifyItemRangeRemoved method。效能會比直接 call notifyDataSetChanged 更佳。而 ListAdapter 用了 AsyncListDiffer,就是把 DiffUtil 計算的動作放去非 UI thread 上面執行來提升效能。
DiffUtil.ItemCallback 的寫法非常簡單,一般只需要 override 兩個 method:areItemsTheSame 和 areContentsTheSame。前者是判斷兩個 object 的 ID 是否相同;後者是判斷兩個 object 是否完全相同。如果 areItemsTheSame return false,那 areContentsTheSame 就不會被執行。
object DiffCallback : DiffUtil.ItemCallback<StationListItem>() {
    override fun areItemsTheSame(oldItem: StationListItem, newItem: StationListItem): Boolean =
        when {
            oldItem is Group && newItem is Group -> oldItem.line == newItem.line
            oldItem is Child && newItem is Child -> oldItem.line == newItem.line && oldItem.station == oldItem.station
            else -> false
        }

    override fun areContentsTheSame(
        oldItem: StationListItem,
        newItem: StationListItem
    ): Boolean = when {
        oldItem is Group && newItem is Group -> oldItem == newItem
        oldItem is Child && newItem is Child -> oldItem == newItem
        else -> false
    }
}
我們用 object 而不是普通 class 的原因是因為它沒有 side effect。在 areItemsTheSame 中,由於 Child 本身沒有 ID 讓我們比較,所以只能以 line 和 station 作對比。
至於 areContentsTheSame 因為我們本身 Group 和 Child 都是 data class,所以我們可以放心用 Kotlin compiler 生成的 equals 來做比較。
首先是路綫 item type,這次我們會用 data binding,因為又有 onClick、顯示文字和切換三角形 icon。以下是 station_list_line_item.xml 的內容:
<?xml version="1.0" encoding="utf-8"?>
<layout xmlns:android="http://schemas.android.com/apk/res/android"
    xmlns:tools="http://schemas.android.com/tools">

    <data>

        <variable
            name="group"
            type="net.swiftzer.etademo.presentation.stationlist.StationListItem.Group" />

        <variable
            name="presenter"
            type="net.swiftzer.etademo.presentation.stationlist.LineStationPresenter" />

        <variable
            name="callback"
            type="net.swiftzer.etademo.presentation.stationlist.StationListAdapter.Callback" />
    </data>

    <LinearLayout
        android:layout_width="match_parent"
        android:layout_height="48dp"
        android:background="?selectableItemBackground"
        android:clickable="true"
        android:focusable="true"
        android:gravity="center_vertical"
        android:onClick="@{() -> callback.toggleExpanded(group.line)}"
        android:paddingStart="16dp"
        android:paddingEnd="16dp">

        <ImageView
            android:layout_width="wrap_content"
            android:layout_height="wrap_content"
            android:contentDescription="@null"
            android:src="@{group.expanded ? @drawable/ic_baseline_arrow_drop_down_24 : @drawable/ic_baseline_arrow_end_24}"
            tools:src="@drawable/ic_baseline_arrow_drop_down_24" />

        <com.google.android.material.textview.MaterialTextView
            android:layout_width="0dp"
            android:layout_height="wrap_content"
            android:layout_marginStart="16dp"
            android:layout_weight="1"
            android:ellipsize="end"
            android:maxLines="1"
            android:text="@{presenter.mapLine(group.line)}"
            android:textAlignment="viewStart"
            android:textAppearance="?textAppearanceBody1"
            tools:text="@tools:sample/cities" />
    </LinearLayout>
</layout>

由於是用了 data binding,所以 XML 檔的 root tag 是 <layout> 而不是 <LinearLayout>。<data> 就是用來放 Java imports 和 data binding 用到的 variable。三個 variable 分別是:
group 就是路綫的 objectpresenter 這個跟 MVP 的 presenter 沒甚麼關係,只是放了從 enum 取得車站路綫名稱的 code,方便重用callback 當按下路綫或車站時會 call 的 callback接着我們看看 data binding 的特有寫法。第一個是 <LinearLayout> 的 android:onClick。@{() -> callback.toggleExpanded(group.line)} 其實是 android.view.View.OnClickListener 的實作,不過用 lambda 來寫。凡是 data binding 都要用 @{} 包住,入面就是寫 Java code(不是 Kotlin)。整句的意思是當 onClick 時就會執行我的 lambda,因為 OnClickListener 的 onClick 第一個參數是 View 但我們不會用到,所以直接寫 () 就可以了。而 lambda 的內容就是 call callback.toggleExpanded(group.line),用來通知按了這條路綫。關於這個 callback 我們之後會介紹。
另一個要看的位置是 <ImageView> 的 android:src。@{group.expanded ? @drawable/ic_baseline_arrow_drop_down_24 : @drawable/ic_baseline_arrow_end_24} 其實就是 Java ternary operator (這個寫法反而 Kotlin 沒有,一定要寫成 if (...) ... else ....)。全句的意思是如果 group.expanded 是 true 就顯示 @drawable/ic_baseline_arrow_drop_down_24 否則就顯示 @drawable/ic_baseline_arrow_end_24。Data binding 可以用 @drawable 引用 drawable resource,其他 resource type 例如 @string 和 @plurals 都可以用同樣寫法。
還有一個要看的位置是 <MaterialTextView> 的 android:text。這次我們只是顯示由 enum 取得的路綫名稱。由於我們會在好幾個地方用到這個轉換邏輯,所以把它放到另一個 class。而 presenter.mapLine 會 return String ,那就可以交予 MaterialTextView 顯示。
另一個 layout XML 是車站名稱,檔案名稱是 station_list_station_item.xml。
<?xml version="1.0" encoding="utf-8"?>
<layout xmlns:android="http://schemas.android.com/apk/res/android"
    xmlns:tools="http://schemas.android.com/tools">

    <data>

        <variable
            name="child"
            type="net.swiftzer.etademo.presentation.stationlist.StationListItem.Child" />

        <variable
            name="presenter"
            type="net.swiftzer.etademo.presentation.stationlist.LineStationPresenter" />

        <variable
            name="callback"
            type="net.swiftzer.etademo.presentation.stationlist.StationListAdapter.Callback" />
    </data>

    <com.google.android.material.textview.MaterialTextView
        android:layout_width="match_parent"
        android:layout_height="48dp"
        android:background="?selectableItemBackground"
        android:clickable="true"
        android:ellipsize="end"
        android:focusable="true"
        android:gravity="center_vertical|start"
        android:maxLines="1"
        android:onClick="@{() -> callback.onClickLineAndStation(child.line, child.station)}"
        android:paddingStart="56dp"
        android:paddingEnd="16dp"
        android:text="@{presenter.mapStation(child.station)}"
        android:textAlignment="viewStart"
        android:textAppearance="?textAppearanceBody2"
        tools:text="@tools:sample/cities" />
</layout>

這次我不解釋了,因為跟剛才那個大同小異。
剛才 layout XML 看到的 callback 就是這樣子,沒甚麼特別:
interface Callback {
    fun toggleExpanded(line: Line)
    fun onClickLineAndStation(line: Line, station: Station)
}
剛才在 layout XML 看到 LineStationPresenter 就是這樣子:
@ActivityScoped
class LineStationPresenter @Inject constructor(@ActivityContext context: Context) {
    private val language = context.resources.configuration.appLanguage

    fun mapLine(line: Line): String = when (language) {
        Language.CHINESE -> line.zh
        Language.ENGLISH -> line.en
    }

    fun mapStation(station: Station): String = when (language) {
        Language.CHINESE -> station.zh
        Language.ENGLISH -> station.en
    }
}

val Configuration.appLanguage: Language
    get() = if (ConfigurationCompat.getLocales(this)[0].language == Locale.CHINESE.language) {
        Language.CHINESE
    } else {
        Language.ENGLISH
    }
目的就是拿 Activity 的 Context 來得知現在的 Locale 然後決定輸出中文還是英文的路綫車站名。@ActivityScoped 是 Dagger Hilt 的 annotation,意思是這個 object 是跟隨 ActivityComponent 的生死。而 @ActivityContext 是 Dagger Hilt 提供的 qualifier,意思是我們要拿到 Acitivity 的 Context 而不是 Application 的 Context。我們不造新的 binding adapter 來做轉換是因為 binding adapter 是整個 app 都能用到,沒有 namespace。如果做的轉換只是個別 feature 才會用到的話我覺得不用 binding adapter 比較好。
留意凡是 resource 的東西都不應放在 ViewModel 內轉換,這是因為界面語言是可以隨時轉換,如果用 Application 的 Context 來決定顯示甚麼語言會出現不一致。layout XML 用到的 string resource 就按最新語言設定顯示,因為跟隨 configuration change 重新建立 Activity 而重新 inflate layout XML;但如果從 ViewModel 的 constructor 取得 Application Context 的話,因為 ViewModel 能在 configuration change 後存活,那就是用 configuration change 之前的 Context 導致顯示的文字不是按照最新語言設定。
如果不喜歡另外準備一個自訂的 class 放那些 enum 轉換文字的 code 的話,可以考慮使用 data binding 的 converter 功能。
ViewHolder由於控制各 UI widget 顯示甚麼東西都交予 layout XML 用 data binding 控制,所以 ViewHolder 的角式就變了設置 data binding 和交資料給 data binding。現附上兩個 ViewHolder 的 code:
class LineItemViewHolder(
    private val binding: StationListLineItemBinding,
    lifecycleOwner: LifecycleOwner,
    presenter: LineStationPresenter,
    callback: Callback,
) : RecyclerView.ViewHolder(binding.root) {
    init {
        binding.lifecycleOwner = lifecycleOwner
        binding.presenter = presenter
        binding.callback = callback
    }

    fun bind(group: StationListItem.Group) {
        binding.group = group
    }
}
class StationItemViewHolder(
    private val binding: StationListStationItemBinding,
    lifecycleOwner: LifecycleOwner,
    presenter: LineStationPresenter,
    callback: Callback,
) : RecyclerView.ViewHolder(binding.root) {
    init {
        binding.lifecycleOwner = lifecycleOwner
        binding.presenter = presenter
        binding.callback = callback
    }

    fun bind(child: StationListItem.Child) {
        binding.child = child
    }
}
或許你有看過一些教學或其他人會在改變 binding variable 後要 call binding.executePendingBindings() 觸發 UI 更新,但我們卻沒有這樣做。這是因為我們交了 LifecycleOwner 給 binding。如果我們交的 variable 是 LiveData 或 StateFlow,只要預先設定好 LifecycleOwner 就能自動觸發 UI 更新。這就是我們刻意在 ViewHolder 的 constructor 要求 LifecycleOwner 的原因。而 constructor 的 binding.root 就是從 binding object 取得 root view 的寫法(因為 RecyclerView.ViewHolder 的 constructor 需要 root view)。至於 bind method 就是讓 ListAdapter#onBindViewHolder 能夠提交當前 list item object 到 ViewHolder。
之前準備了這麼多的東西就是為了寫本篇最主要的 class:StationListAdapter。首是是它的基本骨架:
class StationListAdapter(
    lifecycleOwner: LifecycleOwner,
    presenter: LineStationPresenter,
    callback: Callback,
) : ListAdapter<StationListItem, RecyclerView.ViewHolder>(StationListItem.DiffCallback) {
    private val lifecycleOwner = WeakReference(lifecycleOwner)
    private val presenter = WeakReference(presenter)
    private val callback = WeakReference(callback)

		override fun onCreateViewHolder(parent: ViewGroup, viewType: Int): RecyclerView.ViewHolder {
        TODO()
    }

    override fun getItemViewType(position: Int): Int = when (getItem(position)) {
        TODO()
    }

    override fun onBindViewHolder(holder: RecyclerView.ViewHolder, position: Int) {
        TODO()
    }
}
由於 ViewHolder 用了 LifecycleOwner、LineStationPresenter、Callback,所以我們在 StationListAdapter 的 constructor 傳入這些東西,好讓我們在 onCreateViewHolder 時能夠把它們傳入去 ViewHolder。而我們另外造了三個 WeakReference 把 constructor 帶進來的東西放入去是避免 memory leak。而 ListAdapter 的兩個 type argument 分別是 list item 和 ViewHolder 的 type。由於我們有兩個 ViewHolder,所以我們惟有選用 RecyclerView.ViewHolder。如果你的 ListAdapter 只有單一 ViewHolder,那可以直接用那個 ViewHolder type,這樣就能在 onBindViewHolder 直接用到那個 ViewHolder 而不用 type casting。當然你可以用 sealed class/interface 來避免強行 type casting。
接着我們開始寫 getItemViewType,我們以 layout XML 的 R class 來做 view type ID,這樣就保證不會撞號碼。
override fun getItemViewType(position: Int): Int = when (getItem(position)) {
    is StationListItem.Group -> R.layout.station_list_line_item
    is StationListItem.Child -> R.layout.station_list_station_item
    else -> throw UnsupportedOperationException("Unsupported view type at position $position")
}
然後是 onCreateViewHolder,我們會按照 view type 決定 instantiate 那一個 ViewHolder。
override fun onCreateViewHolder(parent: ViewGroup, viewType: Int): RecyclerView.ViewHolder {
    val inflater = LayoutInflater.from(parent.context)
    return when (viewType) {
        R.layout.station_list_line_item -> LineItemViewHolder(
            binding = StationListLineItemBinding.inflate(inflater, parent, false),
            lifecycleOwner = requireNotNull(lifecycleOwner.get()),
            presenter = requireNotNull(presenter.get()),
            callback = requireNotNull(callback.get()),
        )
        R.layout.station_list_station_item -> StationItemViewHolder(
            binding = StationListStationItemBinding.inflate(inflater, parent, false),
            lifecycleOwner = requireNotNull(lifecycleOwner.get()),
            presenter = requireNotNull(presenter.get()),
            callback = requireNotNull(callback.get()),
        )
        else -> throw UnsupportedOperationException("Unsupported view type $viewType")
    }
}
最後是 onBindViewHolder,由於我們用了 data binding,所以只需要提交那個 list item 進去 ViewHolder 就可以了。不過就算我們把 ViewHolder 用 sealed class/interface 包住都要替 list item 做 type casting,除非整個 list 只有一款 list item class。
override fun onBindViewHolder(holder: RecyclerView.ViewHolder, position: Int) {
    when (val item = getItem(position)) {
        is StationListItem.Group -> (holder as LineItemViewHolder).bind(item)
        is StationListItem.Child -> (holder as StationItemViewHolder).bind(item)
    }
}
現在 StationListAdapter 已經完成了,完整的 code 可以到 GitHub repo 查閱。下一篇會實作 ViewModel、Fragment 的部分,屆時就能完成車站列表頁的部分。