終於來到為 ViewModel 寫 unit test 的部分,亦都意味着這個系列快要完結。之前我們寫過其他 layer 的 unit test,用過 MockK 和 Strikt。來到現在偏向 UI 那邊的 unit test,我們會用到 Robolectric。
在 Android SDK 入面有不少 class 是跟 Java Standard Library 一樣,但亦都有一大堆 class 是 Android SDK 才會有,例子有 Context、Uri 等等。由於 Java Standard Library 沒有這堆 class,如果無特別處理的話就不能在電腦上跑 unit test,只能拿到 Android 裝置上執行(實機或模擬器),所以就出現了 Robolectric 這個 library。它能令你在電腦上執行帶有 Android SDK 獨有 class 的 unit test,原理就是它會為每個 Android 版本都預備一個 JAR 檔案,入面載入那些 Android SDK 獨有 class 的 stub,好讓在執行 unit test 時不會找不到那些 class。當然你亦可以自己用 mock library 例如 MockK 把 Android SDK 的 class 都 mock 一次,但實際上要 mock 的話就很大機會不只要 mock 一個 class。例如 context.resources.getString 這個 method 你要先 mock Context 再 mock Resources 然後再 mock getResources 和 getString 兩個 method,所以還是用 Robolectric 比較實際。
順帶一提,正因為 Robolectric 是製造一堆跟 Android SDK 同 signature 的 class,所以當新的 Android 版本推出時不會馬上就有對應該 Android 版本的 JAR 可供下載,要等好幾個月才會有。
首先我們需要加入 Android 測試相關的 dependency:
testImplementation "androidx.test:core-ktx:$testCoreVersion"
testImplementation "androidx.test.ext:junit:$testExtJunitVersion"
testImplementation "androidx.arch.core:core-testing:$coreTestingVersion"
testImplementation "org.robolectric:robolectric:$robolectricVersion"
然後我們會以 LineStationPresenter 先來個簡單的示範,看看如何使用 Robolectric。
@RunWith(AndroidJUnit4::class)
class LineStationPresenterTest {

    private lateinit var presenter: LineStationPresenter

    @Before
    fun setUp() {
        presenter = LineStationPresenter(ApplicationProvider.getApplicationContext())
    }

    @Test
    @Config(qualifiers = "en-rUS")
    fun `mapLine english`() {
        expectThat(presenter.mapLine(Line.AEL)).isEqualTo("Airport Express")
    }

    @Test
    @Config(qualifiers = "fr-rFR")
    fun `mapLine french`() {
        expectThat(presenter.mapLine(Line.AEL)).isEqualTo("Airport Express")
    }

    @Test
    @Config(qualifiers = "zh-rTW")
    fun `mapLine chinese taiwan`() {
        expectThat(presenter.mapLine(Line.AEL)).isEqualTo("機場快綫")
    }

    @Test
    @Config(qualifiers = "en-rUS")
    fun `mapStation english`() {
        expectThat(presenter.mapStation(Station.QUB)).isEqualTo("Quarry Bay")
    }

    @Test
    @Config(qualifiers = "fr-rFR")
    fun `mapStation french`() {
        expectThat(presenter.mapStation(Station.QUB)).isEqualTo("Quarry Bay")
    }

    @Test
    @Config(qualifiers = "zh-rHK")
    fun `mapStation chinese hong kong`() {
        expectThat(presenter.mapStation(Station.QUB)).isEqualTo("鰂魚涌")
    }
}
LineStationPresenter 本身就是很簡單,只有兩個 method。由於在 constructor 需要用到 Context,所以要用到 Robolectric。當 JUnit 4 test 要用到 Robolectric 的話我們就要在 test class 加註 @RunWith(AndroidJUnit4::class)。如果要取得 Context 就要經 ApplicationProvider.getApplicationContext() 取得。
到了 test case 的部分,除了 @Test 之外我們還加了 @Config。這個是 Robolectric 的 annotation,用來控制「裝置」的配置。由於 mapLine 和 mapStation 內裏要判斷當前系統語言來決定輸出中文還是英文名字,所以我們需要改變配置來令測試達至全面覆蓋。除了改語系之外,@Config 還可以改變其他的配置,例如屏幕密度、尺寸等等,詳情可以參閱 Robolectric 的文檔。
有時候執行 Robolectric 的 test 出現以下錯誤:
java.lang.NullPointerException
	at java.base/java.io.File.<init>(File.java:279)
	at com.facebook.soloader.ApplicationSoSource.<init>(ApplicationSoSource.java:46)
	at com.facebook.soloader.SoLoader.initSoSources(SoLoader.java:285)
	at com.facebook.soloader.SoLoader.init(SoLoader.java:207)
	at com.facebook.soloader.SoLoader.init(SoLoader.java:189)
	at com.facebook.soloader.SoLoader.init(SoLoader.java:217)
	at net.swiftzer.etademo.flipper.FlipperHelper.init(FlipperHelper.kt:25)
	at net.swiftzer.etademo.EtaDemoApp.onCreate(EtaDemoApp.kt:16)
	at org.robolectric.android.internal.AndroidTestEnvironment.lambda$installAndCreateApplication$2(AndroidTestEnvironment.java:350)
這是因為我們的 EtaDemoApp 用了 Flipper,但其實執行 unit test 應該不會用到 Flipper。要解決這個問題有兩個做法。第一個是好像之前處理 debug 和 release build type 的做法另外做一個假的 FlipperHelper。在 app/src/test/java/net/swiftzer/etademo/flipper 建立 FlipperHelper.kt
class FlipperHelper @Inject constructor(*
    @ApplicationContext private val context: Context,
    private val inspectorFlipperPlugin: InspectorFlipperPlugin,
    private val crashReporterPlugin: CrashReporterPlugin,
    private val databasesFlipperPlugin: DatabasesFlipperPlugin,
    private val sharedPreferencesFlipperPlugin: SharedPreferencesFlipperPlugin,
    private val networkFlipperPlugin: NetworkFlipperPlugin,
) {
    fun init() {
        // no-op
    }
}
另一個方法是在 app/src/test/resources 放一個名為 robolectric.properties 的檔案。
然後入面放這些內容:
application=android.app.Application
意思就是把所有 Robolectic 的 test 都轉用 android.app.Application 作為 Application class,那就避開了 EtaDemoApp 有 Flipper 的問題。先前提到 Robolectic 支援最新版 Android 會有滯後,在等待支援新版 Android 的時候我們可以在 robolectric.properties 指定 SDK level:
sdk=30
如果 test class 或 method 出現 @Config 的話,Robolectric 會優先使用 @Config 的配置。
StationListViewModel來到我們第一個 ViewModel 測試。由於 StationListViewModel 沒有用到 Android SDK 的東西,所以不用加 @RunWith(AndroidJUnit4::class)。我們先來試試第一個 test 看看一開始時 StationListViewModel.list 是不是只顯示路綫名稱。
class StationListViewModelTest {

    private lateinit var viewModel: StationListViewModel

    @MockK
    private lateinit var getLinesAndStations: GetLinesAndStationsUseCase

    @Before
    fun setUp() {
        MockKAnnotations.init(this)
        every { getLinesAndStations() } returns linkedMapOf(
            Line.TKL to linkedSetOf(Station.LHP, Station.TKO),
            Line.TCL to linkedSetOf(Station.TUC, Station.SUN, Station.TSY),
            Line.TML to linkedSetOf(Station.TUM, Station.SIH, Station.TIS),
        )
        viewModel = StationListViewModel(getLinesAndStations)
    }

    @Test
    fun `station list default state`() = runBlockingTest {
        viewModel.list.test {
            expectThat(awaitItem()).hasSize(3).and {
                get(0).assertGroup(Line.TKL, false)
                get(1).assertGroup(Line.TCL, false)
                get(2).assertGroup(Line.TML, false)
            }
            expectNoEvents()
        }
    }

		private fun Assertion.Builder<StationListItem>.assertGroup(line: Line, isExpanded: Boolean) =
        isA<StationListItem.Group>().and {
            get(StationListItem.Group::line).isEqualTo(line)
            get(StationListItem.Group::isExpanded).isEqualTo(isExpanded)
        }

    private fun Assertion.Builder<StationListItem>.assertChild(line: Line, station: Station) =
        isA<StationListItem.Child>().and {
            get(StationListItem.Child::line).isEqualTo(line)
            get(StationListItem.Child::station).isEqualTo(station)
        }
}
由於只是測試,我們在 setUp 隨便弄幾條路綫和車站就可以了。在 station list default state 用 viewModel.list.test 訂閱這個 Flow 並取得它的值做 assertion。那個 test { ... } 不是 Kotlin Flow 提供的,是用了 Turbine 這個 library。這樣就可以像 RxJava 般做測試。test lambda 入面寫的 code 都是在訂閱後進行的。在 test lambda 入面我們可以用 awaitItem() 等待 Flow 的最新值然後拿來做 assertion。如果你期望那個 Flow 會射出兩個值那你就要 call 兩次 awaitItem()。最尾的 expectNoEvents() 顧名思義就是說這個 Flow 應該不會再有其他東西射出來,如果真的有就會報錯。而最尾的 assertGroup 和 assertChild 是 custom assertion,之前已經介紹過。
要用 Turbine 首先要加入這個 dependency:
testImplementation "app.cash.turbine:turbine:$turbineVersion"
然後因為 Turbine 用了未正式推出的 Kotlin Time,所以要 opt-in。
android {
    // 略……
    kotlinOptions {
        jvmTarget = '1.8'
        freeCompilerArgs += [
                "-Xuse-experimental=kotlin.time.ExperimentalTime",
        ]
    }
}
之後我們試試執行這個 test:
Exception in thread "Test worker" java.lang.IllegalStateException: Module with the Main dispatcher had failed to initialize. For tests Dispatchers.setMain from kotlinx-coroutines-test module can be used
	at kotlinx.coroutines.internal.MissingMainCoroutineDispatcher.missing(MainDispatchers.kt:113)
	略……
Caused by: java.lang.RuntimeException: Method getMainLooper in android.os.Looper not mocked. See http://g.co/androidstudio/not-mocked for details.
	at android.os.Looper.getMainLooper(Looper.java)
  略……
出現這個錯誤是因為我們在 StationListViewModel 用了 viewModelScope。而 viewModelScope 是用 Main dispatcher,Main dispatcher 在 Android 上是理解為在 UI thread 上執行。但 Kotlin Coroutine 在 Android 上用的話那個 Main dispatcher 的定義會在 kotlinx-coroutines-android 提供。如果要令 unit test 成功執行我們可以用 Dispatchers.setMain 換成 TestCoroutineDispatcher。我們一般在 ViewModel 時常用到 viewModelScope,如果每個 test method 都寫一個 Dispatchers.setMain 和 Dispatchers.resetMain 會很麻煩,所以我們可以寫 test rule。以下的 MainCoroutineScopeRule 就是從 Kotlin Coroutines codelab 抄回來的:
@ExperimentalCoroutinesApi
class MainCoroutineScopeRule(
    val dispatcher: TestCoroutineDispatcher = TestCoroutineDispatcher(),
) : TestWatcher(), TestCoroutineScope by TestCoroutineScope(dispatcher) {
    override fun starting(description: Description?) {
        super.starting(description)
        // If your codebase allows the injection of other dispatchers like
        // Dispatchers.Default and Dispatchers.IO, consider injecting all of them here
        // and renaming this class to `CoroutineScopeRule`
        //
        // All injected dispatchers in a test should point to a single instance of
        // TestCoroutineDispatcher.
        Dispatchers.setMain(dispatcher)
    }

    override fun finished(description: Description?) {
        super.finished(description)
        cleanupTestCoroutines()
        Dispatchers.resetMain()
    }
}
然後之前的 code 會變成這樣:
class StationListViewModelTest {

    @get:Rule
    val coroutineScope = MainCoroutineScopeRule()

    // 略……

    @Test
    fun `station list default state`() = coroutineScope.runBlockingTest {
        // 略……
    }
}
留意要用 MainCoroutineScopeRule 的 coroutineScope 來做 runBlockingTest,否則會報錯:
Unfinished coroutines during teardown. Ensure all coroutines are completed or cancelled by your test.
kotlinx.coroutines.test.UncompletedCoroutinesError: Unfinished coroutines during teardown. Ensure all coroutines are completed or cancelled by your test.
	at kotlinx.coroutines.test.TestCoroutineDispatcher.cleanupTestCoroutines(TestCoroutineDispatcher.kt:178)
	at kotlinx.coroutines.test.TestCoroutineScopeImpl.cleanupTestCoroutines(TestCoroutineScope.kt:35)
	at net.swiftzer.etademo.MainCoroutineScopeRule.cleanupTestCoroutines(MainCoroutineScopeRule.kt)
	at net.swiftzer.etademo.MainCoroutineScopeRule.finished(MainCoroutineScopeRule.kt:78)
  略……
大意就是像 Android Dev Summit '19 的 Testing Coroutines on Android 所講的情況有點像:test case 的 runBlockingTest 執行完時 viewModelScope 還在執行中。
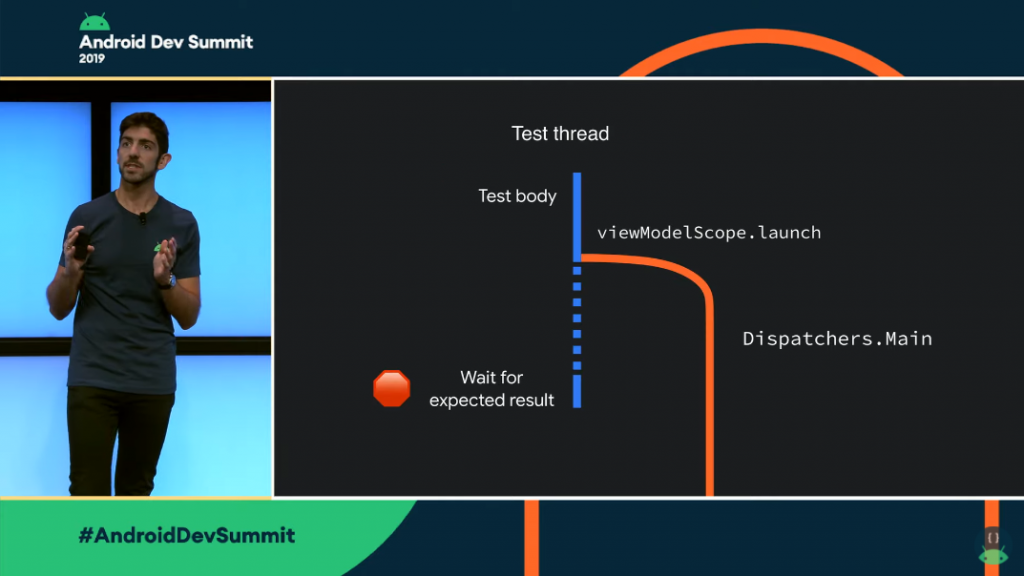
當我們改用 MainCoroutineScopeRule 的 coroutineScope 來做 runBlockingTest,就能等待 viewModelScope 執行完才把 runBlockingTest 完結。

上述圖片擷取自 Testing Coroutines on Android (Android Dev Summit '19)
這個東西在之後測試 EtaViewModel 時很有用。
我們繼續寫餘下的 test case。這次我們試試展開其中一條路綫,看看那條路綫的車站有沒有放出來。
@Test
fun `station list expand line`() = coroutineScope.runBlockingTest {
    viewModel.list.test {
        expectThat(awaitItem()).hasSize(3)
        viewModel.toggleExpanded(Line.TCL)
        expectThat(awaitItem()).hasSize(6).and {
            get(0).assertGroup(Line.TKL, false)
            get(1).assertGroup(Line.TCL, true)
            get(2).assertChild(Line.TCL, Station.TUC)
            get(3).assertChild(Line.TCL, Station.SUN)
            get(4).assertChild(Line.TCL, Station.TSY)
            get(5).assertGroup(Line.TML, false)
        }
        expectNoEvents()
    }
}
由於我們已經在另一個 test case 試過一開始時會顯示三條路綫,所以針對第一個值的 assertion 只檢查是不是有三項內容就算了。
由於其他跟展開和收合路綫的 test case 寫法都是大同小異,我就不貼出來。現在看看當按下車站時會不會觸發導航至班次頁的 event。
@Test
fun `launch eta screen`() = coroutineScope.runBlockingTest {
    viewModel.launchEtaScreen.test {
        viewModel.onClickLineAndStation(Line.AEL, Station.AIR)
        expectThat(awaitItem()).isEqualTo(Line.AEL to Station.AIR)
        expectNoEvents()
    }
}
這個 test 寫法很簡單,就是看看當 onClickLineAndStation 後 launchEtaScreen 有沒有發射那個路綫和車站 Pair。
我們看過 Robolectric 的設定和示範了如何在 unit test 取得 Context。有了 Robolectric 我們就可以把一些不太跟 UI 有很大關係但又用了 Android SDK 的 class 的 code 在非 Android 裝置上執行 unit test。這樣可以加快 unit test 執行速度(因為在 Android 裝置執行 unit test 必定比在普通電腦上執行 unit test 慢)。另外又示範了改變 Main dispatcher 的方法和用 Turbine 幫助測試 Kotlin Flow。下一篇我們會開始寫 EtaViewModel 的 unit test。完整的 code 可以在 GitHub repo 找到。