
經過了二十一天,進入到了實作的部分,接下來就會建置一系列實際連線至DB並透過Restful溝通的Reactive的服務。這篇主要是透過Restful溝通,後續會接著介紹連線至DB的部分。
大致上的流程是:
main 啟動Netty Server,WebClient 發出RequestRouter 接受到Request ,轉向到Handler
Handler 處理後回傳。1.Spring Initializr
產生Reactive Spring 專案,主要就是選擇Spring Reactive Web,就會包含WebFlux 與 Netty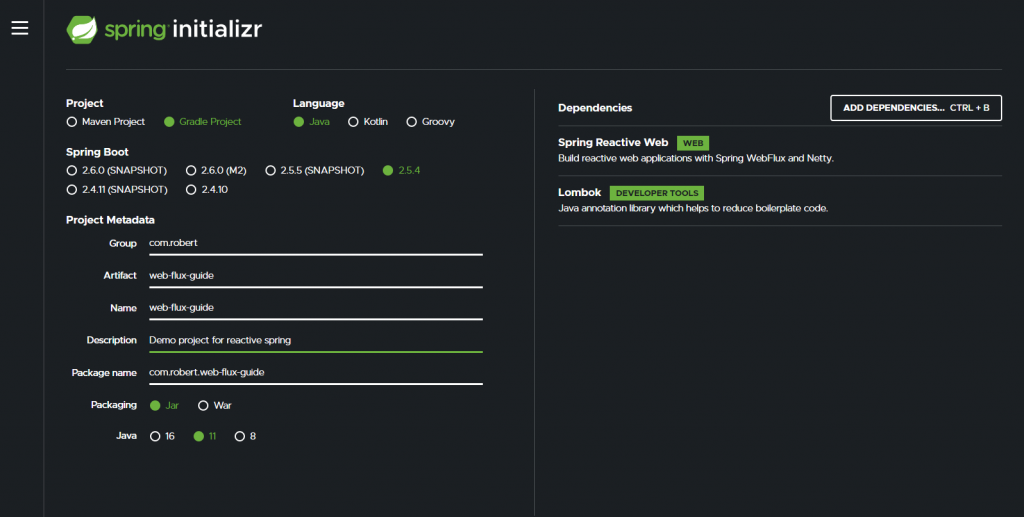
GreetingHandlerGreeting.java單純的值物件。@Data
@NoArgsConstructor
@AllArgsConstructor
public class Greeting {
private String message;
}
GreetingHandler.java Handler 搭配下面介紹的Router類似於Controller,可以看到是一個functional的寫法。
import com.robert.webfluxguide.vo.Greeting;
import org.springframework.http.MediaType;
import org.springframework.stereotype.Component;
import org.springframework.web.reactive.function.BodyInserters;
import org.springframework.web.reactive.function.server.ServerRequest;
import org.springframework.web.reactive.function.server.ServerResponse;
import reactor.core.publisher.Mono;
@Component
public class GreetingHandler {
  public Mono<ServerResponse> hello(ServerRequest request) {
    return ServerResponse.ok().contentType(MediaType.APPLICATION_JSON)
        .body(BodyInserters.fromValue(new Greeting("Hello, Spring!")));
  }
}
一樣支援Spring Mvc的annotation (不需要Router),效果會是一樣的。
@RestController
public class GreetingHandler {
  @GetMapping("/hello")
  public Mono<Greeting> hello() {
    return Mono.just(new Greeting("Hello, Spring!"));
  }
//  public Mono<ServerResponse> hello(ServerRequest request) {
//    return ServerResponse.ok().contentType(MediaType.APPLICATION_JSON)
//        .body(BodyInserters.fromValue(new Greeting("Hello, Spring!")));
//  }
}
GreetingRouter.java 負責轉導,在這邊就是把路徑/hello轉給hanlder內的hello,跟以前寫過前端的Router寫法類似,感覺會把轉導集中在Router內,相對於以前分散在各controller內可能會更好管理路徑。@Configuration(proxyBeanMethods = false)
public class GreetingRouter {
@Bean
public RouterFunction<ServerResponse> route(GreetingHandler greetingHandler) {
return RouterFunctions
.route(GET("/hello").and(accept(MediaType.APPLICATION_JSON)), greetingHandler::hello);
}
}
GreetingClient.java 類似於之前的RestTemplate ,負責呼叫其他api,但WebClient同時支援阻斷與非阻斷式,在這邊範例就是建立一個呼叫自己hello的apiimport com.robert.webfluxguide.vo.Greeting;
import org.springframework.http.MediaType;
import org.springframework.stereotype.Component;
import org.springframework.web.reactive.function.client.WebClient;
import reactor.core.publisher.Mono;
@Component
public class GreetingClient {
private final WebClient client;
// Spring Boot auto-configures a `WebClient.Builder` instance with nice defaults and
// customizations.
// We can use it to create a dedicated `WebClient` for our component.
public GreetingClient(WebClient.Builder builder) {
this.client = builder.baseUrl("http://localhost:8080").build();
}
public Mono<String> getMessage() {
return this.client
.get()
.uri("/hello")
.accept(MediaType.APPLICATION_JSON)
.retrieve()
.bodyToMono(Greeting.class)
.map(Greeting::getMessage);
}
}
WebFluxGuideApplication.java,啟動伺服器,並透過GreetingClient呼叫Api。補充一下避免有人跟我一開始看到這邊,被前面太多陌生的內容影響,一看到GreetingClient 的取得是透過getBean而不是@Autowired,以為是WebFlux不支援@Autowired,其實是因為這邊main方法是static,使用getBean會容易一些,透過constructor @Autowired一樣是沒問題的。import com.robert.webfluxguide.client.GreetingClient;
import org.springframework.boot.SpringApplication;
import org.springframework.boot.autoconfigure.SpringBootApplication;
import org.springframework.context.ConfigurableApplicationContext;
@SpringBootApplication
public class WebFluxGuideApplication {
public static void main(String[] args) {
ConfigurableApplicationContext context = SpringApplication.run(WebFluxGuideApplication.class, args);
GreetingClient greetingClient = context.getBean(GreetingClient.class);
// We need to block for the content here or the JVM might exit before the message is logged
System.out.println(">> message = " + greetingClient.getMessage().block());
}
}
成功畫面
完成了一個單純的服務,詳細的介紹會在下一篇。
不知不覺也到了最後十篇了,reactive java可能對於台灣接受度還不高,可憐的點閱率,感謝三個追蹤的人,讓我覺得寫的東西至少還是有人想看。
