還記得一開始建立專案時選擇的是 Angular + Nestjs 作為專案的前後端語言嗎?

Nestjs 簡單來說可以想成後端版本的 Angular。繼承Angular 種種優點與特性,可以用快速且有價購地建立起一個後端使用的 Nodejs 服務。
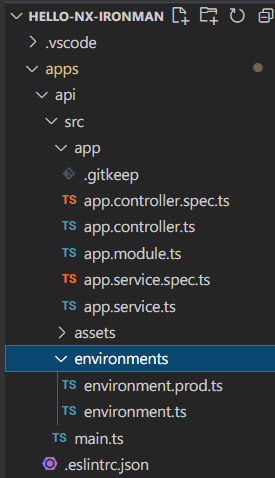
可以看到 Nestjs 的資料夾結構和 Angular 完全一模一樣,而應用的概念也幾乎和 Angular 相同
基本上可以將所有在 Angular 所學到的各種觀念套用在 Nestjs 上面。像是 模組化、 依賴注入、 裝飾器、 管道等等,都同樣可以應用在 Nestjs 上面
以上是對 Nestjs 非常非常粗淺的介紹,如果要看詳細介紹,推薦看看更厲害的夥伴寫的 Nestjs 30天挑戰賽
import { Logger } from '@nestjs/common';
import { NestFactory } from '@nestjs/core';

import { AppModule } from './app/app.module';

async function bootstrap() {
  const app = await NestFactory.create(AppModule);
  const globalPrefix = 'api';
  // 開始 cors
  app.enableCors()
  app.setGlobalPrefix(globalPrefix);
	// 設定運行的 port
  const port = process.env.PORT || 3333;
  await app.listen(port, () => {
    Logger.log('Listening at http://localhost:' + port + '/' + globalPrefix);
  });
}

bootstrap();
在 angular 當中,幾乎不會碰到 main.ts ,但是在 nestjs 要小小修改一下 main.ts
app.enableCors(): 先開啟前端遇到最煩人的cors 問題,之後再來嚴格限制const port = process.env.PORT || 3333; 將預設的連接端口從 3333 改成吃運行時連接的號碼,因為部屬上去的時候,不一定都是3333,所以讓 nodejs 自動抓取import { Body, Controller, HttpService, HttpStatus, Post,Response } from '@nestjs/common';
import { AppService } from './app.service';
@Controller()
export class AppController {
constructor(
private readonly appService: AppService,
) {}
@Post('snedMessageToLineChannel')
snedMessageToLineChannel(@Body() data,@Response() res) {
this.appService.pushMessageToLineChannel(data).subscribe(()=>{
return res.status(HttpStatus.OK).json();
});
}
@Post('snedDayoffMessageToLineChannel')
snedDayoffMessageToLineChannel(@Body() data,@Response() res) {
this.appService.pushDayoffMessageToLineChannel(data).subscribe((d)=>{
return res.status(HttpStatus.OK).json();
});
}
}
controller 作為 api 的進入點,由 裝飾器 來決定連接的方法與路徑,還記得前幾天由前端送到後端的打卡資料嗎?是利用 post 方法,送到路徑 snedMessageToLineChannel 的後端位置,就是送往此處,如果方法與路徑都配對到了,就可以使用 @Body() 裝飾器去收到api的資料,然後再交由服務去處理,處理完畢之後,也可以使用 @Response() 裝飾器回送資料給前端,告訴前端處理的結果是成功還是失敗等等。
import { Injectable } from '@nestjs/common';
import {
  ClientConfig,
  Client,
  TextMessage,
  MessageAPIResponseBase,
  TemplateMessage,
  StickerMessage,
} from '@line/bot-sdk';
import { from, Observable } from 'rxjs';

@Injectable()
export class AppService {
  clientConfig: ClientConfig = {
    channelAccessToken: '你的access token',
    channelSecret: '你的channel secret ',
  };
  client = new Client(this.clientConfig);
  groupId = '傳送到群組的id';
  constructor() {}

  pushMessageToLineChannel(
    messageContent: any
  ): Observable<MessageAPIResponseBase> {
    const { imageUrl, name, message, docPath } = messageContent;
    const textMessage = `${name} 預約打卡囉` ;
    const templateMessage: TemplateMessage = {
      type: 'template',
      altText: textMessage,
      template: {
        type: 'buttons',
        thumbnailImageUrl: imageUrl,
        imageAspectRatio: 'rectangle',
        imageSize: 'cover',
        imageBackgroundColor: '#FFFFFF',
        title: textMessage,
        text: `${message}`,
        actions: [
          {
            type: 'uri',
            label: `看看${name}的打卡`,
            uri: `https://challenage90days.web.app/checkin/${docPath}`,
          },
        ],
      },
    };

    return from(this.client.pushMessage(this.groupId, templateMessage));
  }

  pushDayoffMessageToLineChannel({ name }): Observable<MessageAPIResponseBase> {
    const stickerMessage: StickerMessage = {
      type: 'sticker',
      packageId: '6362',
      stickerId: '11087923',
    };
    const textMessage: TextMessage = {
      type: 'text',
      text: `${name} 請假囉`,
    };

    return from(this.client.pushMessage(this.groupId, textMessage));
  }
}
再來就是服務的部分,這部分的程式碼和上一篇介紹 line message API 的應用的程式碼一模一樣,故不再贅述。但是簡單來說,就是資料處理完之後,再丟會controller 告訴處理的結果。
也就是說資料處理的流程是這樣 API→controller→service→controller→response
這一篇就這樣快速介紹Nestjs 與專案的應用,下一篇就要來介紹如何將Nestjs 部屬上去,作為一支真正可以在網際網路上使用的 API


 iThome鐵人賽