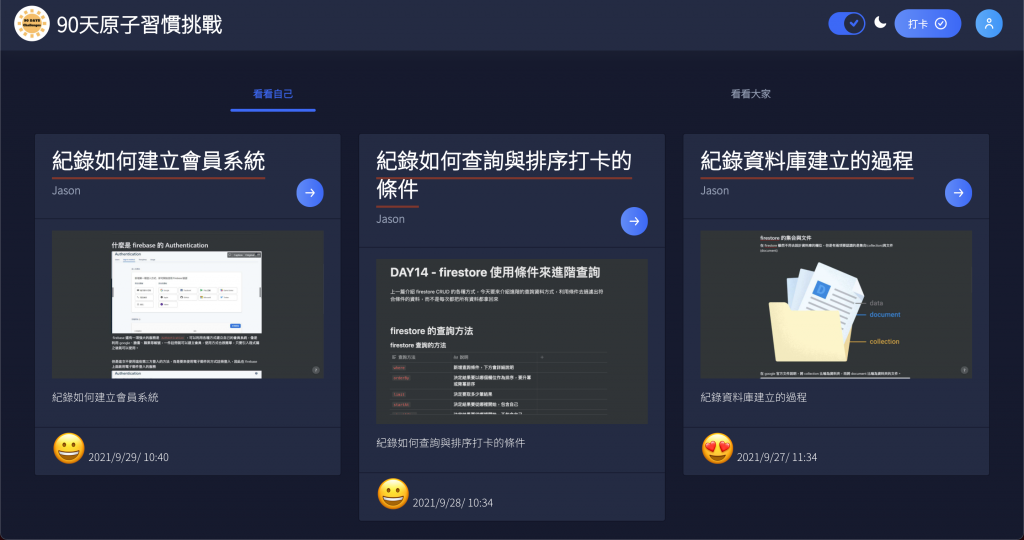
隨著專案前端、後端等等各個架構與部署都準備完成,Side project 就差最後一步驟,將自己或別人辛苦的每日打卡內容展示出來

本功能將分分為兩篇,本篇將示範建立成果展現頁面與一些小細節。下一篇將介紹如何用 firestore 執行比較複雜的動態條件查詢,展示如何顯示看看自己與看看大家的功能
首先,先來看呈現每日打卡結果的卡片,在此將卡片獨立為一個元件來製作,以利後來的維護
<nb-card [status]="status">
  <nb-card-header>
    <h3>
      <span class="underline">
        {{ checkin.content }}
      </span>
    </h3>
    <div class="subtitle">
      {{ checkin.postUser }}
      <button nbButton hero shape="round" status="primary" routerLink="/checkin/{{ checkin.docPath }}">
        <nb-icon icon="arrow-forward-outline"></nb-icon>
      </button>
    </div>
  </nb-card-header>
  <nb-card-body>
    <div>
      <img height="auto" width="100%" [src]="checkin.imgFile" />
    </div>
    <p>
      <a [href]="checkin.url">{{ checkin.url }}</a>
    </p>
    <p>
      {{ checkin.content }}
    </p>
  </nb-card-body>
  <nb-card-footer>
    <span class="emoji">{{ checkin.emoji }}</span>
    {{ checkin.time.toDate() | date: 'y/M/d/ h:mm' }}
  </nb-card-footer>
</nb-card>
在html的方面,也是淋漓盡致使用 nebular 提供的元件,再將資料綁定上去。
一個值得一提的地方是:
{{ checkin.time.toDate() | date: 'y/M/d/ h:mm' }}
在將儲存在firestore 的時間戳記轉換成一般的時間格式的時候,並不會將資料做實際的轉換,我們所要的是顯示的方式的轉換而已,不需要去特別轉換原始資料。因此就是使用 管道 pipe 的最好時機,使用 angular 內建的日期管道,即可顯示出我們需要的日期格式,而不必去修改任何資料。
這樣可以打造更好維護與使用的元件
邏輯的方面因為只是展示而已,所以只有將資料輸入之外,還有一個重點:
changeDetection: ChangeDetectionStrategy.OnPush,
這是 angular 的變更檢測,由於資料綁定的特性,只要有一項資料變更,angular 就會檢查整個會面上所有的畫面需不需要。
但是如果元件在製作的時候切分夠乾淨、夠獨立的話,不會受到外部元件影響的話,只有輸入的 input 會影響到元件的內容,就可以使用 ChangeDetectionStrategy.OnPush 讓變更檢測不會檢測元件,減少效能上的負擔。是非常重要的效能優化技巧
import {
  ChangeDetectionStrategy,
  Component,
  Input,
} from '@angular/core';
import { Checkin } from '@challenge90days/api-interfaces';

@Component({
  selector: 'challenge90days-checkin-card',
  templateUrl: './checkin-card.component.html',
  styleUrls: ['./checkin-card.component.scss'],
  changeDetection: ChangeDetectionStrategy.OnPush,
})
export class CheckinCardComponent {
  @Input() checkin: Checkin;
}
樣式同樣秉持著,別人設定好的就不調,只針對需要的地方微調
.subtitle{
    color: #8f9bb3;
    font-weight: 600;
    line-height: 2rem;
    margin-top: 7px;
    display: flex;
    justify-content: space-between;

}

.underline{
    padding-bottom: 3px;
    border-bottom: 3px solid #893128;
}

.emoji{
    font-size: 3rem;
}
這樣就製作完畢成果展示的卡片元件,下一篇將要介紹如何使用 angular fire 去做 firestore 動態與複雜的查詢
