iT邦幫忙

1

Python & GCP 學習筆記_Gmail API 操作

最近在一個偶然的情況下接觸到 Gmail API
因此找了一個周末來好好研究一下該怎麼操作他
以下是學習紀錄,如果有錯或是有更好的寫法,歡迎留言討論喔

簡單目錄

一、GCP設定教學以及取得 credentials.json

二、取得 token.json

三、利用 yagmail 寄送 email

四、參考資源

一、GCP 設定教學

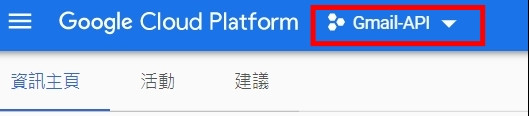
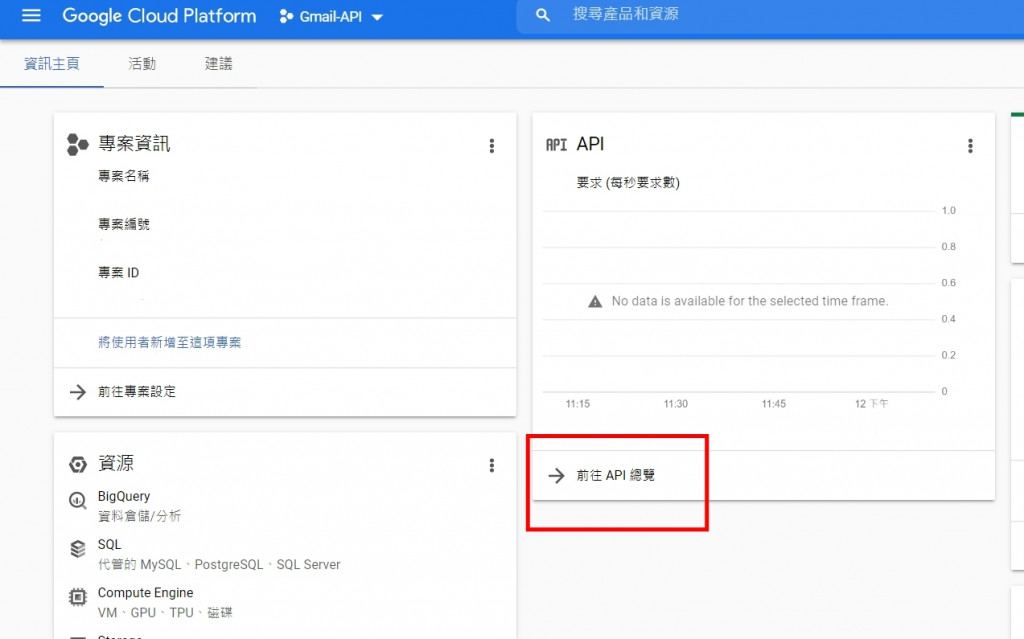
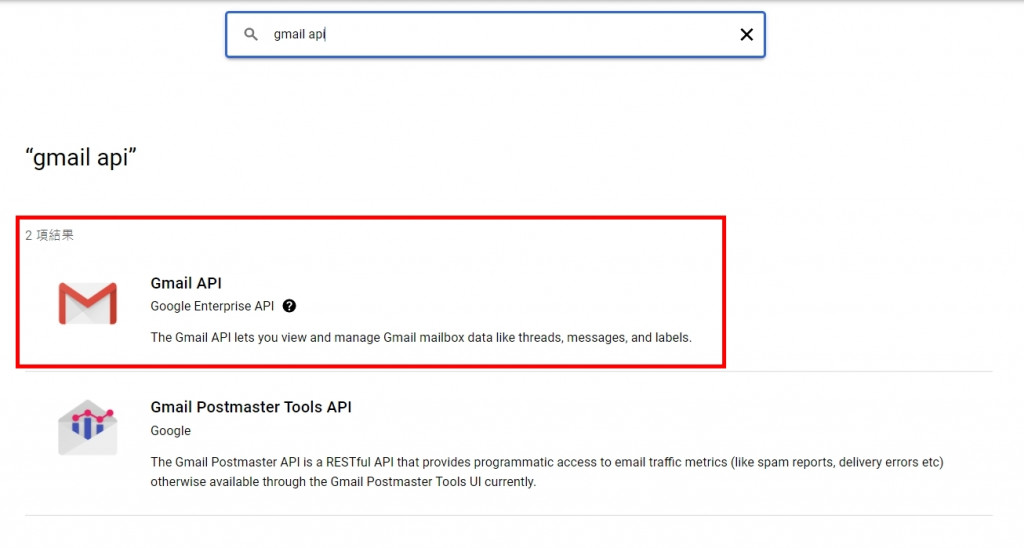
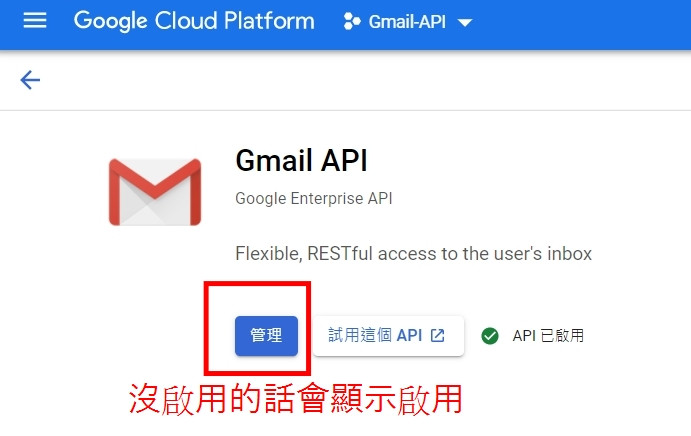
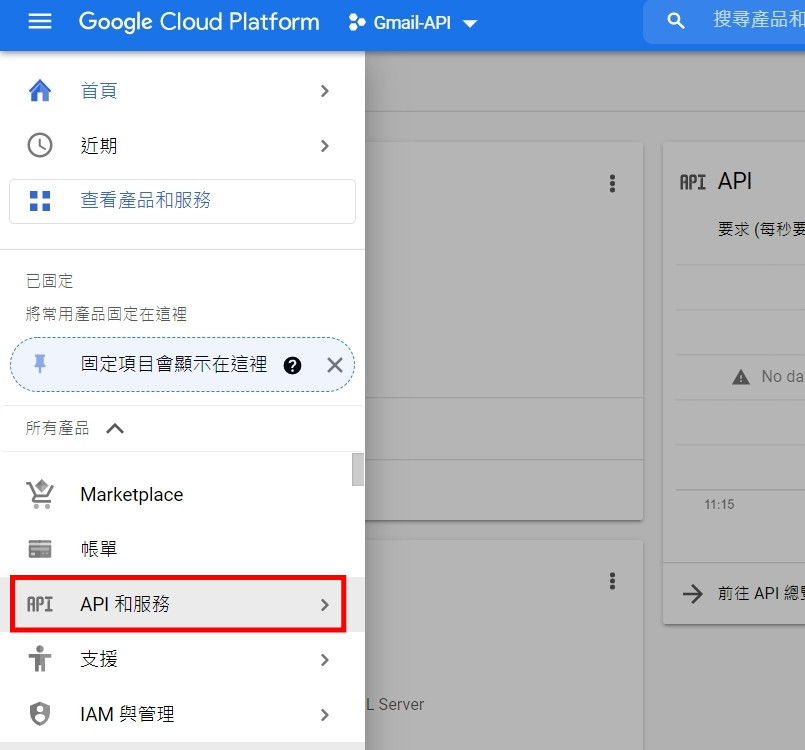
首先,要使用和 google 各項服務相關的話必須到 Google_Cloud_Platform 建立帳戶以及專案
,才可以取得各項服務相關的 API

(一)、Google Cloud Platform (GCP)

前往 這個網址 並登入 GCP

(二)、建立一個專案並啟用 API

  1. 點選上方專案部分,可以建立 or 選擇一個專案
    https://ithelp.ithome.com.tw/upload/images/20211128/20144024X5rL8lrlNy.jpg
  2. 進入專案後,點選 "前往 API 總覽" 並點選 啟用 API 和服務
    https://ithelp.ithome.com.tw/upload/images/20211128/20144024wpiNo13Q8T.jpg
    https://ithelp.ithome.com.tw/upload/images/20211128/201440243M8ex5Pxu3.jpg
  3. 之後會進入到一個搜尋頁面,搜尋 gmail api 點選進入後選擇啟用
    https://ithelp.ithome.com.tw/upload/images/20211128/20144024RkLsdZCC7u.jpg
    https://ithelp.ithome.com.tw/upload/images/20211128/20144024kQbaY60Zuh.jpg

(三)、取得憑證和 credentials.json

  1. 回到主頁並選取左上方的三條線,並選擇 "API 和服務"
    https://ithelp.ithome.com.tw/upload/images/20211128/20144024Js9zSRT5K3.jpg
  2. 進入後選擇憑證
    https://ithelp.ithome.com.tw/upload/images/20211128/20144024DiOztDjjqC.jpg
  3. 點選上方的建立憑證,並依序建立 "API 金鑰" 以及 "OAuth 2.0 用戶端 ID"
    https://ithelp.ithome.com.tw/upload/images/20211128/20144024cD7erXyCIG.jpg
  4. 點選 "OAuth 2.0 用戶端 ID" "動作" 欄位下方的下載按鈕,會挑出一個彈跳視窗,接著點選 下載 JSON
    https://ithelp.ithome.com.tw/upload/images/20211128/20144024zqHJOKB1pF.jpg
    https://ithelp.ithome.com.tw/upload/images/20211128/20144024AvomgR0DdV.jpg
  5. 將下載下來的檔案命名為 credentials.json,留著備用

二、取得 token.json

以下操作皆於 pycharm 底下進行,事前需要先建立一個空專案
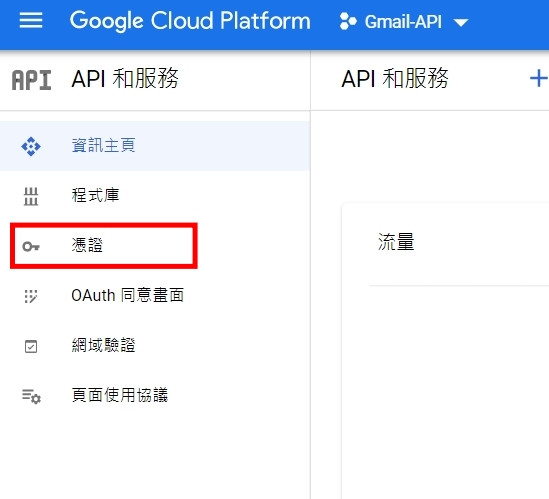
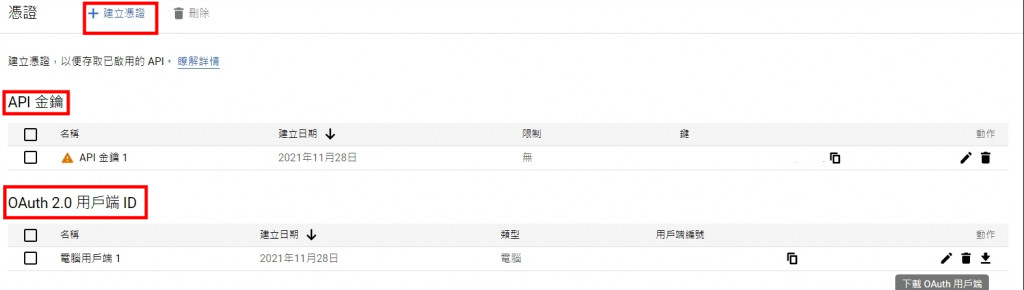
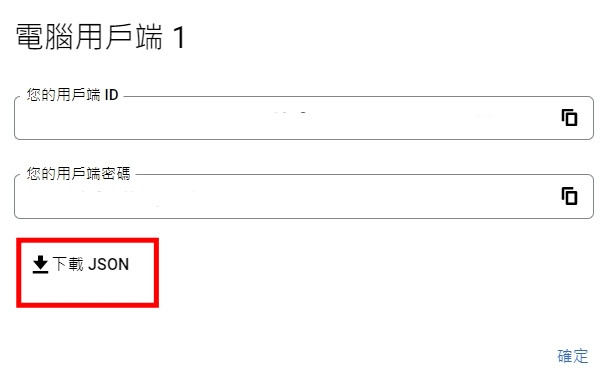
(一)、安裝必要套件

根據 官方文件 說明,
我們必須利用下面這個指令安裝必要的套件
pip install --upgrade google-api-python-client google-auth-httplib2 google-auth-oauthlib

(二)、建立 "quickstart.py"

接著在專案目錄底下建立一個名為 "quickstart.py" 的檔案,並將下面的程式碼複製貼上

from __future__ import print_function
import os.path
from googleapiclient.discovery import build
from google_auth_oauthlib.flow import InstalledAppFlow
from google.auth.transport.requests import Request
from google.oauth2.credentials import Credentials

# If modifying these scopes, delete the file token.json.
SCOPES = ['https://www.googleapis.com/auth/gmail.readonly']

def main():
    """Shows basic usage of the Gmail API.
    Lists the user's Gmail labels.
    """
    creds = None
    # The file token.json stores the user's access and refresh tokens, and is
    # created automatically when the authorization flow completes for the first
    # time.
    if os.path.exists('token.json'):
        creds = Credentials.from_authorized_user_file('token.json', SCOPES)
    # If there are no (valid) credentials available, let the user log in.
    if not creds or not creds.valid:
        if creds and creds.expired and creds.refresh_token:
            creds.refresh(Request())
        else:
            flow = InstalledAppFlow.from_client_secrets_file(
                'credentials.json', SCOPES)
            creds = flow.run_local_server(port=0)
        # Save the credentials for the next run
        with open('token.json', 'w') as token:
            token.write(creds.to_json())

    service = build('gmail', 'v1', credentials=creds)

    # Call the Gmail API
    results = service.users().labels().list(userId='me').execute()
    labels = results.get('labels', [])

    if not labels:
        print('No labels found.')
    else:
        print('Labels:')
        for label in labels:
            print(label['name'])

if __name__ == '__main__':
    main()

(三)、修改 SCOPES

由於一些權限問題,會造成 mail 無法寄送,因此我們需要替換下面這行程式碼

  • before:
    SCOPES = ['https://www.googleapis.com/auth/gmail.readonly']
  • after:
    SCOPES = ['https://mail.google.com/']

(四)、移動 credentials.json

接著將剛剛備用的 credentials.json 檔案移動到專案資料夾底下
https://ithelp.ithome.com.tw/upload/images/20211128/20144024CBSbBhbH0H.jpg

(五)、執行 quickstart.py

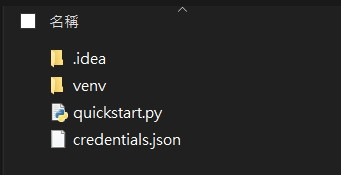
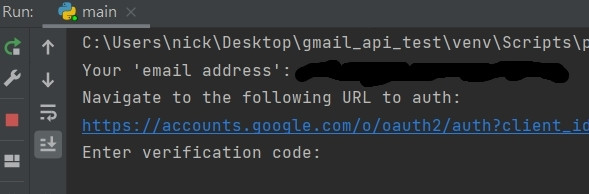
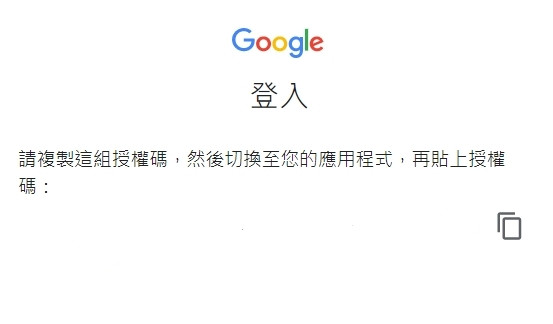
接著執行 "quickstart.py" 會自動跳出瀏覽器視窗要你選擇 or 登入帳號
https://ithelp.ithome.com.tw/upload/images/20211128/20144024gfhoFz3ODy.jpg
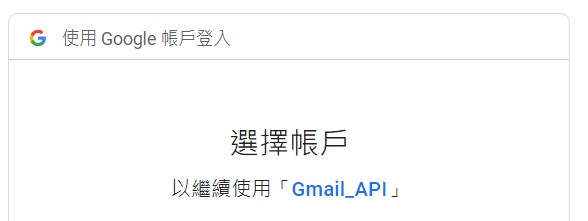
接著按照流程點選繼續 -> 繼續,全部結束後會跳出文字題是可以關閉視窗
https://ithelp.ithome.com.tw/upload/images/20211128/20144024Fm68ktJYAZ.jpg
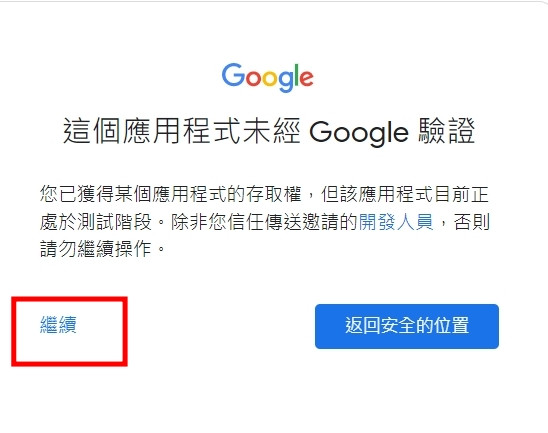
回到專案資料夾內你會發現專案資料夾內多了一個 "token.json" 的檔案
https://ithelp.ithome.com.tw/upload/images/20211128/20144024UaHR2McrvW.jpg
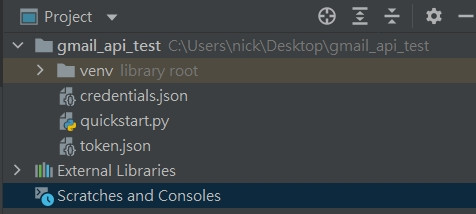
到這邊為止所有的設定就完成成了,接下來要開始正式寄信了!!

三、利用 yagmail 寄送 email

如果按照官方文件的步驟寄出一封 mail 會需要許多的步驟,筆者這邊找到一個叫 yagmail 的套件
,可以協助我們處理 mail 的寄送

(一)、安裝 yagmail

pip install yagmail[all]

(二)、建立一個新的 python 檔案

建立一個新的 python 檔案,並將以下程式碼複製進去

import yagmail

file = ['runtime.txt', 'debug.log']  # 傳送多個檔案 以list型態
yag = yagmail.SMTP("xxx@gmail.com", oauth2_file="credentials.json")
yag.send(
    to="xxxx@gmail.com", 
    subject="subject",
    contents="contents",
    attachments=file
)
  • 解釋:
  1. file 的部分取決於有沒有要傳送檔案,如果只有一個,則直接指定檔案路徑,若有多個,可以用 list 包起來
  2. yagmail.SMTP,第一個參數為 mail 的撰寫者, oauth2_file 則是前面有提到過的 credentials.json 檔案
  3. yag.send(),to 參數為 mail 的收件者,同樣如果要指定多個收件者,可使用 list 包起來
  4. 其他三個參數分別為,主旨、內容、附件

(三)、寄送 email

將上面的檔案編輯好後,就可以執行該檔案來實際寄送 email 了,如果是第一次寄送會需要進行下面的步驟

  1. terminal 會提示你輸入你的 email
    https://ithelp.ithome.com.tw/upload/images/20211128/20144024CJIAgJrVDW.jpg
  2. 輸入之後會秀出一段網址,請點擊該網址並選擇 or 登入帳戶,並依序案兩次繼續
    https://ithelp.ithome.com.tw/upload/images/20211128/20144024bL851W9dJe.jpg
  3. 取得驗證碼,並複製
    https://ithelp.ithome.com.tw/upload/images/20211128/201440243NegtcuOLI.jpg
  4. 回到 terminal 中貼上驗證碼在 "Enter verification code" 的後面並 Enter
  5. 寄信成功
    備註: 目前測試下來是每個專案只需要進行上述步驟一次,後續都不需要再進行

四、參考資源

  1. Gmail API 官方文件
  2. yagmail 教學文章
  3. yagmail 套件

圖片
  直播研討會
圖片
{{ item.channelVendor }} {{ item.webinarstarted }} |
{{ formatDate(item.duration) }}
直播中

1 則留言

0
火爆浪子
iT邦研究生 1 級 ‧ 2022-05-14 21:35:52

感謝分享
請問有PHPMAILER的方式嗎?

如果你是指有沒有 PHP 版本的話,看 官方文件 上寫是有的,只是說 yagmail 這個套件是 python 使用的就是了 php 有沒有類似包好的套件就不清楚了

我要留言

立即登入留言