因為接下來是連假,下班之後要回老家,所以今天就比較早發文章~
昨天已經把前置作業做完了,接下來我們來解讀一下範例,搞不好沒有想像中的那麼難~
首先我們將專案打開,這裡用一個小技巧,快速打開編輯器
透過code 指令來打開VsCode code official-demo
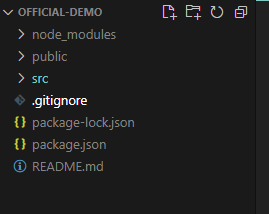
接下來我們來看一下專案結構
Demo 底下有三個主要的資料夾,分別是node_modules、public 以及 src
node_modules 基本上就是存放 Node 的模組
public 就是常見的專案結構,公開的圖片檔、html檔
src 存放的是存取資源,這裡可以看到Js檔、CSS檔。
看完之後我們終於要進入正題了,我個人的理解習慣會先從最簡單的開始,所以我們先來解讀一下Html檔不是png檔最簡單嘛?
<!DOCTYPE html>
<html lang="en">
  <head>
    <meta charset="utf-8" />
    <link rel="icon" href="%PUBLIC_URL%/favicon.ico" />
    <meta name="viewport" content="width=device-width, initial-scale=1" />
    <meta name="theme-color" content="#000000" />
    <meta
      name="description"
      content="Web site created using create-react-app"
    />
    <link rel="apple-touch-icon" href="%PUBLIC_URL%/logo192.png" />
    <!--
      manifest.json provides metadata used when your web app is installed on a
      user's mobile device or desktop. See https://developers.google.com/web/fundamentals/web-app-manifest/
    -->
    <link rel="manifest" href="%PUBLIC_URL%/manifest.json" />
    <!--
      Notice the use of %PUBLIC_URL% in the tags above.
      It will be replaced with the URL of the `public` folder during the build.
      Only files inside the `public` folder can be referenced from the HTML.
      Unlike "/favicon.ico" or "favicon.ico", "%PUBLIC_URL%/favicon.ico" will
      work correctly both with client-side routing and a non-root public URL.
      Learn how to configure a non-root public URL by running `npm run build`.
    -->
    <title>React App</title>
  </head>
  <body>
    <noscript>You need to enable JavaScript to run this app.</noscript>
    <div id="root"></div>
    <!--
      This HTML file is a template.
      If you open it directly in the browser, you will see an empty page.
      You can add webfonts, meta tags, or analytics to this file.
      The build step will place the bundled scripts into the <body> tag.
      To begin the development, run `npm start` or `yarn start`.
      To create a production bundle, use `npm run build` or `yarn build`.
    -->
  </body>
</html>
落落長的看起來沒啥重點XD,但這裡其實有一個重點,就是body 中一個id是root的DOM
大膽假設,小心求證;我們先假設這個Dom就是我們看到的畫面核心之一。
至於如何求證?我們就偷偷把它註解掉
然後就發現localhost:3000一片空白XD
由此可知,React還是一樣會操作DOM,那我們接下來就解讀看看它是如何操作的
我們繼續解讀一下html的地方,發現他好像沒有引入JS檔案
但我們可以從已知的目標中得知,我們一定要找到至少一個JS檔,不然畫面不可能憑空出現
我們到src找找看,有一個叫做index.js的檔案很可疑,基本上範例都是這樣叫XD
我們點開index.js後可以發現一個重點:
const root = ReactDOM.createRoot(document.getElementById('root'));
就是它了,合理的解讀:React也是透過selector的方式來取得網頁的element
然後把取得的element放到變數之後去render畫面
render的內容是丟一個App的元件到畫面上,接著往上找可以看到
import App from './App';
所以元件的內容是在App.js的這個檔案做出來的,我們要保持著好奇的精神繼續往上翻
import logo from './logo.svg';
import './App.css';
function App() {
  return (
    <div className="App">
      <header className="App-header">
        <img src={logo} className="App-logo" alt="logo" />
        <p>
          Edit <code>src/App.js</code> and save to reload.
        </p>
        <a
          className="App-link"
          href="https://reactjs.org"
          target="_blank"
          rel="noopener noreferrer"
        >
          Learn React
        </a>
      </header>
    </div>
  );
}
export default App;
好的就是它了XD,我們把 p tag中的文字換掉來看看結果
Edit <code>src/App.js</code> and save to reload. => 這是我的第一個React

這裡我想補充"稍微"一點:
如果對於(純)網頁還算熟悉的話,應該會發現在App.js的範例之中,當需要寫css class的時候都會改寫成className。
原因是class 在 JavaScript 之中有特別的含意,class 是 ECMAScript 在2015年提出的Syntax Sugar
主要目的是為了取代複雜的property inheritance。
那什麼是property inheritance ? 我們目前只需要知道大概:
在過去JavaScript在 繼承建構式(construct)的時候
因為function的繼承要借助prototype這個物件來達到目的,導致程式碼變得沒有那麼美麗。
所以就衍伸出了class 這個語法糖。我們只要知道class在js之中被拿去用了,所以在這裡不能寫class要改成className
(再寫下去就變成JS文章分享了)
今天官方範例就到這邊,看了好多有關react的文章,頭好混亂QQ
