今天要來嘗試看看,過去在開發的時候會使用到的前端套件。
其實 如果是寫純前端(HTML 5 + CSS + JavaScript),而沒有使用其他框架的話,前端套件的使用蠻直觀的;只要 在標頭的地方引入然後前端code的地方依照套件的規則寫就好了。
我並不想要自己刻套件出來,考量的點大致上如下:
1.自認沒有美感,也不是「真.前端工程師」,所以寫出來一定難看
2.前端功力沒有很強,因此擔心畫面常發生難以預料的情形
其實前陣子有看到一篇文章在講述關於前端工程師要用套件還是要自己刻,但我現在找不到連結了QQ
所以我這邊只能稍微講一下自己的看法以及我個人考量的點:
1.考量專案的緊急程度:要是專案的開發時程短,整體時間上非常緊湊,我認為能用套件就用套件吧
2.考量需求的複雜度:如果評估以自身能力寫一個前端需求(且要自我要求複用性),需要佔一大部分的開發時程,那就要好好考慮是不是真的有必要自己刻。
3.考量目標套件的生命週期:使用套件沒有一定的好與壞,但是使用套件之前要好好評估一下這個套件的更新頻率、社群甚至是稍微瀏覽一下原始碼,避免成為套件孤兒或有天大的bug這種窘境。
前端其實有許多長期維護,且很多人使用的套件,我認為這種活躍、有持續更新以及有一定的使用者的套件可以放心使用,要是真的有問題,出事的也不會只有寥寥幾人(要死大家一起死的概念)
Swiper 顧名思義就是 滑動,我們可以到官網來看看他的實際範例,因此我們今天的目標就是借助這個套件的神力來做到滑動的需求。
上面講了那麼多,今天就來嘗試看看Swiper套件,要是很順利 這篇文章就很短,要是很不順利 這篇文章就會很長。
首先,我們先到Swiper React 看看大致上要怎麼使用,以及可能要注意的點,這個套件的範例其實寫得算詳細
一開始來安裝吧!我們把現在正在運行的 npm run dev 停掉,然後透過npm來安裝Swiper套件
npm i swiper
安裝好之後我們到 packeage.json
"dependencies": {
    "swiper": "^8.4.2"
}
看到這個就代表安裝好了。
接下來我們來看看怎麼使用這個套件吧
註冊router的部分我相信各位同學都非常厲害了,我之後就會略過註冊路由的段落
這裡就直接拿官方範例出來用用看:
import react from "react";
import { Swiper, SwiperSlide } from 'swiper/react';
import 'swiper/css';
export default () => {
    return (
        <Swiper
            spaceBetween={50}
            slidesPerView={2}
            onSlideChange={() => console.log('slide change')}
            onSwiper={(swiper) => console.log(swiper)}
            className="flex flex-col justify-center w-6/12"
        >
            <SwiperSlide>Slide 1</SwiperSlide>
            <SwiperSlide>Slide 2</SwiperSlide>
            <SwiperSlide>Slide 3</SwiperSlide>
            <SwiperSlide>Slide 4</SwiperSlide>
        </Swiper>
    );
};
然後再跑一次npm run dev,結果果然沒讓我失望...
error while updating dependencies:
Error: EEXIST: file already exists, rename '專案路徑/node_modules/.vite/deps_temp' -> '專案路徑/node_modules/.vite/deps'
我們照著他的路徑進去會發現有兩隻檔案:deps跟deps_temp,然後在deps_temp裡面有swiper,所以我就把deps改成deps_d(暫時刪除的概念)然後deps_temp改成deps
再重新跑一次 npm run dev ,終於可以了!!
接著到畫面來看一下成果
基本上我們這樣就建立了最基本的Swiper
在沒有用框架的情況下,如果Swiper想要調整一些API,例如:要加入導覽箭頭、頁數...等。
都會把相關的參數寫到物件之中。
無前端框架範例如下:
const swiper = new Swiper('.swiper', {
    // Optional parameters
    direction: 'horizontal',
    allowTouchMove: true,
    loop: false,
    slidesPerView: 2.8,
    spaceBetween: 8,
    // If we need pagination
    pagination: {
        el: '.swiper-pagination',
    },
    // Navigation arrows
    navigation: {
        nextEl: '.swiper-button-next',
        prevEl: '.swiper-button-prev',
    },
    // And if we need scrollbar
    scrollbar: {
        el: '.swiper-scrollbar',
    },
});
但在使用React的情況下,會相對複雜一些(步驟比較多):
首先我們要先把module 從swiper之中引入,還要再引入相關的css檔。
import {Pagination,Navigation,Scrollbar} from "swiper";

import 'swiper/css/pagination';
import 'swiper/css/navigation';
import 'swiper/css/scrollbar';
接下來,我們要在Swiper Component之中加入 module:
modules={[Pagination , Navigation , Scrollbar]}
告訴 Swiper 這個會用到多少module
最後,要代入其他參數設定,最後Swiper會變成這樣:
<Swiper
    modules={[Pagination,Navigation,Scrollbar]}  // 引入module
    spaceBetween={50} //Slide之間的距離
    slidesPerView={2}  //一頁顯示幾個slide
    navigation //左右箭頭導航
    pagination={{ clickable: true }}  //頁數
    scrollbar={{ draggable: true }} //滾動條
    onSlideChange={() => console.log('slide change')}
    onSwiper={(swiper) => console.log(swiper)}
    className="flex flex-col justify-center w-6/12"
>
    <SwiperSlide>Slide 1</SwiperSlide>
    <SwiperSlide>Slide 2</SwiperSlide>
    <SwiperSlide>Slide 3</SwiperSlide>
    <SwiperSlide>Slide 4</SwiperSlide>
</Swiper>
踩坑時間:官網範例有多放一個Ally的module
import { Navigation, Pagination, Scrollbar, A11y } from 'swiper';
 <Swiper
      modules={[Navigation, Pagination, Scrollbar, A11y]}
      spaceBetween={50}
      slidesPerView={3}
      navigation
      pagination={{ clickable: true }}
      scrollbar={{ draggable: true }}
      onSwiper={(swiper) => console.log(swiper)}
      onSlideChange={() => console.log('slide change')}
    >
如果有看到以下error:
Uncaught TypeError: Failed to execute appendChild on Node: parameter 1 is not of type Node
把Ally徹底拔掉即可。
官網寫說Ally是Accessibility module,然後實際用途我不太確定
這裡有寫好的範例可以直接copy
因為我發現篇幅稍微短,我就再加個SweetAlert套件~
SweetAlert其實就是比較好看的Alert
一樣的安裝起手式,我們要先把SweetAlert 安裝起來
我原本是打算裝這個,但我後來發現他的發表是6個月前,而且都沒有更新。
回到官網找看了一下,發現官網是放這個。我也不知道啥情況,所以我跟著官網的實作看看
npm install --save sweetalert2 sweetalert2-react-content
然後就噴錯:
npm ERR! code ERESOLVE
npm ERR! ERESOLVE unable to resolve dependency tree
npm ERR!
npm ERR! While resolving: undefined@undefined
npm ERR! Found: react@17.0.2
npm ERR! node_modules/react
npm ERR!   dev react@"^17.0.2" from the root project
npm ERR!
npm ERR! Could not resolve dependency:
npm ERR! peer react@"^18.0.0" from sweetalert2-react-content@5.0.3
npm ERR! node_modules/sweetalert2-react-content
npm ERR!   sweetalert2-react-content@"*" from the root project
npm ERR!
npm ERR! Fix the upstream dependency conflict, or retry
npm ERR! this command with --force, or --legacy-peer-deps
npm ERR! to accept an incorrect (and potentially broken) dependency resolution.
npm ERR!
npm ERR! See /root/.npm/eresolve-report.txt for a full report.
npm ERR! A complete log of this run can be found in:
npm ERR!     /root/.npm/_logs/2022-09-27T04_03_33_558Z-debug-0.log
我改成只安裝sweetalert2看看:npm i sweetlaert2
這時候我們的dependencies變成這樣了
"dependencies": {
    "react-sweetalert2": "^0.5.2",
    "swiper": "^8.4.2",
    "vite": "^3.1.3"
}
上面的問題應該是React的版本造成的問題(sweetalert2-react-content 應該要React 18 以上)
但我這裡還是先強制安裝試試看:npm i sweetalert2-react-content --legacy-peer-deps
然後一樣把官網的範例放到我們的server上面運行看看
import react, { useState } from 'react';
import Swal from 'sweetalert2'
import withReactContent from 'sweetalert2-react-content'
export default function Alert(){
    const MySwal = withReactContent(Swal)
    return (
        <div>
            <button onClick={() => {
                MySwal.fire({
                    title: <p>Hello World</p>,
                    didOpen: () => {
                        // `MySwal` is a subclass of `Swal` with all the same instance & static methods
                        MySwal.showLoading()
                    },
                }).then(() => {
                    return MySwal.fire(<p>Shorthand works too</p>)
                })
            }}>
                Open
            </button>
        </div>
    );
}
執行之後發生問題: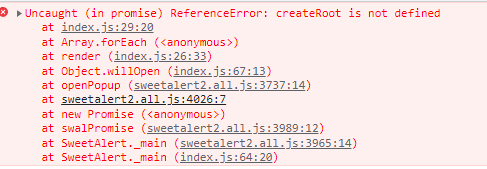
原來是因為改過寫法,所以最新的只支援React 18(用 Day 4 講到的createRoot寫法)
為了有追根究柢的精神,我到他發布的 git repository 去翻版本,發現是v5版本以上才是用createRoot寫法
所以我就改成下載 v4.2.0 版本的sweetAlert(npm)
我直接改package.json的版本,然後跑一次 npm install
然後用一樣的程式碼來測試,直接跑npm run dev
God Damn!!! 我終於成功了
明天把今天學到的套件拿來應用在前面做的專案之中~
那我們明天見啦!!
感謝教學 :)
想跟你推薦另外一套 react 輪播,叫做 "bear-react-carousel",可以嘗試看看
看了一下官網,是很有特色的套件,之後的專案我會嘗試看看,謝謝你的推薦!