今天來講一個比將簡單的UI,這兩個的都是可以根據元件跳出視窗訊息的工具,通常在補述功能或提示時會使用到。
<?xml version="1.0" encoding="utf-8"?>
<LinearLayout xmlns:android="http://schemas.android.com/apk/res/android"
android:layout_width="wrap_content"
android:layout_height="wrap_content"
android:background="@drawable/ic_pop_bg"
android:orientation="vertical">
<TextView
android:id="@+id/textView"
android:layout_width="wrap_content"
android:layout_height="wrap_content"
android:ems="7"
android:textColor="@color/black"
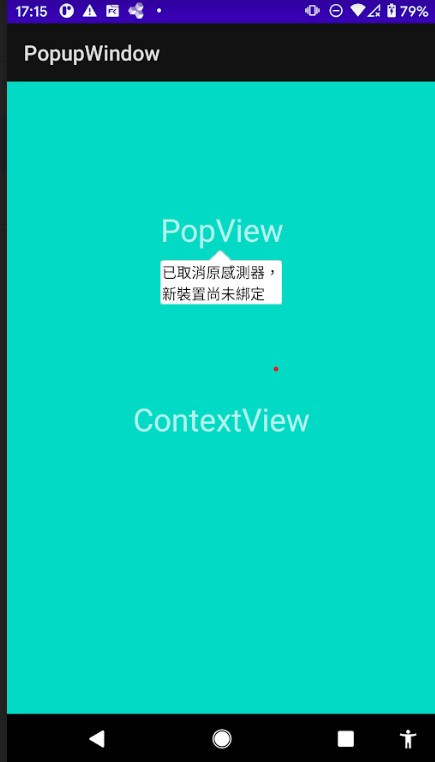
android:text="已取消原感測器,新裝置尚未綁定" />
</LinearLayout>
private void initPopupWindow(View v) {
        //渲染第一步的View
       View view = LayoutInflater.from(mContext).inflate(R.layout.popupwindow_layout,null,false);
       //new PopupWindow 物件,並設置大小
       final PopupWindow popWindow = new PopupWindow(view,
                ViewGroup.LayoutParams.WRAP_CONTENT, ViewGroup.LayoutParams.WRAP_CONTENT, true);
       //設置背景顏色
//     popWindow.setBackgroundDrawable(newColorDrawable(getResources().getColor(R.color.gray)));
       //設置彈跳動畫
       popWindow.setAnimationStyle(R.anim.anim_pop);
       //設置彈出位置
//       popWindow.showAtLocation(v, Gravity.NO_GRAVITY,0,0);
       //設置彈出位置位於指定View下方
       popWindow.showAsDropDown(v,0,0);
    }
顯示的位置有兩種方式:
1.showAtLocation
根據屏幕去設Gravity,有多種如Gravity.NO_GRAVITY、Gravity.TOP、Gravity.BOTTOM等。
2.showAsDropDown
直接指定彈出位置位於指定View下方,可透過偏移量微調。
位置的參數可以自己調適看看效果,分別代表x、y軸的偏移量,如popWindow.showAsDropDown(v,30,30);
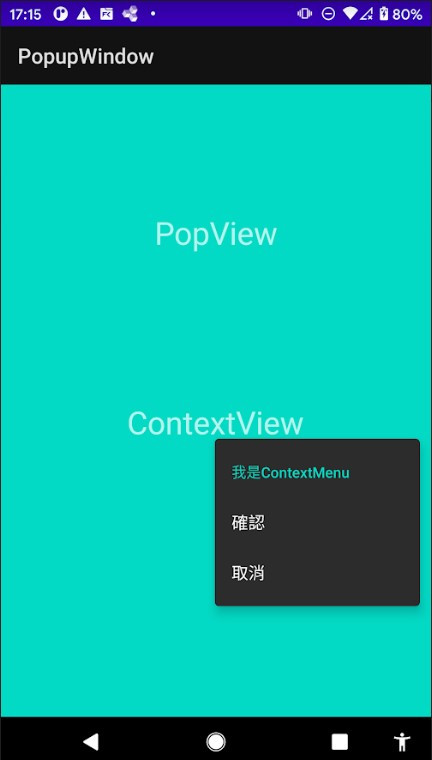
建立方法與onCreateOptionsMenu上的相似,如下。
<?xml version="1.0" encoding="utf-8"?>
<menu xmlns:android="http://schemas.android.com/apk/res/android">
    <item
        android:id="@+id/confirm"
        android:title="確認" />
    <item
        android:id="@+id/cancel"
        android:title="取消"/>
</menu>
@Override
    public void onCreateContextMenu(ContextMenu menu, View v, ContextMenu.ContextMenuInfo menuInfo) {
        MenuInflater inflater = new MenuInflater(this);
        //將menu渲染
        inflater.inflate(R.menu.cont_view,menu);
        if (menu != null){
            //設定標題
            menu.setHeaderTitle("我是ContextMenu");
        }
        super.onCreateContextMenu(menu, v, menuInfo);
    }
    @Override
    public boolean onContextItemSelected(@NonNull MenuItem item) {
        switch (item.getItemId()){
            case R.id.confirm:
                Toast.makeText(this,"確認",Toast.LENGTH_SHORT).show();
                break;
            case R.id.cancel:
                Toast.makeText(this,"取消",Toast.LENGTH_SHORT).show();
                break;
        }
        return super.onContextItemSelected(item);
    }


 iThome鐵人賽