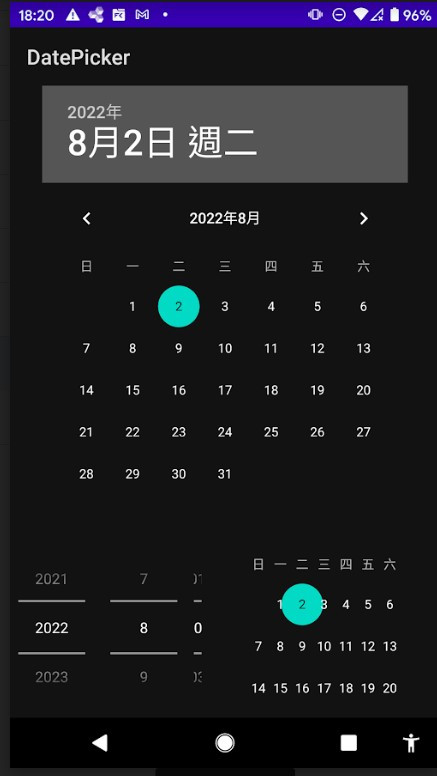
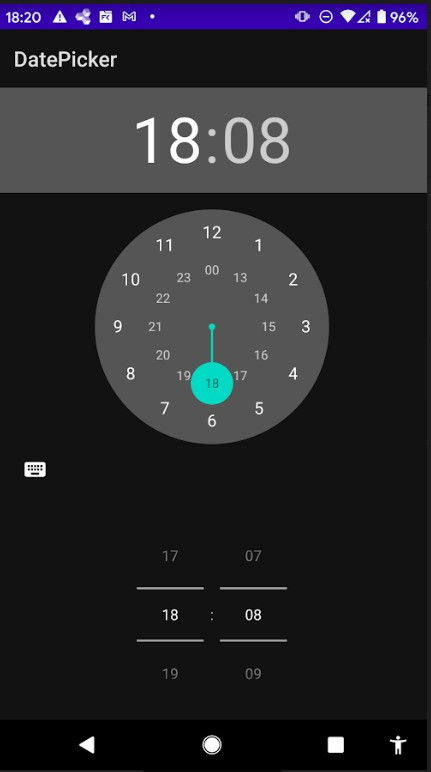
今天來講關於時間的選擇工具,App常會需要紀錄時間日期,所以接下來介紹的工具之後將會很常見,也有很多種套件和做法,而我將講解最陽春基本的,讓各位能先認識,之後的就靠各位研究拉~
日期選擇器,能夠選擇年、月、日。
<?xml version="1.0" encoding="utf-8"?>
<androidx.constraintlayout.widget.ConstraintLayout xmlns:android="http://schemas.android.com/apk/res/android"
    xmlns:app="http://schemas.android.com/apk/res-auto"
    xmlns:tools="http://schemas.android.com/tools"
    android:layout_width="match_parent"
    android:layout_height="match_parent"
    tools:context=".DatePickerActivity">

    <LinearLayout
        android:layout_width="match_parent"
        android:layout_height="match_parent"
        android:orientation="vertical"
        android:gravity="center_horizontal"
        app:layout_constraintBottom_toBottomOf="parent"
        app:layout_constraintEnd_toEndOf="parent"
        app:layout_constraintStart_toStartOf="parent"
        app:layout_constraintTop_toTopOf="parent">

        <DatePicker
            android:id="@+id/datePicker_calender"
            android:layout_width="wrap_content"
            android:layout_height="wrap_content"
            android:datePickerMode="calendar" />

        <DatePicker
            android:id="@+id/datePicker_spinner"
            android:layout_width="match_parent"
            android:layout_height="wrap_content"
            android:datePickerMode="spinner" />
    </LinearLayout>

</androidx.constraintlayout.widget.ConstraintLayout>
其中**android:datePickerMode=""**有分為spinner和calendar(預設)兩種樣式,可以根據自己的需求和喜好選擇自己喜歡的樣式。
private DatePicker datePicker_calender,datePicker_spinner;
    @Override
    protected void onCreate(Bundle savedInstanceState) {
        super.onCreate(savedInstanceState);
        setContentView(R.layout.activity_date_picker);

        datePicker_calender = findViewById(R.id.datePicker_calender);
        datePicker_spinner = findViewById(R.id.datePicker_spinner);

        if (Build.VERSION.SDK_INT >= Build.VERSION_CODES.O) {
            datePicker_calender.setOnDateChangedListener(
                new DatePicker.OnDateChangedListener() {
                    @Override
                    public void onDateChanged(DatePicker datePicker,
                                  int i, int monthOfYear, int dayOfMonth) {
                        Log.e("TAG", monthOfYear+"/"+dayOfMonth );
                    }
                });
        }

        if (Build.VERSION.SDK_INT >= Build.VERSION_CODES.O) {
            datePicker_spinner.setOnDateChangedListener(
                new DatePicker.OnDateChangedListener() {
                    @Override
                    public void onDateChanged(DatePicker datePicker,
                                  int i, int monthOfYear, int dayOfMonth) {
                        Log.e("TAG", monthOfYear+"/"+dayOfMonth );
                    }
                });
        }
    }
這樣很簡單的獲取選擇的年、月、日,不過要注意的是取出來的月分為0~11,所以對應到正確的月份記得+1喔!!
時間選擇器,能夠選擇分時。
<?xml version="1.0" encoding="utf-8"?>
<androidx.constraintlayout.widget.ConstraintLayout xmlns:android="http://schemas.android.com/apk/res/android"
    xmlns:app="http://schemas.android.com/apk/res-auto"
    xmlns:tools="http://schemas.android.com/tools"
    android:layout_width="match_parent"
    android:layout_height="match_parent"
    tools:context=".TimePickerActivity">

    <LinearLayout
        android:layout_width="match_parent"
        android:layout_height="match_parent"
        android:orientation="vertical"
        app:layout_constraintBottom_toBottomOf="parent"
        app:layout_constraintEnd_toEndOf="parent"
        app:layout_constraintStart_toStartOf="parent"
        app:layout_constraintTop_toTopOf="parent">

        <TimePicker
            android:id="@+id/clock_timepicker"
            android:layout_width="match_parent"
            android:layout_height="0dp"
            android:layout_weight="2" />

        <TimePicker
            android:id="@+id/spinner_timepicker"
            android:layout_width="match_parent"
            android:layout_height="0dp"
            android:layout_weight="1"
            android:timePickerMode="spinner"/>
    </LinearLayout>

</androidx.constraintlayout.widget.ConstraintLayout>
其中**android:timePickerMode=""**有分為spinner和clock(預設)兩種樣式,可以根據自己的需求和喜好選擇自己喜歡的樣式。
2. 實例化,並取得時間選擇器的時間
private TimePicker clock_timepicker,spinner_timepicker;
    @Override
    protected void onCreate(Bundle savedInstanceState) {
        super.onCreate(savedInstanceState);
        setContentView(R.layout.activity_time_picker);

        clock_timepicker = findViewById(R.id.clock_timepicker);
        spinner_timepicker = findViewById(R.id.spinner_timepicker);

        //設定24小時制
        spinner_timepicker.setIs24HourView(true);
        clock_timepicker.setIs24HourView(true);
        //時鐘樣式
        clock_timepicker.setOnTimeChangedListener(new TimePicker.OnTimeChangedListener() {
            @Override
            public void onTimeChanged(TimePicker timePicker, int hour, int minute) {
                Log.e("TAG", hour+":"+minute);
            }
        });
        //Spinner樣式
        spinner_timepicker.setOnTimeChangedListener(new TimePicker.OnTimeChangedListener() {
            @Override
            public void onTimeChanged(TimePicker timePicker, int hour, int minute) {
                Log.e("TAG", hour+":"+minute);
            }
        });
    }
這樣就能夠獲取選擇得時、分,以上就是最簡單基本的時間選擇。


通常這兩個工具很常會配合Dialog,可以看看我去年的初學30篇文章中的AlertDialog,想想怎麼結合順便練習看看吧。
其實網上還有許多大神提供的套件,可以去延伸閱讀,包括這兩個選擇器的結合等。
今天的介紹就到這邊了,希望有幫助到各位~
