目標:
1.建立文章的View檔案
2.常見的Asp.net core mvc 後端傳值到前端的方法
(會先題的原因是,之後會常用到前後端傳值,所以先講這部分)
步驟:
step1.在CreateArticle 上面右鍵新增檢視 ->打上檔名CreateArticle ->就會在Views/Article 新增好檔案了。
(滑鼠右鍵,點在紅色框框處)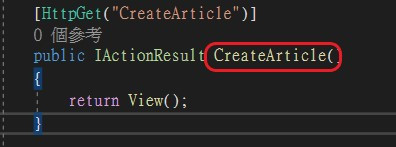
step2. 貼上前端 CreateArticle.cshtml的程式碼,這邊要注意Action名稱要跟新增的View名稱相同。
@section Styles {
<style>
    .ck-editor__editable {
        min-height: 500px;
    }
</style>
}

<form asp-controller="Article" asp-action="CreateArticle" method="post">
    <div class="form-group" style="width:700px;margin-right:auto;margin-left:auto;">

        <textarea name="Content" class="form-control" id="editor" rows="50"></textarea>

    </div>
    <button type="submit">Send</button>
</form>

    @section Scripts {

<script src="~/ckeditor7/build/ckeditor.js"></script>
<script>
    // ckEdit 5
    ClassicEditor
        .create(document.querySelector('#editor'), {
            removePlugins: [ 'ImageResize' ,'ImageStyle' ,'ImageToolbar' ],
            ckfinder: {
                uploadUrl: '/Article/Uploads'
            }
        })
        .catch(error => {
            console.error(error);
        });
</script>
}
Asp.net core mvc 後端傳值到前端的方法
其實有很多方式,這邊只講我常用的三種。
1.ViewBag 不可跨Action 傳送
2.TempData 可以跨Action 傳送
3.強型別model 的傳送 (也就是如下圖這樣的寫法)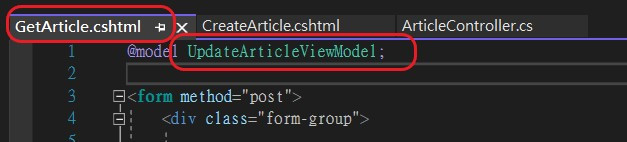
(@model 就是綁定一個物件,這就是強型別的用法)