今天我們簡單的來看我們專案架構以及flutter架構

我們能看到flutter透過他的引擎,在每一個平台上,包含一個特定的嵌入層,來提供一個入口,並且程序可藉由此入口與底層系統進行協調溝通,並且管理事件循環隊列。並且將底層包裝成Dart,並用dart:ui暴露給Flutter framework。
引擎將負責對需要合成的場景進行柵格化,提供Flutter核心API的底層實現,包括圖形(通過 Skia)、文本佈局、文件及網絡 IO、輔助功能支持、插件架構和 Dart 運行環境及編譯環境的工具鏈。
而我們一般都透過Flutter framework與Flutter交互,並且通常在widgets那層進行撰寫。
簡單認識一下架構後,我們開始來看我們創建的專案。

我們打開todo\lib\main.dart:
import 'package:flutter/material.dart';

void main() {
  runApp(const MyApp());
}

class MyApp extends StatelessWidget {
  const MyApp({Key? key}) : super(key: key);

  // This widget is the root of your application.
  @override
  Widget build(BuildContext context) {
    return MaterialApp(
      title: 'Flutter Demo',
      theme: ThemeData(
        primarySwatch: Colors.blue,
      ),
      home: const MyHomePage(title: 'Flutter Demo Home Page'),
    );
  }
}

class MyHomePage extends StatefulWidget {
  const MyHomePage({Key? key, required this.title}) : super(key: key);

  final String title;

  @override
  State<MyHomePage> createState() => _MyHomePageState();
}

class _MyHomePageState extends State<MyHomePage> {
  int _counter = 0;

  void _incrementCounter() {
    setState(() {
      _counter++;
    });
  }

  @override
  Widget build(BuildContext context) {
    return Scaffold(
      appBar: AppBar(
        title: Text(widget.title),
      ),
      body: Center(
        child: Column(
          mainAxisAlignment: MainAxisAlignment.center,
          children: <Widget>[
            const Text(
              'You have pushed the button this many times:',
            ),
            Text(
              '$_counter',
              style: Theme.of(context).textTheme.headline4,
            ),
          ],
        ),
      ),
      floatingActionButton: FloatingActionButton(
        onPressed: _incrementCounter,
        tooltip: 'Increment',
        child: const Icon(Icons.add),
      ),
    );
  }
}
我們能看到flutter透過runApp來啟動我們的應用
void main() {
  runApp(const MyApp());
}
我們能看到他透過widgets層裡面的函式功能,來啟動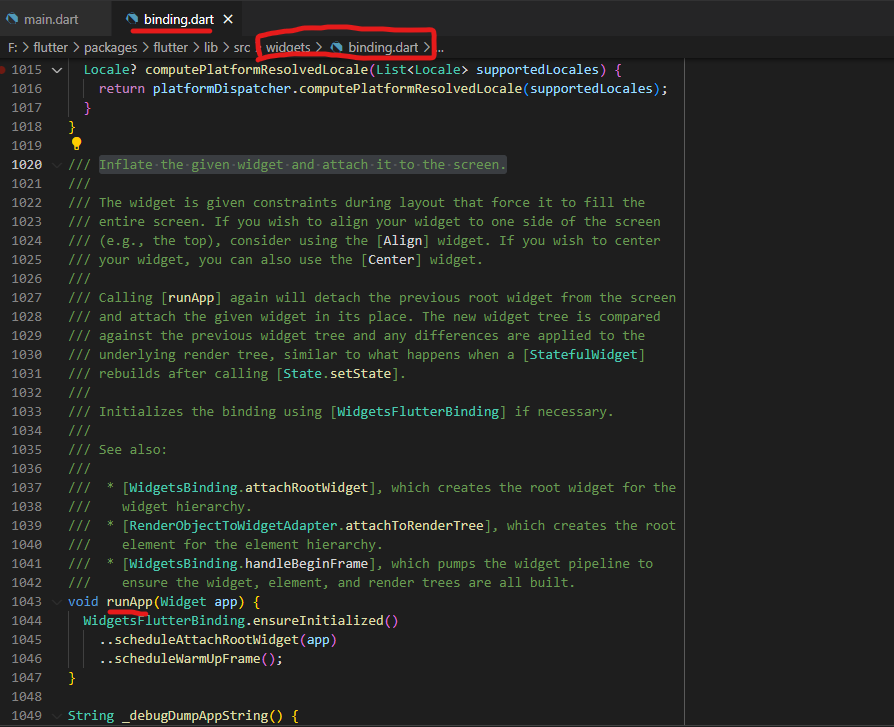
並且透過註解中知道,他會將我們給定的widget繪製並將其附加到屏幕上。
接著我們看到Widget類,我們知道他是由DiagnosticableTree繼承而來

而DiagnosticableTree從註解能得知,它主要用於在除錯時獲取子類的各種屬性和children資訊
A base class for providing string and [DiagnosticsNode] debug representations describing the properties and children of an object.
並且Widget是一個abstract class;並且由@immutable,得知它的各個屬性是不可變的。所以我們寫各種 Widget 時,所寫的各個屬性要加final、late或static又或者是使用?(nullable)的原因,因為widget是不可變的,在渲染最後,一定要確定widget的各個屬性。
(而現在的flutter版本中所使用的dart會預設開啟Sound null safety(也就是沒有特別聲明的話所有的type都是non-nullable的)之前dart會將未特別聲明的變數給預設為null type,而在新版本將Null給獨立出來。所以未特別聲明的話,實例化時值會變成不是確定的,是無法通過靜態檢查)
接著我們看到了createElement() 方法,它交由子類去實現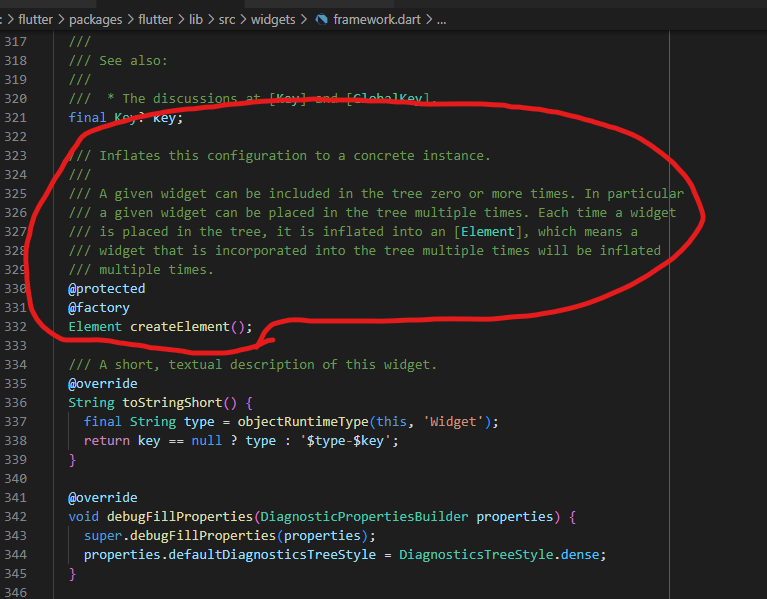
並且從註解中得知他會將config inflate為具體instance
接著看到canUpdate(...),這個方法是來更新們的wiget。如果返回 true 表示可以更新當前Element部件,並用新的widget來更新Element的 widget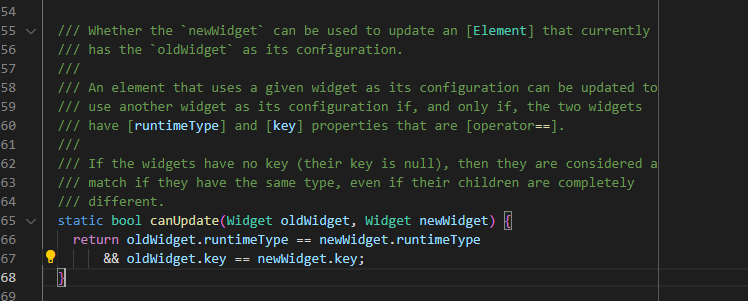
我們今天簡單認識一下了我們flutter專案架構以及他是如何將widget建立起來。明天我們開始簡單介紹一下widget


 iThome鐵人賽