StackBlitz是一個非常方便的線上編輯器,可線上編輯各種主流框架,完成之後也便於在團隊成員中分享,適合用於製作互動式技術文件的範例,或做一些新功能的開發範例。如果本機不想花時間安裝Angular的開發環境,又想操作一下本篇範例,可以考慮申請一個StackBlitz帳號。

簡單介紹基本操作,首先請登入StackBlitz帳號,
官網範例 - 在StackBlitz中產生一個預置的範例專案
產品列表會用到來自products.ts裡的預定義產品資料
export const products = [
  {
    id: 1,
    name: 'Phone XL',
    price: 799,
    description: 'A large phone with one of the best screens'
  },
  {
    id: 2,
    name: 'Phone Mini',
    price: 699,
    description: 'A great phone with one of the best cameras'
  },
  {
    id: 3,
    name: 'Phone Standard',
    price: 299,
    description: ''
  }
];
product-list.component.html使用結構型指令方法。
src/app/product-list/product-list.component.html
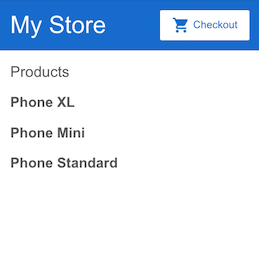
<h2>Products</h2>

<!-- 這裡使用一個 結構型指令 -->
<div *ngFor="let product of products"></div>
Angular插值語法的範例。插值 {{ }}可以讓你把屬性值渲染為文字。
src/app/product-list/product-list.component.html
<h2>Products</h2>

<div *ngFor="let product of products">
    <h3>
        <!-- 每個商品的名稱 -->
        {{ product.name }}
    </h3>
</div>
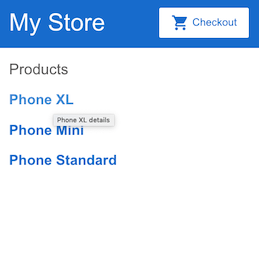
a元素在title屬性上使用屬性繫結([])特性,將滑鼠懸停在產品名稱上,可以檢視所繫結的name屬性值。
src/app/product-list/product-list.component.html
<h3>
    <a [title]="product.name + ' details'">
        {{ product.name }}
    </a>
</h3>
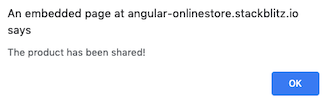
繫結DOM事件,只要把DOM事件的名字包裹在圓括號中,然後用放在引號中的範本語句對它賦值就可以了。
src/app/product-list/product-list.component.ts
export class ProductListComponent {
    products = products;

    share() {
        window.alert('The product has been shared!');
    }
}
src/app/product-list/product-list.component.html
<button type="button" (click)="share()">
    Share
</button>
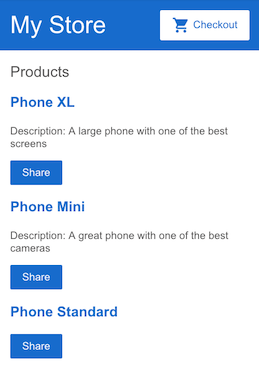
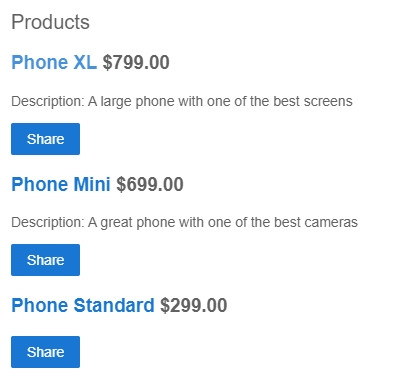
利用管道修改配送元件的範本,以顯示價格。
src/app/product-list/product-list.component.html
<div *ngFor="let product of products">
    <h3>
        <a [title]="product.name + ' details'">
            {{ product.name }}
        </a>

        <!-- currency pipe -->
        <span>{{ product.price | currency }}</span>
    </h3>

    <p *ngIf="product.description">Description: {{ product.description }}</p>

    <div>
        <button type="button" (click)="share()">Share</button>
    </div>
</div>

StackBlitz開一個新的終端ng generate component product-details
or
不產生測試檔
ng generate component product-details --skip-tests=true
關聯URL路徑與元件,在app.module.ts中,新增產品詳情的路由。
src/app/app.module.ts
@NgModule({
  imports: [
    BrowserModule,
    ReactiveFormsModule,

    // 新增路由規則
    RouterModule.forRoot([
      { path: '', component: ProductListComponent },
      { path: 'products/:productId', component: ProductDetailsComponent },
    ])
  ],
  declarations: [
    AppComponent,
    TopBarComponent,
    ProductListComponent,
    ProductAlertsComponent,
    ProductDetailsComponent,
  ],
修改產品名稱上的連結,使其包括以product.id為引數的routerLink。
src/app/product-list/product-list.component.html
<div *ngFor="let product of products">
  <h3>
    <a
      [title]="product.name + ' details'"
      [routerLink]="['/products', product.id]">
      {{ product.name }}
    </a>
  </h3>

  <!-- . . . -->

</div>
Angular建立元件完成後會看到如下畫面,代表product-details元件建立完成。

在ngOnInit()方法中,從路由引數中提取 productId,並在products陣列中找到相應產品。
src/app/product-details/product-details.component.ts
import { Component, OnInit } from "@angular/core";
import { ActivatedRoute } from "@angular/router";
import { Product, products } from "../products";

@Component({
    selector: "app-product-details",
    templateUrl: "./product-details.component.html",
    styleUrls: ["./product-details.component.css"],
})
export class ProductDetailsComponent implements OnInit {
    constructor(private route: ActivatedRoute) {}

    product: Product | undefined;

    ngOnInit(): void {
        // First get the product id from the current route.
        const routeParams = this.route.snapshot.paramMap;
        const productIdFromRoute = Number(routeParams.get("productId"));

        // Find the product that correspond with the id provided in route.
        this.product = products.find((product) => product.id === productIdFromRoute);
    }
}
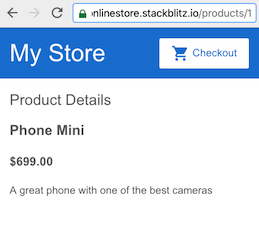
src/app/product-details/product-details.component.html
<h2>Product Details</h2>

<div *ngIf="product">
    <h3>{{ product.name }}</h3>
    <h4>{{ product.price | currency }}</h4>
    <p>{{ product.description }}</p>
</div>
在StackBlitz終端中透過執行以下命令產生一個新的cart服務。
> ng generate service cart --skip-tests=true

CREATE src/app/cart.service.ts (133 bytes)
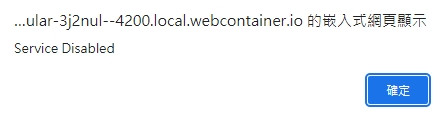
buyItems時顯示Service Disabled。
src/app/cart.service.ts
import { Injectable } from "@angular/core";

@Injectable({
    providedIn: "root",
})
export class CartService {
    constructor() {}

    buyItems() {
        alert("Service Disabled");
    }
}
在top-bar注入服務使用CartService。
src/app/top-bar/top-bar.component.ts
import { Component, OnInit } from "@angular/core";

// 引入服務
import { CartService } from "../cart.service";

@Component({
    selector: "app-top-bar",
    templateUrl: "./top-bar.component.html",
    styleUrls: ["./top-bar.component.css"],
})
export class TopBarComponent implements OnInit {
    // 注入服務
    constructor(private cartService: CartService) {}

    cart() {
        // 使用服務
        this.cartService.buyItems();
    }

    ngOnInit(): void {}
}
在top-bar綁定點擊事件。
src/app/top-bar/top-bar.component.html
<a class="button fancy-button" (click)="cart()">
    <i class="material-icons">shopping_cart</i>
    Checkout
</a>
本篇主要目的是使用StackBlitz線上編輯器,用最簡單的方式帶大家練習一遍上一篇介紹到的Angular基本組成部份,雖然主要參考的是快速上手的範例,但為求方便還是簡化了一些環節,讓大家快速練習一次Angular的基本使用方式。
本篇範例結果與官網結果不同,前往練習用範例專案查看結果。
下一篇回到本機環境,在開發專案前做好配置,讓專案更容易維護。
官網範例 - 在StackBlitz中產生一個預置的範例專案