QLineEdit 是 PyQt5 裡的單行輸入框元件,這篇教學會介紹如何在 PyQt5 視窗裡加入 QLineEdit 單行輸入框,並實作修改樣式以及讀取輸入文字等基本應用。
原文參考:QLineEdit 單行輸入框
因為 Google Colab 不支援 PyQt5,所以請使用本機環境 ( 參考:使用 Python 虛擬環境 ) 或使用 Anaconda Jupyter 進行實作 ( 參考:使用 Anaconda )。

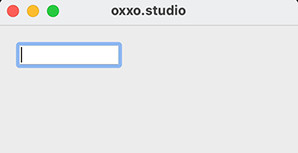
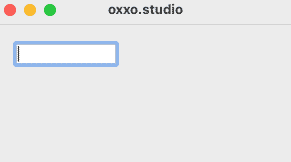
建立 PyQt5 視窗物件後,透過 QtWidgets.QLineEdit(widget) 方法,就能在指定的元件中建立單行輸入框元件,下方的程式碼執行後,會在視窗裡加入一個單行輸入框。
from PyQt5 import QtWidgets, QtGui
import sys
app = QtWidgets.QApplication(sys.argv)

Form = QtWidgets.QWidget()
Form.setWindowTitle('oxxo.studio')
Form.resize(300, 200)

input = QtWidgets.QLineEdit(Form)   # 建立單行輸入框
input.setGeometry(20,20,100,20)     # 設定位置和尺寸

Form.show()
sys.exit(app.exec_())
透過下列 QLineEdit 方法,可以將 QLineEdit 元件定位到指定的位置:
|方法|參數|說明|
|--|--|
|move()|x, y|設定 QLineEdit 在擺放的父元件中的 xy 座標,x 往右為正,y 往下為正,尺寸根據內容自動延伸。|
|setGeometry()|x, y, w, h|設定 QLineEdit 在擺放的父元件中的 xy 座標和長寬尺寸,x 往右為正,y 往下為正,如果超過長寬尺寸,輸入的文字會被裁切無法顯示。|
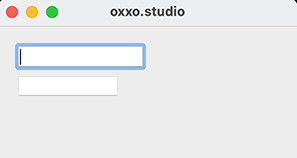
下方的程式碼執行後會放入兩個 QLineEdit,一個使用 move() 定位並使用預設寬度,另外一個使用 setGeometry() 方法定位。
from PyQt5 import QtWidgets
import sys
app = QtWidgets.QApplication(sys.argv)

Form = QtWidgets.QWidget()
Form.setWindowTitle('oxxo.studio')
Form.resize(300, 200)

input_1 = QtWidgets.QLineEdit(Form)   # 第一個輸入框
input_1.move(20,20)

input_2 = QtWidgets.QLineEdit(Form)   # 第二個輸入框
input_2.setGeometry(20,50,100,20)

Form.show()
sys.exit(app.exec_())
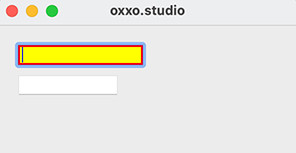
透過 setStyleSheet(),可以使用類似網頁的 CSS 語法設定 QPushButton 樣式,下方的程式碼執行後,第一個輸入框會套用 CSS 樣式語法,當輸入框為焦點時,會變成黃底紅框的樣式,而第二個輸入框則維持原本的樣式。
from PyQt5 import QtWidgets
import sys
app = QtWidgets.QApplication(sys.argv)

Form = QtWidgets.QWidget()
Form.setWindowTitle('oxxo.studio')
Form.resize(300, 200)

input_1 = QtWidgets.QLineEdit(Form)
input_1.move(20,20)
input_1.setStyleSheet('''
    QLineEdit {
        border:1px solid #000;
    }
    QLineEdit:focus {
        border:2px solid #f00;
        background:#ff0;
    }
''')

input_2 = QtWidgets.QLineEdit(Form)
input_2.setGeometry(20,50,100,20)

Form.show()
sys.exit(app.exec_())
下方列出使用 QLineEdit 的常用方法:
| 方法 | 參數 | 說明 |
|---|---|---|
| setText() | str | 預設輸入的文字內容。 |
| setReadOnly() | bool | 設定只能讀取,預設 False。 |
| setDisabled() | bool | 設定是否禁用,預設 False。 |
| setMaxLength() | int | 輸入的最大字元數。 |
| setFocus() | 設定為焦點。 | |
| setEchoMode() | mode | 設定 QtWidgets.QLineEdit.Password 表示為密碼 ( 看不見輸入內容 )。 |
| textChanged.connect() | fn | 文字改變時要執行的函式。 |
| text() | 取得輸入框內容。 |
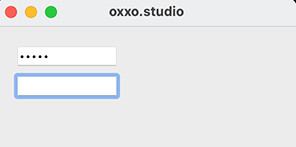
下方的程式碼執行後,預設會先點擊第二個輸入框,而第一個輸入框最多只能輸入五個字元,並且採用密碼的型態表現。
from PyQt5 import QtWidgets
import sys
app = QtWidgets.QApplication(sys.argv)

Form = QtWidgets.QWidget()
Form.setWindowTitle('oxxo.studio')
Form.resize(300, 200)

input_1 = QtWidgets.QLineEdit(Form)
input_1.setGeometry(20,20,100,20)
input_1.setEchoMode(QtWidgets.QLineEdit.Password)
input_1.setText('12345')
input_1.setMaxLength(5)

input_2 = QtWidgets.QLineEdit(Form)
input_2.setGeometry(20,50,100,20)
input_2.setFocus()

Form.show()
sys.exit(app.exec_())
運用 textChanged.connect(fn) 方法,就能在輸入框內容改變時,執行特定的函式,下方的程式碼執行後,當單行輸入框的內容發生改變,就會透過 QLabel 顯示輸入的內容。
from PyQt5 import QtWidgets
import sys
app = QtWidgets.QApplication(sys.argv)

Form = QtWidgets.QWidget()
Form.setWindowTitle('oxxo.studio')
Form.resize(300, 200)

def show():
    label.setText(input.text())

input = QtWidgets.QLineEdit(Form)
input.setGeometry(20,20,100,20)
input.textChanged.connect(show)

label = QtWidgets.QLabel(Form)
label.setGeometry(20,50,100,20)

Form.show()
sys.exit(app.exec_())
大家好,我是 OXXO,是個即將邁入中年的斜槓青年,我已經寫了超過 400 篇 Python 的教學,有興趣可以參考下方連結呦~ ^_^


 iThome鐵人賽