QGraphicsView 是 PyQt5 裡負責顯示圖形的元件,搭配 QGraphicsScene 和 QtGui.QPixmap() 就可以顯示圖片,這篇教學會介紹如何在 PyQt5 視窗裡加入 QGraphicsView 元件並顯示圖片。
原文參考:QGraphicsView 顯示圖片
因為 Google Colab 不支援 PyQt5,所以請使用本機環境 ( 參考:使用 Python 虛擬環境 ) 或使用 Anaconda Jupyter 進行實作 ( 參考:使用 Anaconda )。
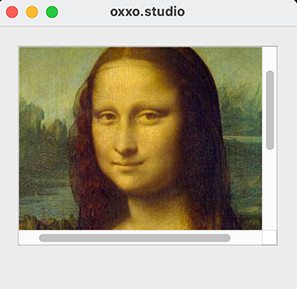
建立 PyQt5 視窗物件後,透過 QtWidgets.QGraphicsView(widget) 方法,就能在指定的元件中建立顯示圖形元件,QGraphicsView 建立後,需再使用 QtWidgets.QGraphicsScene() 建立場景元件,再透過 QtGui.QPixmap() 於場景中加入圖片,最後將場景加入 QGraphicsView 就可以顯示圖片,如果場景大小超過顯示區域,會自動出現捲軸。
from PyQt5 import QtWidgets, QtGui
import sys
app = QtWidgets.QApplication(sys.argv)

Form = QtWidgets.QWidget()
Form.setWindowTitle('oxxo.studio')
Form.resize(300, 300)

grview = QtWidgets.QGraphicsView(Form)  # 加入 QGraphicsView
grview.setGeometry(20, 20, 260, 200)    # 設定 QGraphicsView 位置與大小
scene = QtWidgets.QGraphicsScene()      # 加入 QGraphicsScene
scene.setSceneRect(0, 0, 300, 400)      # 設定 QGraphicsScene 位置與大小
img = QtGui.QPixmap('mona.jpg')         # 加入圖片
scene.addPixmap(img)                    # 將圖片加入 scene
grview.setScene(scene)                  # 設定 QGraphicsView 的場景為 scene

Form.show()
sys.exit(app.exec_())
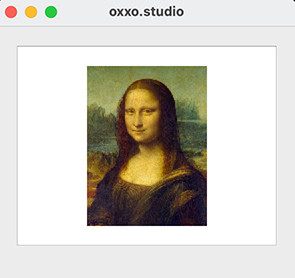
使用 QtGui.QPixmap() 建立圖片後,就能透過 scaled(w, h) 方法調整圖片大小,下方的程式碼執行後,會顯示縮小後的圖片。
from PyQt5 import QtWidgets, QtGui
import sys
app = QtWidgets.QApplication(sys.argv)

Form = QtWidgets.QWidget()
Form.setWindowTitle('oxxo.studio')
Form.resize(300, 300)                    # 視窗大小

grview = QtWidgets.QGraphicsView(Form)
grview.setGeometry(20, 20, 260, 200)     # QGraphicsView 位置 (20, 20) 和大小 260x200
scene = QtWidgets.QGraphicsScene()
scene.setSceneRect(0, 0, 120, 160)       # QGraphicsScene 相對位置 (20, 20) 和大小 120x160
img = QtGui.QPixmap('mona.jpg')
img = img.scaled(120,160)                # 調整圖片大小為 120x160
scene.addPixmap(img)
grview.setScene(scene)

Form.show()
sys.exit(app.exec_())
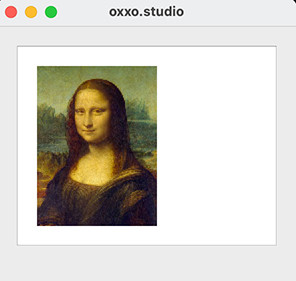
因為使用 setSceneRect 時定位是以「中心點」為主,如果要改成熟悉的「左上角」定位,可透過簡單的數學公式換算,下方的程式碼執行後,會將定位點改成左上角,修改 x 和 y 的數值,就可以控制圖片左上角的座標。
from PyQt5 import QtWidgets, QtGui
import sys
app = QtWidgets.QApplication(sys.argv)

Form = QtWidgets.QWidget()
Form.setWindowTitle('oxxo.studio')
Form.resize(300, 300)

grview = QtWidgets.QGraphicsView(Form)
gw = 260
gh = 200
grview.setGeometry(20, 20, gw, gh)    # QGraphicsView 的長寬改成變數
scene = QtWidgets.QGraphicsScene()
img = QtGui.QPixmap('mona.jpg')
img_w = 120                           # 顯示圖片的寬度
img_h = 160                           # 顯示圖片的高度
img = img.scaled(img_w, img_h)
x = 20                                # 左上角 x 座標
y = 20                                # 左上角 y 座標
dx = int((gw - img_w) / 2) - x        # 修正公式
dy = int((gh - img_h) / 2) - y
scene.setSceneRect(dx, dy, img_w, img_h)
scene.addPixmap(img)
grview.setScene(scene)

Form.show()
sys.exit(app.exec_())
大家好,我是 OXXO,是個即將邁入中年的斜槓青年,我已經寫了超過 400 篇 Python 的教學,有興趣可以參考下方連結呦~ ^_^