
都 2022 年了,還要教 ConstraintLayout 嗎?因為這是新手教學,XML 還是比較好理解。
XML 主要就是上下對齊,一層層包起來,例如
<androidx.constraintlayout.widget.ConstraintLayout
</androidx.constraintlayout.widget.ConstraintLayout>
如果只有一層不需要包起來,那麼可以用 /> 當結尾,例如下面這樣
<androidx.constraintlayout.widget.ConstraintLayout
    xmlns:android="http://schemas.android.com/apk/res/android"
    xmlns:tools="http://schemas.android.com/tools"
    android:layout_width="match_parent"
    android:layout_height="match_parent"
    tools:context=".NoteFragment"/>
也可以這樣
<androidx.constraintlayout.widget.ConstraintLayout
    xmlns:android="http://schemas.android.com/apk/res/android"
    xmlns:tools="http://schemas.android.com/tools"
    android:layout_width="match_parent"
    android:layout_height="match_parent"
    tools:context=".NoteFragment">

</androidx.constraintlayout.widget.ConstraintLayout>
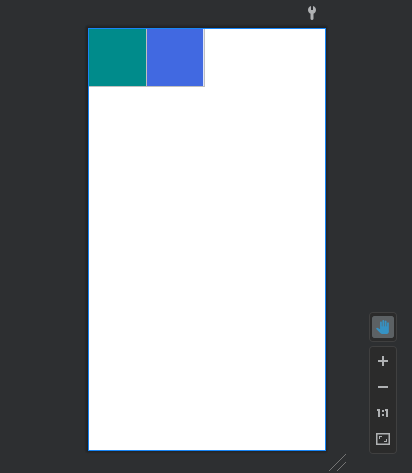
在下圖中,我畫了兩個正方形,分別是一綠一藍,然後讓兩個並排
頁面的全部程式碼長這樣
<?xml version="1.0" encoding="utf-8"?>
<androidx.constraintlayout.widget.ConstraintLayout xmlns:android="http://schemas.android.com/apk/res/android"
    xmlns:app="http://schemas.android.com/apk/res-auto"
    xmlns:tools="http://schemas.android.com/tools"
    android:layout_width="match_parent"
    android:layout_height="match_parent"
    tools:context=".NoteFragment">

    <TextView
        android:id="@+id/green"
        android:layout_width="100dp"
        android:layout_height="100dp"
        android:background="#008b8b"
        app:layout_constraintTop_toTopOf="parent"
        app:layout_constraintLeft_toLeftOf="parent" />

    <TextView
        android:id="@+id/blue"
        android:layout_width="100dp"
        android:layout_height="100dp"
        android:background="#4169e1"
        app:layout_constraintTop_toTopOf="parent"
        app:layout_constraintLeft_toRightOf="@+id/green" />
</androidx.constraintlayout.widget.ConstraintLayout>
首先是綠色正方形,因為我要讓他靠在左上方的位置,所以我給他的指令是
app:layout_constraintTop_toTopOf="parent"
app:layout_constraintLeft_toLeftOf="parent"
然後是藍色正方形,我要讓他在綠色正方形的右邊,所以我給他的指令是
app:layout_constraintTop_toTopOf="parent"
app:layout_constraintLeft_toRightOf="@+id/green"
所以以此類推,你可以設定它的左邊對齊誰的右邊,或者是他的下面對齊誰的上面之類
然後 Google 建議我們用 Start 取代 Left、End 取代 Right,上面是為了方便教學才用舊版,之後都要用 Start 和 End 了
app:layout_constraintDimensionRatio="16:6"
app:layout_constraintHorizontal_weight=""
app:layout_constraintVertical_weight=""
app:layout_constraintHorizontal_chainStyle=""
app:layout_constraintVertical_chainStyle=""

 iThome鐵人賽