好的,根據前一篇所提到的OAuth2.0流程,我們需要
1.取得code(Authorization Grant)
2.取得access token
才能利用後續的服務
GET https://notify-bot.line.me/oauth/authorize
需要參數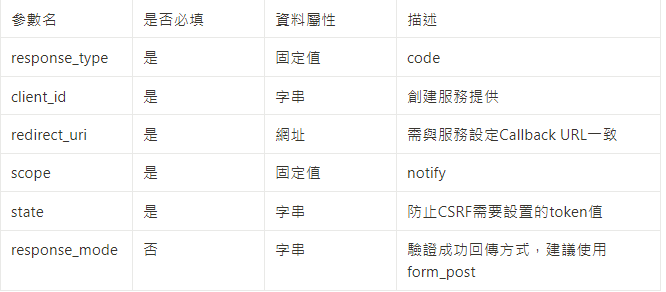
成功則回傳至請求所帶的redirect_uri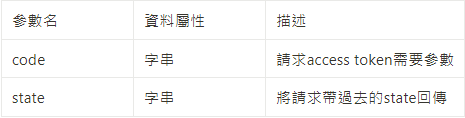
失敗則回傳至請求所帶的redirect_uri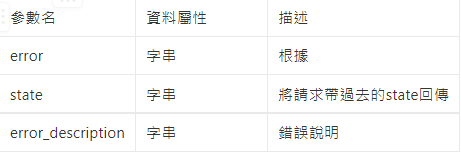
@GetMapping("sendToOauth")
	public void sendToOauth(@RequestParam(name="account")String account,HttpServletRequest request,HttpServletResponse response) throws ServletException, IOException {
		String url = userService.getOAuthCode(account);
		response.sendRedirect(url);
	}
@Override
public String getOAuthCode(String account) {
		StringBuilder sb = new StringBuilder();

		//資料庫取得使用者資料
		User findResult = Optional.of(userDao.findFirstByAccount(account)).orElseThrow(
				()->
					new UserServiceException(
							UserServiceErrorEnum.USER_DATA_NOT_FOUND.getError(),
							UserServiceErrorEnum.USER_DATA_NOT_FOUND.getMessage())
		);

		//設定請求資料
		LineOAuthRequest lineOAuthRequest = new LineOAuthRequest();
		lineOAuthRequest.setClient_id(client_id);
		lineOAuthRequest.setRedirect_uri(redirect_uri);
		lineOAuthRequest.setState(findResult.getState());
		Map<String,Object> variableParams = lineOAuthRequest.getUriParams();

		//組裝GetOAuth URL字串
		sb.append(LineNotifyUrl.GET_OAUTH.getUrl()).append("?");
		for(String key:variableParams.keySet()) {                                                          sb.append(key)
              .append("=")
              .append(String.valueOf(variableParams.get(key)))
              .append("&");
		}
		sb.deleteCharAt(sb.length()-1);
		return sb.toString();
	}
@Data
@NoArgsConstructor
public class LineOAuthRequest {


	private String client_id;
	private String redirect_uri;
	private String response_type = "code";
	private String scope = "notify";
	private String state;
	private String response_mode="form_post";

	public Map<String, Object> getUriParams(){
		try {
            //檢查值並回傳 屬性名與值構成的鍵值對
			beforeSendCheck();
			return ApiUtil.getRequestUriVariables(this);
		}
		catch (Exception e) {
			throw new LineOauthRequestException(4,e.getMessage());
		}

	}

	public void beforeSendCheck() {
		if(!StringUtils.hasText(client_id)) {
			throw new LineOauthRequestException(1,"client_id is empty");
		}
		else if(!StringUtils.hasText(redirect_uri)) {
			throw new LineOauthRequestException(2,"redirect_uri is empty");

		}
		else if(!StringUtils.hasText(state)) {
			throw new LineOauthRequestException(3,"state is empty");
		}
	}
}
public static <T> Map<String, Object> getRequestUriVariables(T source) throws NoSuchMethodException, SecurityException, IllegalAccessException, IllegalArgumentException, InvocationTargetException{
		Map<String, Object> returnMap = new HashMap<>();
		Field[] fields = source.getClass().getDeclaredFields();
		for(int i=0;i<fields.length;i++) {
			String fieldName = fields[i].getName();
			String firstLetter = fieldName.substring(0,1).toUpperCase();
			String getter = "get"+firstLetter+fieldName.substring(1);
			Method method = source.getClass().getMethod(getter, new Class[] {});
			Object value = method.invoke(source, new Object[] {});
			returnMap.put(fieldName, value);
		}
		return returnMap;
	}
POST https://notify-bot.line.me/oauth/token
ContentType: application/x-www-form-urlencoded
需要參數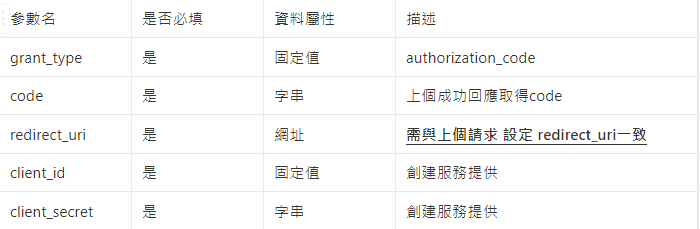
code無論最後結果成功或只能使用一次,並設定有失效時限
這邊有遇到奇怪的點,在取得access token的請求設定redirect_uri,如果與取得code設定的redirect_uri不一致的話,會回傳redirect_uri not match的錯誤。
就算我在Callback URL設定第二個redirect_uri依然是一樣的錯誤,如果有大大知道原因歡迎下方留言告訴我。
成功回應
Content-Type:application/json
@Override
	public void getToken(LineOAuthResponse lineOAuthResponse) throws InvalidKeyException, UserServiceException, IllegalBlockSizeException, BadPaddingException {
		//LineOAuthResponse:getOAuth成功回傳物件

		//設定表頭參數
		String code = lineOAuthResponse.getCode();
		String state = lineOAuthResponse.getState();
		HttpHeaders headers = new HttpHeaders();
	    headers.setContentType(MediaType.APPLICATION_FORM_URLENCODED);
	    MultiValueMap<String, String> params= new LinkedMultiValueMap<String, String>();
	    params.add("grant_type", "authorization_code");
	    params.add("code", code);
	    params.add("redirect_uri", token_redirectUri);
	    params.add("client_id", client_id);
	    params.add("client_secret", token_secret);
		HttpEntity<MultiValueMap<String, String>> entity = new HttpEntity<>(params,headers);
		LineTokenResponse result = restTemplate.postForObject(LineNotifyUrl.GET_TOKEN.getUrl(),         entity, LineTokenResponse.class);
		if(HttpStatus.OK.value()!=result.getStatus()) {
			throw new UserServiceException(
					UserServiceErrorEnum.USER_TOKEN_BACK_ERROR.getError(),
					UserServiceErrorEnum.USER_TOKEN_BACK_ERROR.getMessage());
		}
		//成功取得回應後根據state取出對應的用戶資料
		User origin = Optional.of(userDao.findFirstByPassword(state)).orElseThrow(
				()->
				new UserServiceException(
						UserServiceErrorEnum.USER_DATA_NOT_FOUND.getError(),
						UserServiceErrorEnum.USER_DATA_NOT_FOUND.getMessage())
	);
		//新增token值後更新回資料庫
		origin.setToken(result.getAccess_token());
		userDao.save(origin);

	}
@Data
public class LineTokenResponse {
	private Integer status;
	private String message;
	private String access_token;
}
OK 取得access token,我們在就可以傳訊息給使用者啦~
下篇
Line Notify API 串接實作(二)-推播訊息
 嫩嫩的EveryEnd工程師
