上一篇說明了如何撰寫在資料繫結情境的單元測試,這一篇我們把要設定給元件屬性的資料,改成透過 Angular 服務跟後端程式取得,來了解如何撰寫這種情境的測試程式。
這一篇會使用 ProductPageComponent 頁面元件,這個元件會把 ProductService 服務所取得產品資料,以產品卡片 (ProductCardComponent) 的方式顯示在頁面上。
這支元件相依了 ProductService 服務與 ProductCardComponent 元件。前者利用 HttpClient 跟後端服務取得資料;後者則使用了 Angular Material 與 ShoppingCartService 。因此,如前一篇所述,需要將這些相依對象加入測試模組的設定內。
beforeEach(async () => {
  await TestBed.configureTestingModule({
    imports: [
      HttpClientModule,
      MatButtonModule,
      MatIconModule,
      MatCardModule,
      MatSnackBarModule,
    ],
    declarations: [ProductPageComponent, ProductCardComponent],
    providers: [ShoppingCartService, ProductService],
  }).compileComponents();

  fixture = TestBed.createComponent(ProductPageComponent);
  component = fixture.componentInstance;
  fixture.detectChanges();
});
ProductPageComponent 這個頁面元件,在一開始會利用 ProductService 服務來透過 HttpClient 取得後端服務傳回資料。因為在單元測試中並不會相依任何外部資源,所以在測試上我們必須變更此服務的作業,使得在執行測試時不會使用實際的後端服務。
為此,我們可以自訂一個 ProductSpyService 服務,並在服務內實作 getProducts() 方法,讓此方法直接傳回 3 筆產品資料。
const products = [
  new Product({ id: 1, name: '產品 A', price: 999 }),
  new Product({ id: 2, name: '產品 B', price: 200 }),
  new Product({ id: 3, name: '產品 C', price: 10 }),
];

@Injectable({
  providedIn: 'root',
})
export class ProductSpyService {
  getProducts(): Observable<Product[]> {
    return of(products);
  }
}
接下來,利用 providers 陣列來變更測試模組內的服務。
beforeEach(async () => {
  await TestBed.configureTestingModule({
    imports: [ ... ],
    declarations: [ ... ],
    providers: [
      ShoppingCartService,
      { provide: ProductService, useClass: ProductSpyService },
    ],
  }).compileComponents();
  ...
});
最後,就可以依 ProductSpyService 的 getProducts() 方法所傳回的筆數,來驗證頁面元件所顯示的結果。
it('當後端服務回傳 3 筆產品資料, 頁面應顯示 3 個產品卡片', () => {
  // Arrange
  var cards = fixture.debugElement.queryAll(
    By.directive(ProductCardComponent)
  );

  // Act

  // Assert
  expect(cards.length).toBe(3);
});
spyOn 設定特定服務方法的回傳值如果元件所相依的服務有多個方法,或是依不同的測試情境需要傳回不同值的時候,利用上述方法會需要建立不少的 Spy 服務,而 Jasmine 提供了兩個方式讓我們可以很方便的去建立 Spy 服務。
第一種方法,在 providers 屬性的設定上會使用實際的 ProductService 服務。
beforeEach(async () => {
  await TestBed.configureTestingModule({
    imports: [ ... ],
    declarations: [ ... ],
    providers: [
      ShoppingCartService,
      ProductService,
    ],
  }).compileComponents();
  ...
});
在測試程式中,如下面程式,首先利用 TestBed.inject 方法來取得注入的 ProductService 服務實體,並且利用 spyOn 方法設定該服務的 getProducts 方法的回傳值。
it('當後端服務回傳 3 筆產品資料, 頁面應顯示 3 個產品卡片', () => {
  // Arrange
  const productService = TestBed.inject(ProductService);
  spyOn(productService, 'getProducts').and.returnValue(of(products));

  // Act
  component.ngOnInit();
  fixture.detectChanges();

  // Assert
  var cards = fixture.debugElement.queryAll(
    By.directive(ProductCardComponent)
  );
  expect(cards.length).toBe(3);
});
最後,就可以觸發元件的 ngOnInit() 生命週期事件與變更檢測,進而去驗證頁面上的 ProductCardComponent 元件的個數是否為 3 。
jasmine.createSpyObj 方法建立假服務第二個方式可以利用 Jasmine 提供的 createSpyObj 方法來建立假服務,此方法會回傳一 jsamine.SpyObj<> 型別物件,因此一開始會宣告 productService 變數。
let productService: jasmine.SpyObj<ProductService>;
其次,會利用 createSpyObj<ProductService> 來建立一 Spy 服務,此方法可以傳入 Spy 服務需要的方法名稱。接下來,就會去設定 getProducts 方法預計的回傳資料,以及使用 useValue 方式來替代 ProductService 服務。
beforeEach(async () => {
  productService = jasmine.createSpyObj<ProductService>(['getProducts']);
  productService.getProducts.and.returnValue(of(products));

  await TestBed.configureTestingModule({
    imports: [ ... ],
    declarations: [ ... ],
    providers: [
      ShoppingCartService,
      { provide: ProductService, useValue: productService },
    ],
  }).compileComponents();
  ...
});
最後,就可以撰寫與自訂假服務一樣的測試案例。
it('當後端服務回傳 3 筆產品資料, 頁面應顯示 3 個產品卡片', () => {
  // Arrange
  var cards = fixture.debugElement.queryAll(
    By.directive(ProductCardComponent)
  );

  // Act

  // Assert
  expect(cards.length).toBe(3);
});
文章的最後就來執行 ng test。
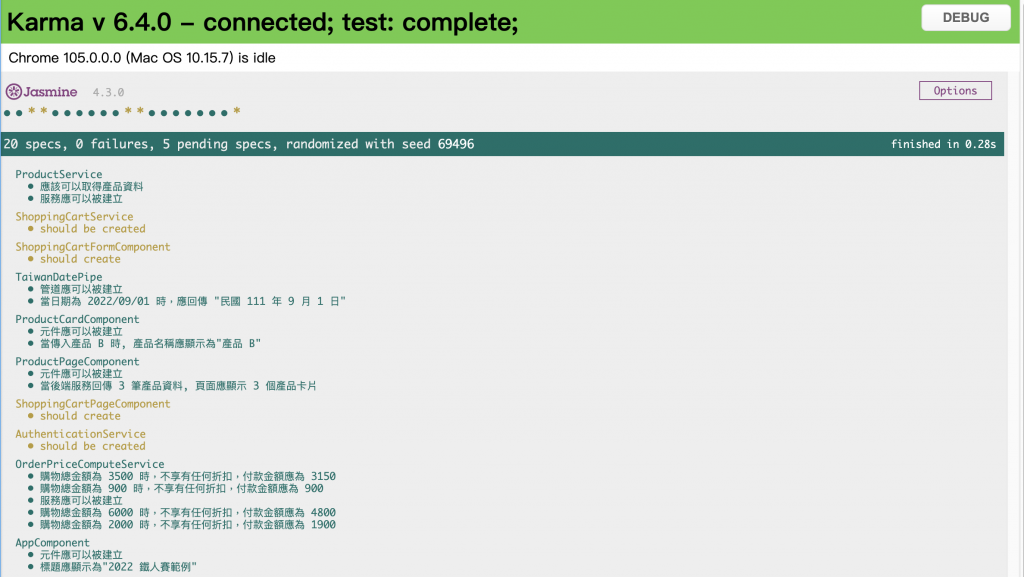
這一篇介紹了三種建立假服務物件的方法,讓我們可以在單元測試不與 HttpClient 相依,完整的測試程式可以參考 GitHub 中。接下來就更進一步的說明在這種假服務物件的情境下,有什麼其他測試的方法可以使用。