「好,今天來學怎麼模擬一些對陣法的操作行為!」艾草道。
「嗯嗯。」
「為什麼要模擬操作陣法的行為呢?可以更容易看出哪些操作的情況下,陣法會有一些疏漏。」艾草忘我的補充。
「嗯嗯嗯。」
「咦,你今天怎麼這麼配合?」艾草回過神來,往我看了過來。
「嗯嗯嗯嗯。總之我們開始學習吧!」我心虛的停止了手邊對陣法的瘋狂操作行為。
「啊啊啊,沒有要進行壓力測驗呀!你在幹嘛啊啊啊~~~」

昨天的情境練習有使用到 React Testing Library 的 fireEvent 來執行 click 事件,今天要來使用 user event 來改寫 fireEvent 。
為什麼要使用 user event 呢?
fireEvent 雖然一樣能調用事件,但 use event 可以更容易模擬使用者與瀏覽器的交互行為,官方文件上有舉例:
For example, when a user types into a text box, the element has to be focused, and then keyboard and input events are fired and the selection and value on the element are manipulated as they type.
用戶輸入文字框時會有一連串的交互行為,包含一開始文字框的 focus 後續會觸發鍵盤的輸入事件再輸入內容時也同時在操作元素的值。
認識完 user event 後來了解如何使用:
在使用 creat-react-app 建立專案的情況下,已經幫我們安裝好 user event 了,而安裝好的版本是 v13 ,目前 user event 已更新至 v14 版本,但文章還是會先按照 v13 版本進行解釋。
如果專案還沒有安裝 user event ,可以透過底下指令安裝:
npm install --save-dev @testing-library/user-event @testing-library/dom
接下來來認識 user event 好用的幾種操作行為吧!
首先從常用的 click 開始:
以下程式碼取自官方文件,在使用之前記得先引入 userEvent 後,直接透過 userEvent.click 並帶入要點選的對象:
import React from 'react'
import {render, screen} from '@testing-library/react'
// 記得引入 userEvent
import userEvent from '@testing-library/user-event'

test('click', () => {
  render(
    <div>
      <label htmlFor="checkbox">Check</label>
      <input id="checkbox" type="checkbox" />
    </div>,
  )

  userEvent.click(screen.getByText('Check'))
  expect(screen.getByLabelText('Check')).toBeChecked()
})
除此之外跟 click 相關的還有 dblClick 可以透過此方式判斷點擊 checkbox 兩次後是否不是打勾狀態:
test('click', () => {
  render(
    <div>
      <label htmlFor="checkbox">Check</label>
      <input id="checkbox" type="checkbox" />
    </div>,
  )

  userEvent.dblClick(screen.getByText('Check'))
  expect(screen.getByLabelText('Check')).not.toBeChecked()
})
type(element, text, [options]) 該方法可以使用在 input 或 textarea,透過 React Testing Library 選取該 input 或 textarea 後可以輸入要顯示的數字,會模擬使用者操作時點擊 input 的行為後再去做輸入。
假設今天有一個元件 Input 如下:
import { useState } from "react";

const Input = () => {
  const [value, setValue] = useState('');
  const changeValue = (value) => setValue(value);

  return (
    <>
      <input
        value={value}
        onChange={(e) => changeValue(e.target.value)}
      />
      <h1>{value}</h1>
    </>
  );
};

export default Input;
可透過 type 去模擬使用者輸入進行測試:
import React from "react";
import { render, screen } from "@testing-library/react";
import userEvent from "@testing-library/user-event";
import Input from "./TestInput";

test("type", () => {
  render(<Input />);
  userEvent.type(screen.getByRole("textbox"), 'Hello');
  expect(screen.getByText('Hello')).toBeInTheDocument();
});
且除了輸入文字內容外,也可以輸入一些特殊符號,如下圖(圖片取自官方文件):
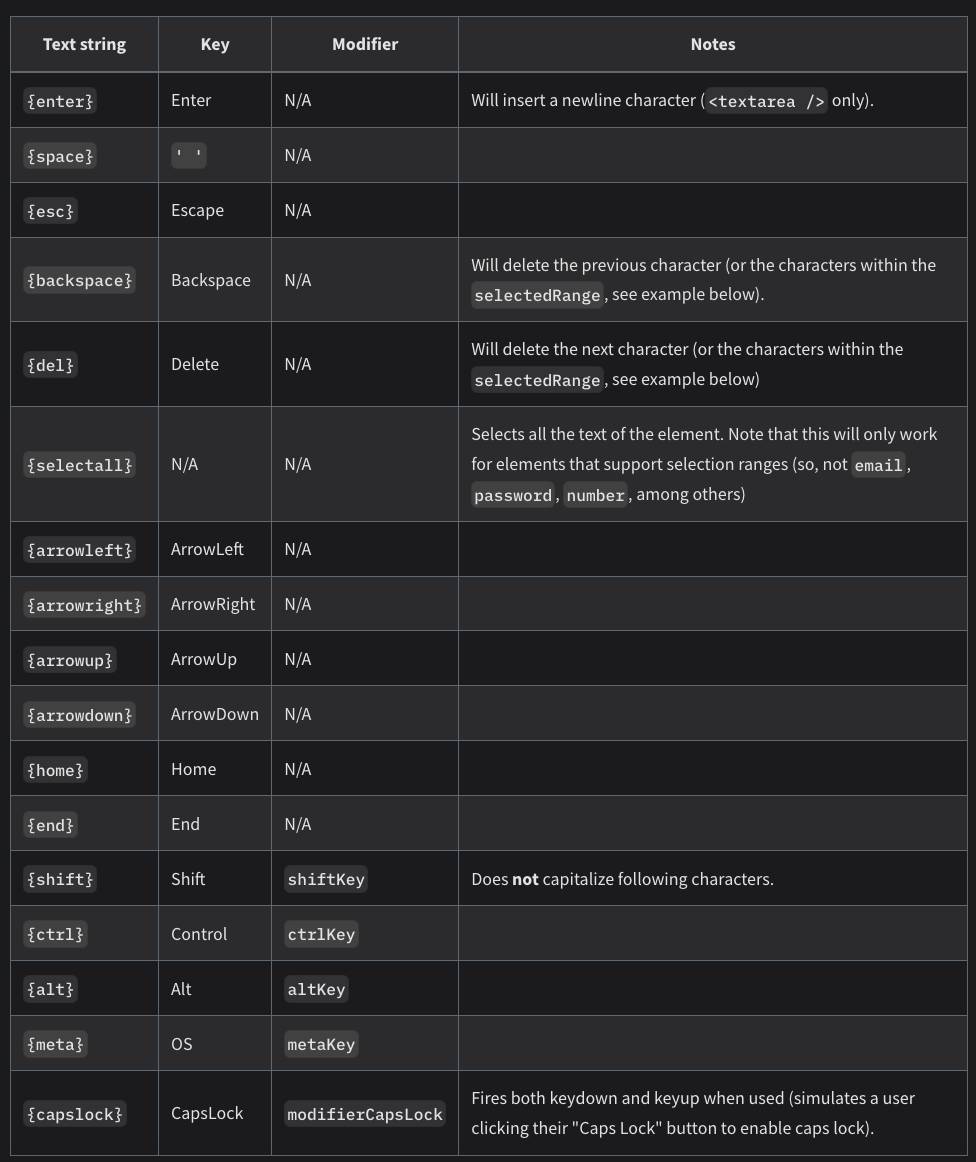
使用方式只要像這樣直接加進去:
test("type", () => {
  render(<Input />);
  userEvent.type(screen.getByRole("textbox"), 'Helli{backspace}o');
  expect(screen.getByText('Hello')).toBeInTheDocument();
});
其他還有很多方法像是:
keyboard :輸入的鍵盤事件,與 type 相似但並沒有單擊行為upload :用於檔案上傳的測試selectOptions :選擇 selet 的選項都可以參閱官方文件唷!
這是昨天 form 表單要測試打勾後是否將按鈕改為可點擊狀態的程式碼:
import "jest";
import React from 'react';
import { render, fireEvent, screen } from "@testing-library/react";
import "@testing-library/jest-dom";
import Form from "./test";

describe('Click the checkbox to change the disabled property of the button', () => {
  test('Unable to press the button at first' ,() => {
    render(<Form />);
    expect(screen.getByRole('button')).toBeDisabled();
  })
  test('The button can be turned on when the checkbox is checked' ,() => {
    render(<Form />);
    fireEvent.click(screen.getByRole('checkbox'));
    expect(screen.getByRole('button')).toBeEnabled();
  })
  test('Clicking the checkbox twice disables the button',() => {
    render(<Form />);
    fireEvent.click(screen.getByRole('checkbox'));
    expect(screen.getByRole('button')).not.toBeDisabled();
    fireEvent.click(screen.getByRole('checkbox'));
    expect(screen.getByRole('button')).toBeDisabled();
  })
})
要改寫這段程式碼只需要兩個步驟:
fireEvent 的地方改寫成 userEvent
來看看改完後的程式碼:
import "jest";
import React from 'react';
import userEvent from '@testing-library/user-event'
import { render, screen } from "@testing-library/react";
import "@testing-library/jest-dom";
import Form from "./test";

describe('Click the checkbox to change the disabled property of the button', () => {
  test('Unable to press the button at first' ,() => {
    render(<Form />);
    expect(screen.getByRole('button')).toBeDisabled();
  })
  test('The button can be turned on when the checkbox is checked' ,() => {
    render(<Form />);
    userEvent.click(screen.getByRole('checkbox'));
    expect(screen.getByRole('button')).toBeEnabled();
  })
  test('Clicking the checkbox twice disables the button',() => {
    render(<Form />);
    userEvent.click(screen.getByRole('checkbox'));
    expect(screen.getByRole('button')).not.toBeDisabled();
    userEvent.click(screen.getByRole('checkbox'));
    expect(screen.getByRole('button')).toBeDisabled();
  })
})
幾個步驟修改後,可以讓測試更貼近使用者的操作行為!
https://testing-library.com/docs/ecosystem-user-event
https://testing-library.com/docs/user-event/intro/


 iThome鐵人賽