大家好,我是 Yubin
在定義 route 的時候,我們會需要定義那個 route 的 hander。而 handler 的第一個參數,就是 FastifyRequest。
這篇文章來談談 FastifyRequest 這個核心物件,以及如何用 TypeScript 來開發。
每個 request 進來,都會被封裝成 FastifyRequest,我們可以透過 FastifyRequest 拿到我們想要的資訊。
query,Query String 物件。body,Request Payload 物件,若 Payload 是 JSON 格式則會轉換成 JavaScript 物件。params,Url 中的 Parameters。headers,HTTP Header 物件,可以取值或設定想要的 header,Type 定義在 NodeJS 的 http 模組裡的 IncomingHttpHeaders,想要拿特定的 header 可以用 request.headers['content-type'] 的方式取得。raw,NodeJS 核心的 HTTP Request 物件,Type 定義在 NodeJS 的 http 模組中的 IncomingMessage。server,拿到 FastifyInstance。id,Request ID。log,拿到 Logger Instance,可以利用 request.log.info() 的方式來寫 log。ip,該 request 的 ip address。ips,ip 的陣列,順序從進到遠,只有在 server 的 trustProxy 打開的情況下有值。hostname,該 request 的 host 欄位。protocol,該 request 所使用的通訊協定。(http 或 https)method,該 request 的 HTTP Method。url,該 request 的 Url。routerMethod,該 route handler 定義的 HTTP Method。routerPath,該 route handler 定義的 Path Pattern。(注意是 Pattern,不是完整的 Path)is404,若為 true,則會交給 404 handler 處理。socket,拿到底層的 socker,Type 為 NodeJS net 模組裡的 Socket。假設有一個 Endpoint 如下
server.post('/hello/:name', (request, reply) => {
  // code
})
透過 API Client (這邊使用 Postman),發送一個像這樣的 request 給伺服器
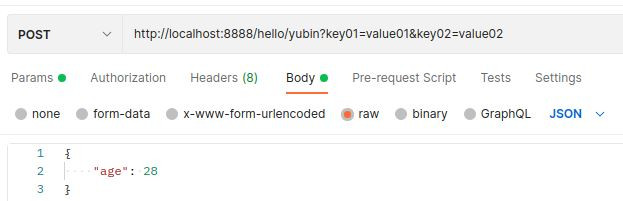
來看一下這個打出去 request。
HTTP Method 是 POST
Url 是 http://localhost:8888/hello/yubin?key01=value01&key02=value02
Payload 是 { "age": 28 }
我們把 Url 拆開來看,
Protocol,通訊協定是 http。
Host,主機是 localhost:8888。
Url 是 /hello/yubin?key01=value01&key02=value02。
Url 中,/hello/yubin 是 path,?key01=value01&key02=value02 是 query string。
如果想定義的 route 中,Path 會有一些參數。
比如說 /hello/yubin,希望把 /hello/後面的字串當成另一個參數 name,
在定義 route 的時候可以用 /hello/:name 的方式。
當有一個 request 進來,如果符合這樣的 Pattern,就會進到 /hello/:name 的 handler 裡面。
如果想要拿到 Url 中的 Parameters,可以利用 request.params,拿到各個 parameters。
server.post('/hello/:name', (request, reply) => {
  const name = request.params.name

  return reply.status(200).send({ message: `Hello ${name}` })
})
但實際在開發的時候,會發現 TypeScript 跳警告。
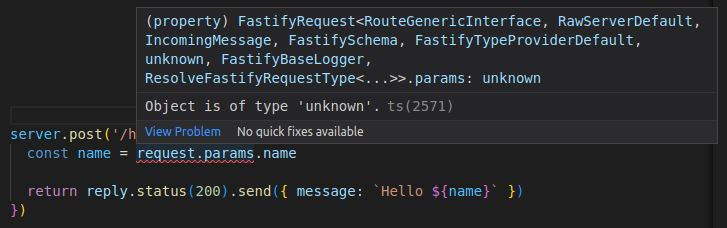
request.params 的型態是 unknown,無法取得 name 這個欄位。
雖然我們知道進來這個 handler 的 request.params 中會有 name 這個欄位,但 Fastify 把 request.params 定為 unknown,目的是要開發者明確定義 request.params 到底是什麼型態。
可以創建一個 Type 後,用 as 的方式,給 request.params 一個 Type。
interface NameParams {
  name: string
}

server.post('/hello/:name', (request, reply) => {
  const params = request.params as NameParams
  const name = params.name

  return reply.status(200).send({ message: `Hello ${name}` })
})
或是把 Type 定義宣告在 .post 那邊,如下範例程式。
interface NameParams {
  name: string
}

server.post<{Params: NameParams}>('/hello/:name', (request, reply) => {
  const name = request.params.name

  return reply.status(200).send({ message: `Hello ${name}` })
})
這也是自己比較喜歡的方式,定義在 route scope,整個 Handler 要拿 Parameters 都可以透過 request.params 來取得。
因為有詳細定義 Type,vscode 或 TypeScript Engine 也會提示你可以用的欄位,增加寫程式的便利性與正確性。
要拿到 query string 可以透過 request.query。
如果期望的 query string 會長這樣進來 ?key01=value01&key02=value02。
interface MyQueryString {
  key01: string
  key02: string
}

server.post<{ Querystring: MyQueryString }>('/hello/:name', (request, reply) => {
  const key01 = request.query.key01
  return reply.status(200).send({ message: `Hello ${key01}` })
})
一樣也可以
request.query as的方式指定 Type
要拿到 Request Payload 可以透過 request.body。
如果期望的 payload 是長這樣 { "age": 28 }。
interface MyBody {
    age: number
}

server.post<{ Body: MyBody }>('/hello/:name', (request, reply) => {
  const age = request.body.age
  return reply.status(200).send({ message: `Age is ${age}` })
})
一樣可以用
request.body as的方式指定 Type
預設的 request.headers 的 Type 為 IncomingHttpHeaders,如果有一些自訂的 header 要拿,可以自己定義 Type。
interface MyHeaders {
  'My-Header01': string
}

server.post<{ Headers: MyHeaders }>('/hello/:name', (request, reply) => {
  const header01 = request.headers['My-Header01']
  return reply.status(200).send({ message: `Header01 is ${header01}` })
})
一樣可以用
request.headers as的方式指定 Type
以上為 FastifyRequest 的介紹以及用 TypeScript 開發的方式。
雖然感覺要多定義一些 Type 才能開發,但藉由強型別的特性,在開發階段讓編輯器或 TypeScript Compiler 幫我們做型別的檢查,降低人為出錯的機會 (例如打錯字),可以讓你寫程式寫得更安心順暢。


 iThome鐵人賽