回到上次的apollo client專案
在index.html加入
<link
  rel="stylesheet"
  href="https://unpkg.com/tachyons@4.12.0/css/tachyons.min.css"
/>
將index.css內容更換如下
body {
  margin: 0;
  padding: 0;
  font-family: Verdana, Geneva, sans-serif;
}

input {
  max-width: 500px;
}

.gray {
  color: #828282;
}

.orange {
  background-color: #ff6600;
}

.background-gray {
  background-color: rgb(246, 246, 239);
}

.f11 {
  font-size: 11px;
}

.w85 {
  width: 85%;
}

.button {
  font-family: monospace;
  font-size: 10pt;
  color: black;
  background-color: buttonface;
  text-align: center;
  padding: 2px 6px 3px;
  border-width: 2px;
  border-style: outset;
  border-color: buttonface;
  cursor: pointer;
  max-width: 250px;
}
將index.js更換如下
import React from 'react';
import ReactDOM from 'react-dom';
import './styles/index.css';
import App from './components/App';


// 1
import {
  ApolloProvider,
  ApolloClient,
  createHttpLink,
  InMemoryCache
} from '@apollo/client';

// 2
const httpLink = createHttpLink({
  uri: 'http://localhost:4000'
});

// 3
const client = new ApolloClient({
  link: httpLink,
  cache: new InMemoryCache()
});

// 4
ReactDOM.render(
  <ApolloProvider client={client}>
    <App />
  </ApolloProvider>,
  document.getElementById('root')
);
到terminal輸入以下內容,這是我們demo專案的server
curl https://codeload.github.com/howtographql/react-apollo/tar.gz/starter | tar -xz --strip=1 react-apollo-starter/server
server下載好後可以看看我們的schema
type Query {
  info: String!
  feed(filter: String, skip: Int, take: Int, orderBy: LinkOrderByInput): Feed!
}

type Feed {
  id: ID!
  links: [Link!]!
  count: Int!
}

type Mutation {
  post(url: String!, description: String!): Link!
  signup(email: String!, password: String!, name: String!): AuthPayload
  login(email: String!, password: String!): AuthPayload
  vote(linkId: ID!): Vote
}

type Subscription {
  newLink: Link
  newVote: Vote
}

type AuthPayload {
  token: String
  user: User
}

type User {
  id: ID!
  name: String!
  email: String!
  links: [Link!]!
}

type Link {
  id: ID!
  description: String!
  url: String!
  postedBy: User
  votes: [Vote!]!
  createdAt: DateTime!
}

type Vote {
  id: ID!
  link: Link!
  user: User!
}

input LinkOrderByInput {
  description: Sort
  url: Sort
  createdAt: Sort
}

enum Sort {
  asc
  desc
}

scalar DateTime
在src下建立兩個資料夾,components跟styles,然後把App.js放到components內,把index.css放到styles內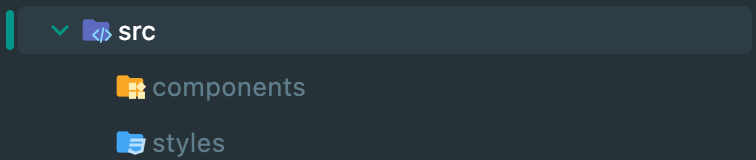
接著輸入以下指令,建立我們的db
cd server
yarn
npx prisma generate
yarn dev
可以去看localhost:4000是不是有出現graphql playground的畫面
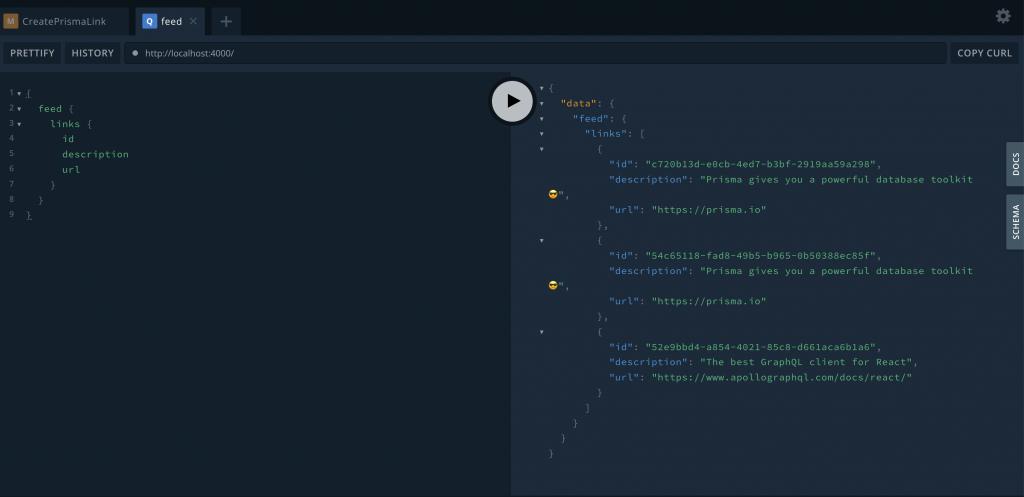
接著輸入以下mutation
mutation CreatePrismaLink {
  post(
    description: "Prisma gives you a powerful database toolkit ?"
    url: "https://prisma.io"
  ) {
    id
  }
}

mutation CreateApolloLink {
  post(
    description: "The best GraphQL client for React"
    url: "https://www.apollographql.com/docs/react/"
  ) {
    id
  }
}
再開另一個視窗輸入看看有沒有取得資料
{
  feed {
    links {
      id
      description
      url
    }
  }
}
測試成功後回到專案,在src/components下建立Link.js
import React from 'react';

const Link = (props) => {
  const { link } = props;
  return (
    <div>
      <div>
        {link.description} ({link.url})
      </div>
    </div>
  );
};

export default Link;
然後再建立LinkList.js
import React from 'react';
import Link from './Link';

const LinkList = () => {
  const linksToRender = [
    {
      id: 'link-id-1',
      description:
        'Prisma gives you a powerful database toolkit ?',
      url: 'https://prisma.io'
    },
    {
      id: 'link-id-2',
      description: 'The best GraphQL client',
      url: 'https://www.apollographql.com/docs/react/'
    }
  ];

  return (
    <div>
      {linksToRender.map((link) => (
        <Link key={link.id} link={link} />
      ))}
    </div>
  );
};

export default LinkList;
修改App.js
import React, { Component } from 'react';
import LinkList from './LinkList';

class App extends Component {
  render() {
    return <LinkList />;
  }
}

export default App;
cd回專案資料夾 npm start 看是否成功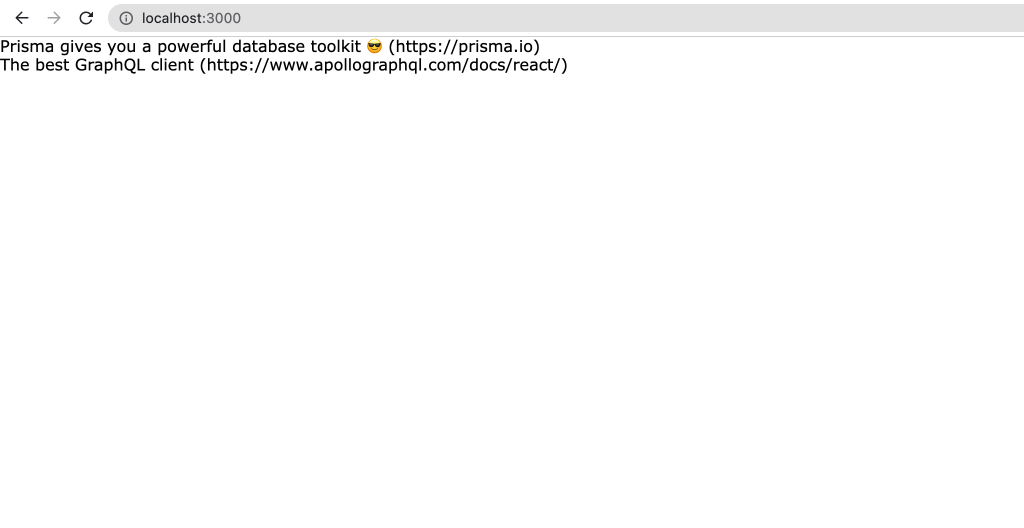
再度修改LinkList.js,讓他使用query取得db的資料
import React from 'react';
import Link from './Link';
import { useQuery, gql } from '@apollo/client';

const FEED_QUERY = gql`
            {
                feed {
                    id
                    links {
                        id
                        createdAt
                        url
                        description
                    }
                }
            }
    `
;

const LinkList = () => {
    const { data } = useQuery(FEED_QUERY);

    return (
        <div>
            {data && (
                <>
                    {data.feed.links.map((link) => (
                        <Link key={link.id} link={link} />
                    ))}
                </>
            )}
        </div>
    );
};

export default LinkList;
完成query之後來練習mutation,在components內建立CreateLink.js
import React, { useState } from 'react';
import { useMutation, gql } from '@apollo/client';


const CREATE_LINK_MUTATION = gql`
    mutation PostMutation(
        $description: String!
        $url: String!
    ) {
        post(description: $description, url: $url) {
            id
            createdAt
            url
            description
        }
    }
`;

const CreateLink = () => {
    const [formState, setFormState] = useState({
        description: '',
        url: ''
    });
    const [createLink] = useMutation(CREATE_LINK_MUTATION, {
        variables: {
            description: formState.description,
            url: formState.url
        }
    });

    return (
        <div>
            <form
                onSubmit={(e) => {
                    e.preventDefault();
                    createLink();
                }}
            >
                <div className="flex flex-column mt3">
                    <input
                        className="mb2"
                        value={formState.description}
                        onChange={(e) =>
                            setFormState({
                                ...formState,
                                description: e.target.value
                            })
                        }
                        type="text"
                        placeholder="A description for the link"
                    />
                    <input
                        className="mb2"
                        value={formState.url}
                        onChange={(e) =>
                            setFormState({
                                ...formState,
                                url: e.target.value
                            })
                        }
                        type="text"
                        placeholder="The URL for the link"
                    />
                </div>
                <button type="submit">Submit</button>
            </form>
        </div>
    );

};

export default CreateLink;
在app.js新增我們寫完的CreateLink
import React, {Component} from 'react';
import LinkList from './LinkList';
import CreateLink from "./CreateLink";

class App extends Component {
    render() {
        return (
            <>
                <LinkList/>
                <CreateLink/>;
            </>
        )
    }
}

export default App;
回到瀏覽器輸入測試內容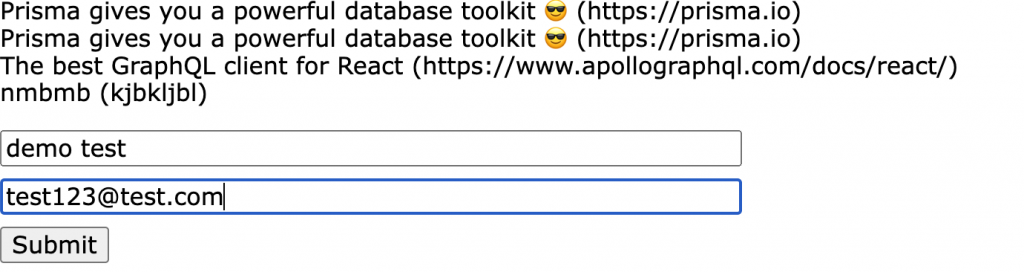
按下submit後重新整理畫面,可以看到已經新增成功,代表我們mutation功能也可以用


 iThome鐵人賽