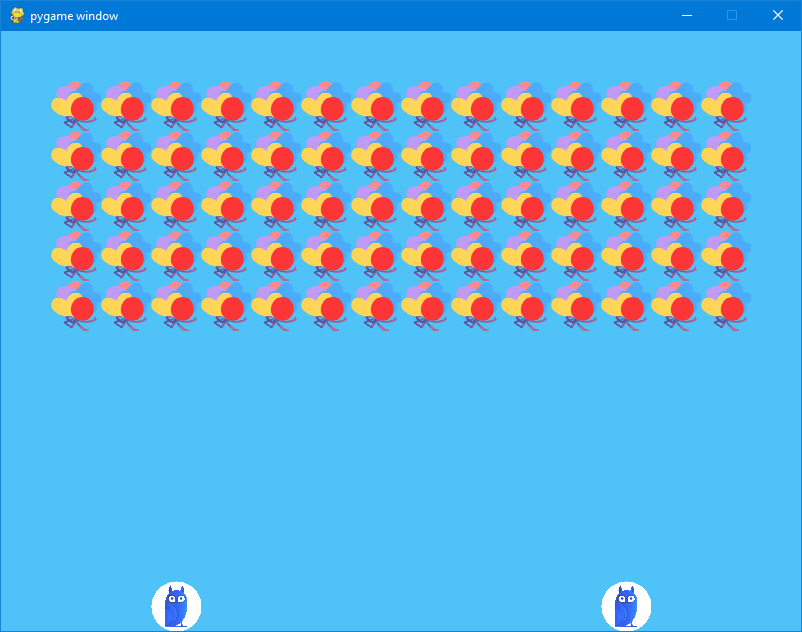
說到經典的射擊遊戲,那絕對少不了小蜜蜂,這有一些影片參考,也是接下來要復刻的遊戲
昨天的最後發現玩家往右走,仍會超出螢幕,可以透過在 Player 裡 print(self.play_rect_area) 或在 play_rect_area 的源頭 Game 發現 play_rect_area 的寬是 WIDTH 其值為1000,跟我們的螢幕寬 800 不太一樣,於是我們有兩種解決方式:
在 Game 改變 play_rect_area 的值
# Game.py
WIDTH = 800
複寫 PaiaGame 的 scene 物件,將 width=800 改成 width=1000
# Game.py
class Game(PaiaGame):
    def __init__(self, user_num):
        self.scene = Scene(width=1000, height=600, color="#4FC3F7", bias_x=0, bias_y=0)
這裡使用(1.),接下來,今天的實作內容我們要新增怪物
新增怪物的圖片,可以在第14天的文章「公開!開發遊戲的所有資源」中找到免費開源的圖庫連結。
複製並貼上 Player.py 在 src ,改名為 Mob.py,將其 class name 也改為 Mob,並修改內容,刪除 Mob 不需要的程式碼。
行動指令
~~DOWN_CMD = "DOWN"
UP_CMD = "UP"
RIGHT_CMD = "RIGHT"
LEFT_CMD = "LEFT"
SHOOT_CMD = "SHOOT"~~
image_id 改成 “mob”
# before
class Mob(pygame.sprite.Sprite):
    def __init__(self, construction: dict, **kwargs):
		self.image_id = "1P"
# after
class Mob(pygame.sprite.Sprite):
    def __init__(self, construction: dict, **kwargs):
        self.image_id = "mob"
f"{self.id}P" 的,也都改成 self.image_id
在 update 刪除 command 和 act
# before
class Mob(pygame.sprite.Sprite):
    def update(self, command: dict) -> None:
        """
        更新玩家資料
        :param command:
        :return:
        """
        self.used_frame += 1
        self.rect.center += self.vel
        self.act(command[self.id])
# after
class Mob(pygame.sprite.Sprite):
    def update(self) -> None:
        """
        更新怪物資料
        :param command:
        :return:
        """
        self.used_frame += 1
        self.rect.center += self.vel
def act(self, action: list) -> None:
    if SHOOT_CMD in action:
        self.shoot()
    if LEFT_CMD in action and self.rect.left > self.play_rect_area.left:
        self.move_left()
    elif RIGHT_CMD in action and self.rect.right < self.play_rect_area.right:
        self.move_right()
    elif UP_CMD in action and DOWN_CMD not in action and self.rect.top > self.play_rect_area.top:
        self.move_up()
    elif DOWN_CMD in action and UP_CMD not in action and self.rect.bottom < self.play_rect_area.bottom:
        self.move_down()
    else:
        self.vel = Vec(0, 0)
然後因為我沒有打算讓怪物往上走,所以也刪除 move_up 的行為
def move_up(self):
    self.vel.y = -self.speed
## Image Sours

Mob Image —— @金吉局 繪師
將所有怪物儲存在 pygame.sprite.Group() 類,方便後續更新與碰撞時使用
將怪物從 (x, y) = (50, 50) 開始,每次迴圈遞增50(怪物的寬),建立怪物,並在到達螢幕寬、一半高之前停止迴圈
將製造出的怪物,儲存進 mobs 和 all_sprites
class BattleMode:
    def __init__(self, play_rect_area: pygame.Rect):
        # init mobs
        self.mobs = pygame.sprite.Group()
        count = 0
        for x in range(50, self.scene_width - 50, 50):
            for y in range(50, self.height_center, 50):
                count += 1
                mob = Mob(create_construction(f"mob_{count}", count, (x, y), (50, 50)), play_rect_area=play_rect_area)
                self.mobs.add(mob)
        self.all_sprites.add(*self.mobs)
要注意使用變數時,變數宣告的順序喔!
class BattleMode:
    def get_init_image_data(self):
        init_image_data = []
        for mob in self.mobs:
            if isinstance(mob, Mob):
                init_image_data.append(mob.get_obj_init_data())
class BattleMode:
    def get_obj_progress_data(self) -> list:
        obj_progress_data = []
        for mob in self.mobs:
            if isinstance(mob, Mob):
                obj_progress_data.append(mob.get_obj_progress_data())
最後小小修改一下玩家初始化的位置
# before
class BattleMode:
    def __init__(self, play_rect_area: pygame.Rect):
        self.player_1P = Player(create_construction(get_ai_name(0), 0, (0, 0), (50, 50)), play_rect_area=play_rect_area)
        self.player_2P = Player(create_construction(get_ai_name(1), 1, (SCENE_WIDTH-50, SCENE_HEIGHT-50), (50, 50)), play_rect_area=play_rect_area)
# after
class BattleMode:
    def __init__(self, play_rect_area: pygame.Rect):
        self.player_1P = Player(create_construction(get_ai_name(0), 0, (self.width_center//2-50, self.scene_height-50), (50, 50)), play_rect_area=play_rect_area)
        self.player_2P = Player(create_construction(get_ai_name(1), 1, (self.width_center+self.width_center//2, SCENE_HEIGHT-50), (50, 50)), play_rect_area=play_rect_area)

