此次 API 的建立將以不同的功能去做切分,各別開發不同用途的 API,首先將會實作 Blog 中「發文」的這個功能,所以以下有關建置的部分皆是為了 Post 這個功能所設計。在建立 API 前,需確認資料庫的狀況、專案建置的架構規劃等,所以本篇將會先著重在架構、資料庫的建立,之後會大致簡述 API 的一些基本建立資訊。
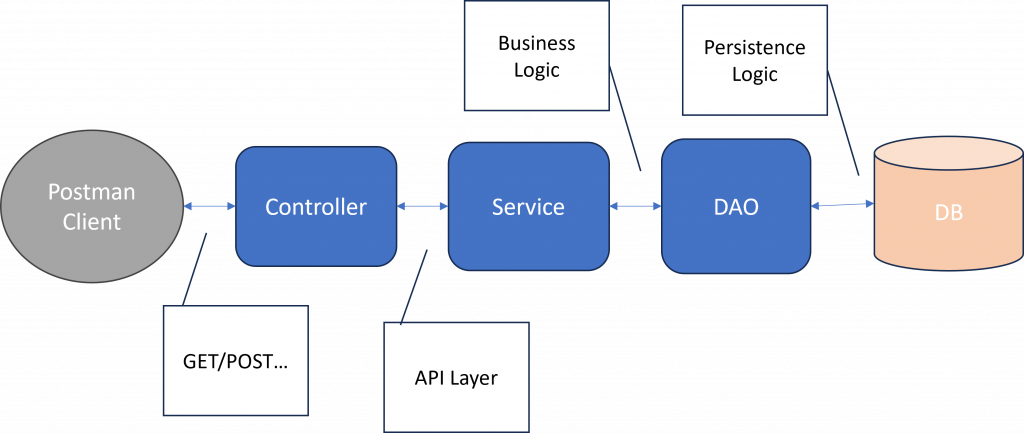
下圖為 Client 端與 DB(Database) 之間的溝通流程,需要透過 Controller 的處理前端的請求,Service 建立邏輯處理,之後由 DAO (Data Access Objects) 這個邏輯物件跟 DB 進行直接的資料處理。

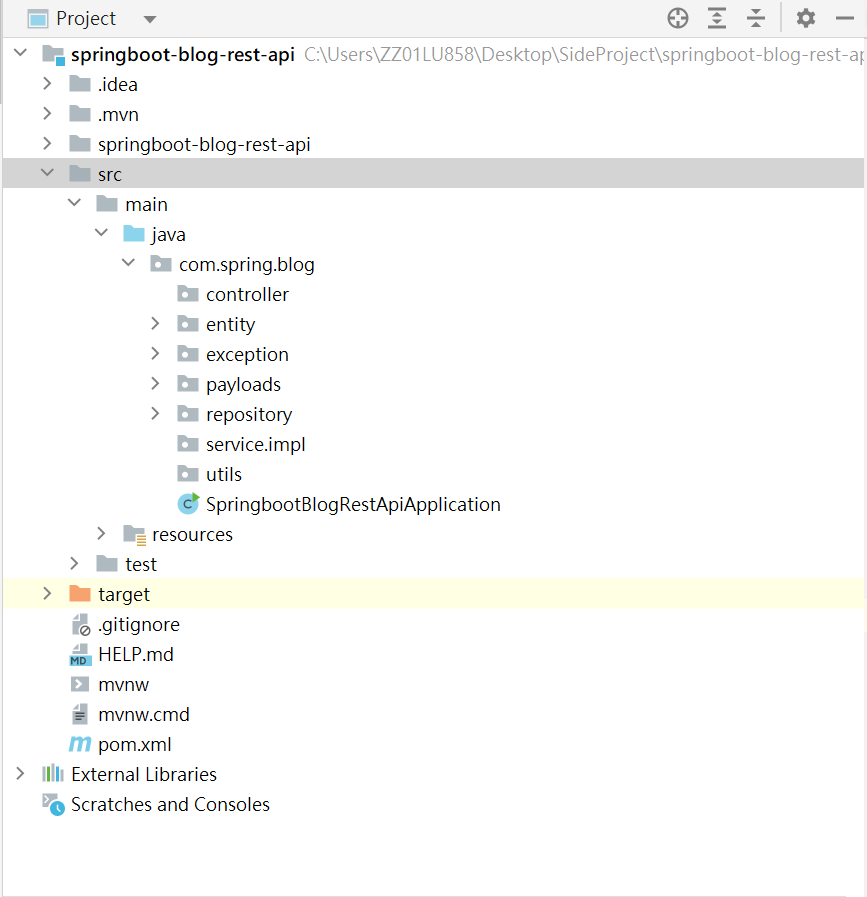
在 Intellij IDEA 中 Import 上一篇 Generate 出來的 project 後,就可以按照上述所說的架構中,建立相對應的 package 來存放,如此也方便未來的維護性,下圖為檔案結構:

application.properties 檔案中輸入以下: (根據本身 DB 狀況要進行微調)spring.datasource.url = jdbc:mysql://localhost:3306/your-db-name
spring.datasource.username=your-username
spring.datasource.password = your-password
spring.jpa.properties.hibernate.dialect=org.hibernate.dialect.MySQLDialect
spring.jpa.hibernate.ddl-auto=update
import jakarta.persistence.*;
import lombok.AllArgsConstructor;
import lombok.Data;
import lombok.NoArgsConstructor;

@Data // Equiv to @Getter @Setter...
@AllArgsConstructor
@NoArgsConstructor

@Entity
@Table(
    name = "posts",uniqueConstraints={@UniqueConstraint(columnNames={"title"})}
)
public class Post {
    // 建立 primary key
    @Id
    @GeneratedValue(strategy=GenerationType.IDENTITY)
    private long id;
    @Column(name="title",nullable = false)
    private String title;
    @Column(name="description",nullable = false)
    private String description;
    @Column(name="content",nullable = false)
    private String content;
    // add Getter / Setter Constructors toString and hashcode method

}
import com.spring.blog.entity.Post;
import org.springframework.data.jpa.repository.JpaRepository;
public interface PostRepository extends JpaRepository<Post,Long>{
// will get all CRUD methods by extending JPA repository and also
    // don't have to use annotation because of the same reason

}
每一個實體 entity 都會各別建立一個 repository
為了要處理 API 的錯誤訊息,以下為 Exception 的設置:
import org.springframework.http.HttpStatus;
import org.springframework.web.bind.annotation.ResponseStatus;

@ResponseStatus(value= HttpStatus.NOT_FOUND)
public class ResourceNotFoundException extends RuntimeException{
    private String resourceName;
    private String fieldName;
    private String filedValue;
    // Create Constructor

    public ResourceNotFoundException(String resourceName, String fieldName, String filedValue) {
        super(String.format("%s Can't find %s: '%%",resourceName,fieldName,filedValue));
        this.resourceName = resourceName;
        this.fieldName = fieldName;
        this.filedValue = filedValue;
    }
    // 建立 Getter and Setter

    public String getResourceName() {
        return resourceName;
    }

    public String getFieldName() {
        return fieldName;
    }

    public String getFiledValue() {
        return filedValue;
    }
}
與資料庫傳輸用的物件。
package com.spring.blog.payloads;

import jakarta.persistence.Column;
import lombok.Data;

@Data
public class PostDto {
    private long id;
    private String title;
    private String description;
    private String content;
}
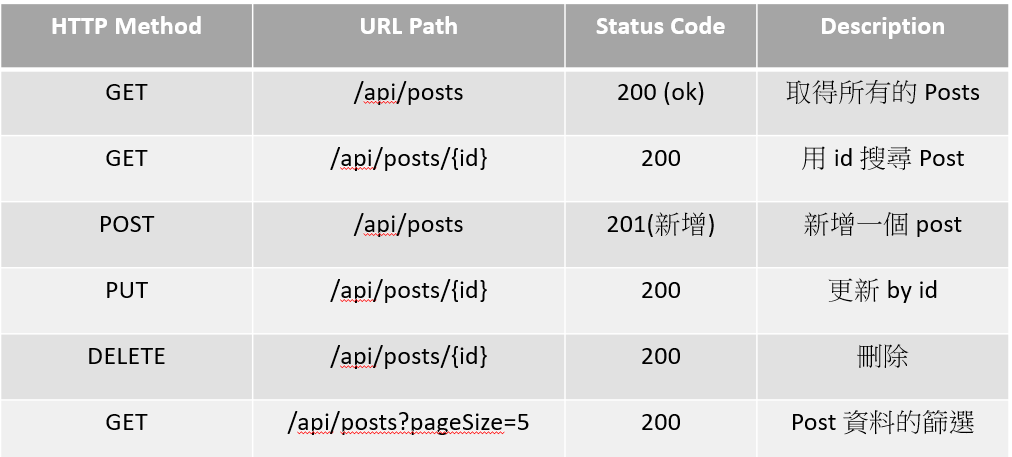
下圖是 Post 要使用 REST API 進行資料存取等動作時的內容架構:

在程式碼中,會使用 @RequestMapping 等去做 URL 的設計 。
而如何做出上圖的 URL 架構,以及其相對應的動作等內容將會在後續揭曉~ 有興趣的記得來看喔~
若文中有錯誤之處還請多包涵與指正,歡迎在文章下方留言討論!
明天見~![]()
