今天將會實作如何將資料進行封裝,並建立 API。
整個過程依序會經過 Entity、Service、Controller。首先會透過 Service 層跟 Entity 進行溝通,並將資料封裝成 DTO,之後會丟入 Controller 中執行動作,並設定 API 路徑等。
負責資料的邏輯封裝,要先建立一個 Interface,這個 Interface 像是發言人一樣,是一個溝通統一窗口。
package com.spring.blog.service;

import com.spring.blog.payloads.PostDto;

public interface PostService {

    PostDto createPost(PostDto postDto);
}
這個 class 因為要跟 Entity 溝通,所以要記得 import,並且也需要先在 Post 的 Entity 以及 PostRepository 中建立 Getter 和 Setter 的 function (可以使用: 按下右鍵 > Generate 來生成 Getter 以及 Setter)
以下 Code 會將資料包成 DTO 物件並回傳,如下:
package com.spring.blog.service.impl;

import com.spring.blog.payloads.PostDto;
import com.spring.blog.repository.PostRepository;
import com.spring.blog.service.PostService;
import org.springframework.beans.factory.annotation.Autowired;
import org.springframework.stereotype.Service;
import com.spring.blog.entity.Post;
@Service
public class PostServiceImpl implements PostService {
    private PostRepository postRepository;
    //only one Constructors
    public PostServiceImpl(PostRepository postRepository){
        this.postRepository = postRepository;
    }
    @Override
    public PostDto createPost(PostDto postDto) {

        Post post = new Post();
        post.setTitle(postDto.getTitle());
        post.setDescription(postDto.getDescription());
        post.setContent(postDto.getContent());

        Post newPost = postRepository.save(post);
        // 將 entity 轉成 DTO
        PostDto postResponse = new PostDto();
        postResponse.setId(newPost.getId());
        postResponse.setTitle(newPost.getTitle());
        postResponse.setDescription(newPost.getDescription());
        postResponse.setContent(newPost.getContent());

        return postResponse;
    }
}
在 Controller 中建立 PostController class
使用 @RestController 以及 @ResponseBody 來將 Java 物件轉換成 JSON 格式
使用 @RequestMapping 定義 URL 的 path
package com.spring.blog.controller;

import org.springframework.http.HttpStatus;
import org.springframework.http.ResponseEntity;
import org.springframework.web.bind.annotation.PostMapping;
import org.springframework.web.bind.annotation.RequestBody;
import org.springframework.web.bind.annotation.RequestMapping;
import org.springframework.web.bind.annotation.RestController;
import com.spring.blog.service.PostService;
import com.spring.blog.payloads.PostDto;
@RestController
@RequestMapping("/api/posts")
public class PostController {
    private PostService postService;
    public PostController(PostService postService){
        this.postService = postService;
    }
    // 建立新文章
    @PostMapping
    public ResponseEntity<PostDto> cretePost(@RequestBody PostDto postDto){
        return new ResponseEntity<>(postService.createPost(postDto), HttpStatus.CREATED);
    }
}
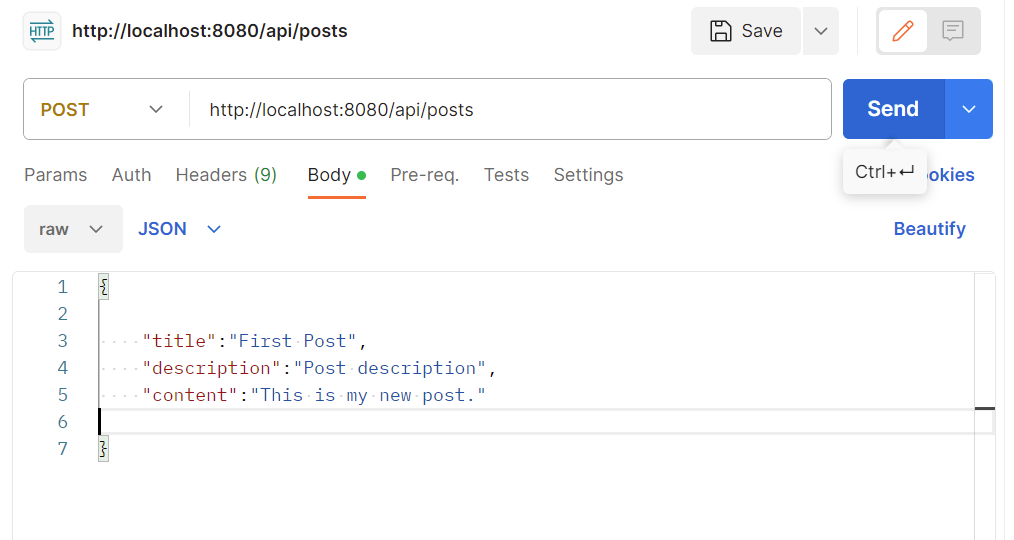
以上都完成後,在 main class 按下 Run 後,就建置完成囉! 新增貼文的 API path 就會是 http://localhost:8080/api/posts
這邊將會用 Postman 這個軟體來做測試。
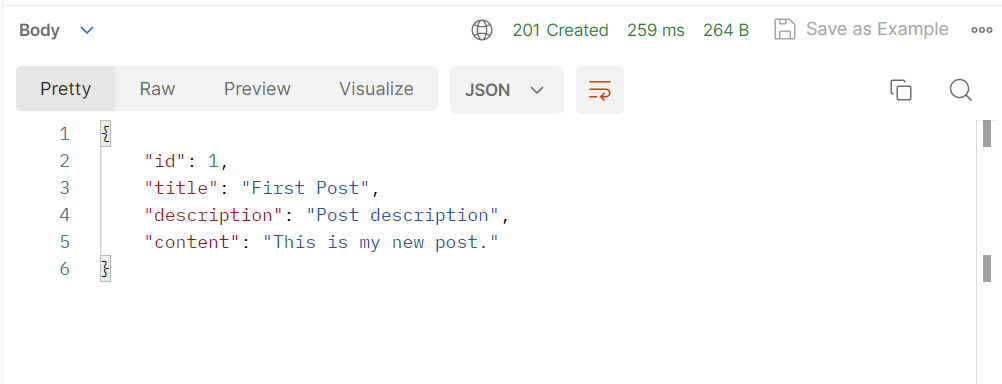
以下在 Postman 運行:

{
    "id": 1,
    "title": "First Post",
    "description": "Post description",
    "content": "This is my new post."
}

以上是關於新增貼文的 API 實作以及測試,明天將會講述如何建立「取得所有貼文」的 API~ 有興趣的記得來看喔~
若文中有錯誤之處還請多多包涵與指正,歡迎在文章下方留言討論!
明天見~![]()
