還記得 HTML element 嗎?應用 HTML Tag 作標記的頁面元素,我們可以透過 Locator 的應用,讓 WebDriver 找出個該元素來執行操作。一般來說 Locator 都是用 Element 的 Tag 和 Attribute 資料來定位。然而 Locator 的種類有很多種,Locator 的選用會影響執行的效能,也會影響維護性,因此需要學習如何選用對的 Locator。
我們需要用到 Browser 的 DevTools 來輔助尋找頁面 Element 的資料,一般都是用 F12 打開。
點開 Elements Tab,選取目標 Element 後,再看 Element Tag 內有什麼資訊可以用來做 Locator。

先看 Locator 有哪些種類,才知道找到 Element 之後要怎樣選用 Locator。
對應到 element 的 ID attribute,一般來說都是 Unique,也相對少被更動。
# Example: <div id="wpfront-notification-bar-spacer">Testing</div>

elem = driver.find_element(By.ID, 'wpfront-notification-bar-spacer')
對應到 element 的 Name attribute,非 Unique,會出現在 HTML form。
# Example: <input type="text" name="username />

elem = driver.find_element(By.NAME, 'username')
是指網頁中超連結的可見文字
# Example: <a href="https://www.example.com">Click here to visit Example</a>

elem = driver.find_element(By.LINK_TEXT, 'Click here to visit Example')
同樣是指網頁中超連結的可見文字,但只需要部分文字符合。
# Example: <a href="https://www.example.com">Click here to visit Example</a>

elem = driver.find_element(By.PARTIAL_LINK_TEXT, 'visit Example')
指 element 的 class attribute,一樣用作定義 Element 的 CSS 樣式,非 Unique。CSS Class 跟外觀有關係,而外觀是蠻常作調整的內容,所以被改的機率比前 2 者稍為高。
# Example: <div class="entry-content"></div>

elem = driver.find_element(By.CLASS_NAME, 'entry-content')
就是 Element Tag,用到的機率很低,因為同頁相同的 Tag 太多。
# Example: <button type="submit"></button>

elem = driver.find_element(By.TAG_NAME, 'button')
使用 CSS 的選擇器語法來指定元素,含有多種選擇器:
元素選擇器:
使用 Tag Name 作選擇器。例如:div 會選擇所有 <div> element。
CSS Class 選擇器:
以 .標記。例如:.classname 會選擇所有帶有指定 class 的element。
ID 選擇器:
以 #標記。例如:#elementId 會選擇具有指定 ID 的element。
屬性選擇器:
使用 Element Attribute 作為選擇器選。例如:[name="username"] 會選擇具有 name 屬性值為 "username" 的 element。
子元素選擇器:
選擇某個 element 的直接 child element。例如:ul > li 會選擇所有在 <ul> element 下的 <li> child element。
後代選擇器:
選擇某個 element 的後代 element。例如:div p 會選擇所有在 <div> 元素內部的 <p> element。
組合選擇器:
結合多個選擇器來選擇 element。例如:div.menu 會選擇所有帶有 menu class 的 <div> element。
例子:
<div class="container">
  <h1>Welcome to My Website</h1>
  <p class="intro">This is the homepage of my website.</p>
  <ul>
    <li>Item 1</li>
    <li>Item 2</li>
    <li>Item 3</li>
  </ul>
</div>
# 通過 **後代選擇器** 定位標題
header = driver.find_element(By.CSS_SELECTOR, '.container h1')
print(header.text)

# 通過 **類選擇器** 定位段落
intro = driver.find_element(By.CSS_SELECTOR, '.intro')
print(intro.text)

# 通過 **組合選擇器** 定位段落
intro = driver.find_element(By.CSS_SELECTOR, 'div.container p.intro')
print(intro.text)

# 通過 **子元素選擇器** 定位列表項目,取得多於一個 Element 時,會存成 List
items = driver.find_elements(By.CSS_SELECTOR, 'div.container ul > li')
for item in items:
    print(item.text)
Output :
Welcome To My Website
This is the homepage of my website.
This is the homepage of my website.
Item 1
Item 2
Item 3
XPath(XML Path Language)是一種用於在 XML 文件中定位元素的語言。它使用路徑表示法來定位 Element,這些路徑類似於文件系統中的路徑。XPath 表達式可以從根元素開始,沿著元素的層次結構進行導航,以定位所需的元素。
XPath 有 2 種寫法:
Absolution XPath (絕對路徑) : 從最頂層開始,逐層列出
/html/body/div/div[2]/div/div[2]/main/article/div/div/div[2]
Relative XPath (相對路徑):是相對於當前元素的路徑,描述元素在當前上下文中的位置
//*[@id="customer_login"]
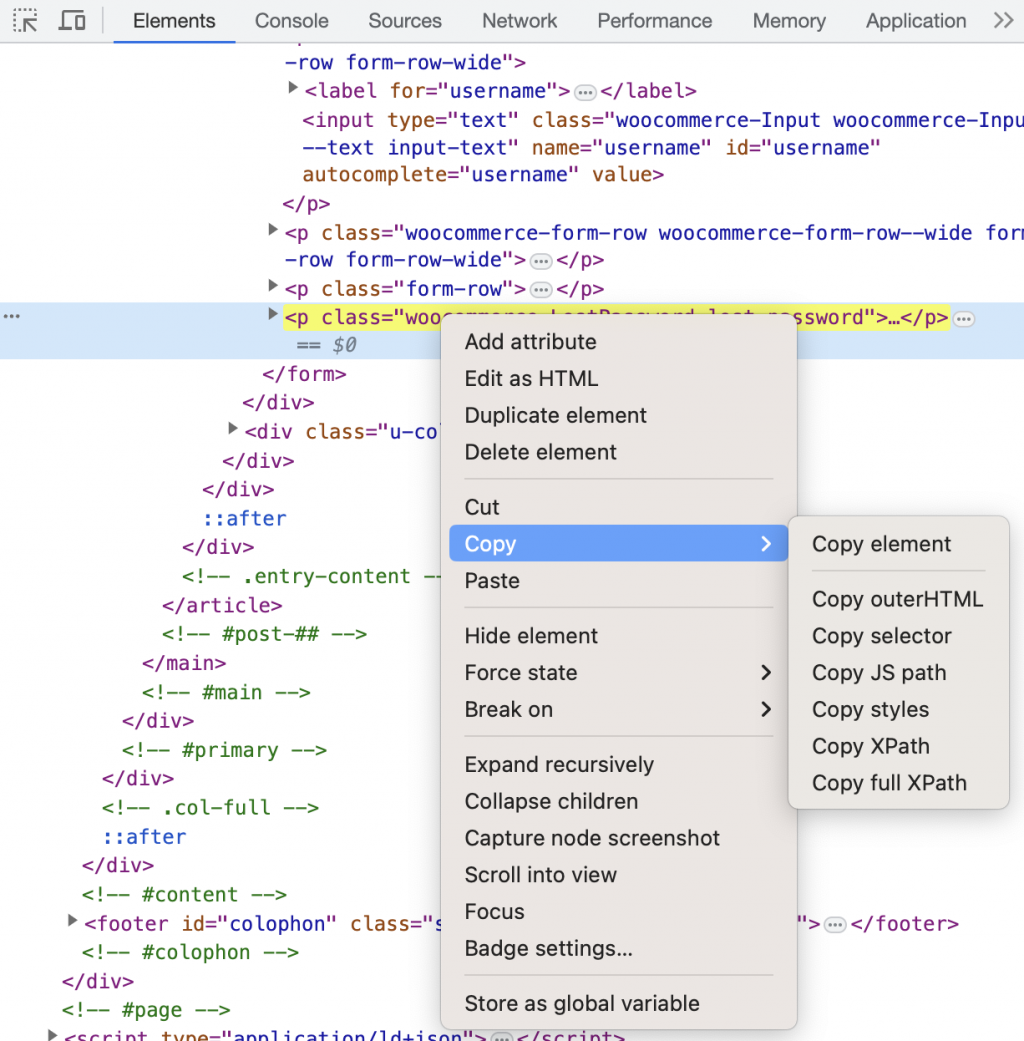
現在 Chrome Browser 的 DevTools,點選 Element 後點右鍵,可以直接 Copy Element 的 XPath。當中可以選擇 XPath 或 Full XPath,分別會得到相對路徑和絕對路徑的寫法。
非常不建議使用 Absolution XPATH ,可讀性極低的同時,頁面每次作任何修改,路徑都一定會跟著改變,那就只能一直跟著改了,時間再多都不夠用。
所以要學習使用 Relative Path,寫的時候也要注意可讀性,避免使用 index 讀取資料。
寫 Relative Path 的小技巧:
- 從目標 Element 中觀察是否有 唯一 且有 代表性的資料 可以使用。
- 若目標 Element 沒有足夠的資訊可定位,再往上一層的 Element 看,再利用 Parent 的關係指到目標 Element。
- 選用 唯一性的資料 可明確定位
- 選用 有代表性的資料 可以提高可讀性,而且這種資料多半都是由 Developer 定義,隨機變動的機率相對小。
我們來看一些例子,同樣是應用這個 HTML 檔
<div class="container">
  <h1>Welcome to My Website</h1>
  <p class="intro">This is the homepage of my website.</p>
  <ul>
    <li>Item 1</li>
    <li>Item 2</li>
    <li>Item 3</li>
  </ul>
</div>
# 通過元素名稱定位標題
header = driver.find_element(By.XPATH, '//h1')
print(header.text)

# 通過 class 屬性值定位段落
intro = driver.find_element(By.XPATH, '//p[@class="intro"]')
print(intro.text)

# 通過父子關係定位列表項目
intro = driver.find_elements(By.XPATH, '//div[@class="container"]/ul/li')
for item in items:
    print(item.text)
XPath Axes (軸)
是 XPath 語言中的一個概念,用於描述 Element 之間的相對位置。它允許你在元素之間進行更靈活的導航和查詢。
軸可以看作是一個指向特定方向的概念,它可以幫助你在文檔中定位特定元素。XPath 定義了一些不同的軸,每個軸都有不同的用途和功能。
以下是一些常見的 XPath 軸:
<!-- 下文會利用這 XML 檔來作例子解釋: -->
<Tree_A/>
<Tree_B>
    <Branch_C>
        <Leaf_E/>
        <Leaf_F/>
    </Branch_C>
    <Branch_D/>
</Tree_B>
ancestor 軸:選擇指定元素的 所有祖先 元素。
I.e. //Leaf_E/ancestor::* 取得 <Branch_C>, <Tree_B> Element
child 軸:選擇指定元素的 所有直接子元素。
I.e. //Tree_B/child::* 取得 <Branch_C> 和 <Branch_D> Element
I.e. //Tree_B/child::Branch_C 取得 <Branch_C> Element
descendant 軸:選擇指定元素的 所有後代元素(包括子孫元素)。
I.e. //Tree_B/descendant::* 取得 <Branch_C>, <Branch_D>, <Leaf_E>, <Leaf_F> Element
I.e. //TreeB/descendant::Leaf_F 取得 <Leaf_F> Element
following 軸:選擇文檔中在指定元素 之後的所有元素。
I.e. //Tree_A/following::* 取得 <Tree_B>, <Branch_C>, <Leaf_E>, <Leaf_F>, <Branch_D> Element
following-sibling 軸:選擇指定元素 之後的所有同級元素。
I.e. //Tree_A/following-sibling::* 取得 <Tree_B> Element
parent 軸:選擇指定元素的 父元素。
I.e. //Branch_C/parent::* 取得 <Tree_B> Element
preceding 軸:選擇文檔中在指定元素之前的所有元素。
I.e. //Branch_D/preceding::* 取得 <Branch_C>, <Leaf_F> , <Leaf_E>, <Tree_B>, <Tree_A> Element
preceding-sibling 軸:選擇指定 元素之前的所有同級元素。
I.e. //Branch_D/preceding-sibling::* 取得 <Branch_C> Element
主要以 寫法簡單,且 不容易被改動的資料 為優先。一般來說 ID 會是最好的選擇,因為他是唯一值,且比較少會被改動。
而我個人的取向會是:ID > Name > ClassName > CSS Selector / XPath ,其他 Locator 看情況選用。
當中 CSS Selector 跟 XPath 會視情況來選用,這 2 者都很萬用,幾乎都可以定位到所有的 Element。
但對於簡單的定位,CSS Selector 的語法會相對簡潔。
而複雜的定位,因為有 XPath Axes 的概念,XPath 相對簡單。
還有一個原因會讓你可能選用 CSS Selector 是前端工程師都會應用,大家溝通上可能會比較方便,也讓你求救有援~
如情況許可,其實會建議在所需的 Element 加一個獨有的 attribute 供 automation test 使用,避免被其他人修改,且讓整個定位語法都相對簡單得多。
I.e.<div data-test-id=”test_only”></div>但這可能需要請 Developer 協助,或是自行修改再請 Developer Review。
知道怎樣選用 Locator 來找 HTML Element,然後要學習怎樣操作 Element 來達到自動化的目的。
透過 find_element() 可以取得 WebElement,WebElement 內建一些 method 可以對 element 作一些操作。以下介紹一些常用的操作:
點擊
elem.click()
輸入資料
elem.send_key('abc')
清除 Text Box 的資料,一般會在輸入資料先作清空
elem.clear()
截取 element 的 screenshot,並存成檔案
elem.screenshot('filename.png')
截取 element 的 screenshot,但不會生成檔案
elem.screenshot_as_png()
取得 element 的文本資料
elem.text
取得 element 指定的 attribute 資料
elem.get_attribute(”id”)
判斷 checkbox / radio button 是否已被選取
elem.is_selected()
判斷互動元件是否已啟用
elem.is_enabled()
透過這些操作,我們可以使用 Selenium 模擬人手操作來完成我們的測試步驟。
推薦 2 個可以練習 Web UI Automation 網站:
可以用來練習怎樣應用 Element 找 Locator,並操作看看。