接著我們可以使用帳號密碼登入後,我們便可以實作幫使用者維持登入狀態。這個時候我們便可以使用JWT或與其類似的技術來實作。
JWT ( Json Web Token ) 是一種把 Json 資料編碼成難以理解的長字串的一個標準。例如 :
eyJhbGciOiJIUzI1NiIsInR5cCI6IkpXVCJ9.eyJzdWIiOiIxMjM0NTY3ODkwIiwibmFtZSI6IkpvaG4gRG9lIiwiaWF0IjoxNTE2MjM5MDIyfQ.SflKxwRJSMeKKF2QT4fwpMeJf36POk6yJV_adQssw5c
通常會在以下情形中使用 :
本次我們使用 python-jose 此套件來生成和驗證 JWT。
pip install python-jose[cryptography]
我們新增一個 config.py 檔以存放所有的全域變數
# src/config.py

SECRET_KEY = "09d25e094faa6ca2556c818166b7a9563b93f7099f6f0f4caa6cf63b88e8d3e7"
ALGORITHM = "HS256"
ACCESS_TOKEN_EXPIRE_MINUTES = 30
我們新增一個 jwt.py 檔以存放所有 JWT 的基礎操作函式。
# src/jwt.py

from jose import jwt
from typing import Union
from datetime import datetime, timedelta
from src.config import SECRET_KEY, ALGORITHM, ACCESS_TOKEN_EXPIRE_MINUTES

oauth2_scheme = OAuth2PasswordBearer(tokenUrl="login")

def create_access_token(
    data: dict, expires_delta: Union[timedelta, None] = ACCESS_TOKEN_EXPIRE_MINUTES
):
    to_encode = data.copy()
    expire = datetime.utcnow() + timedelta(minutes=expires_delta)
    to_encode.update({"exp": expire})
    encoded_jwt = jwt.encode(to_encode, SECRET_KEY, algorithm=ALGORITHM)
    return encoded_jwt
我們將傳入的 data 使用 jose 套件製成一個 jwt 後回傳。
我們在 schemas 中新增一個登入回傳的模型 :
class LoginReturn(Customer):
    token: str
該模型繼承 Customer 並新增一個 token 來將我們的 access token 回傳給前端。
接著修改 main 中的路徑操作函式 :
@app.post("/login", response_model=schemas.LoginReturn)
def login(
    customer: models.Customer = Depends(dependencies.authenticate_customer),
):
    """
    Login
    """
    access_token = jwt.create_access_token(
        data={"sub": customer.id, "mail": customer.mail}
    )
    customer.token = access_token
    return customer
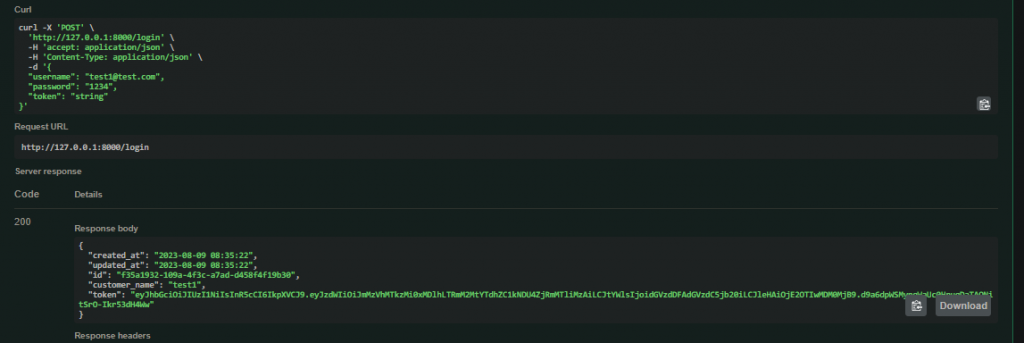
將 response_model 修改成 schemas.LoginReturn,並在拿到顧客資料後用其製作一個 JWT,並將其回傳給前端。

成功會如上圖所示,多出一個 token 回傳顧客資料建立的 JWT。
我們先針對驗證失敗時新增一個 exception :
# src/exceptions.py

class NotAuthenticated(DetailedHTTPException):
    STATUS_CODE = status.HTTP_401_UNAUTHORIZED
    DETAIL = "User not authenticated"

    def __init__(self) -> None:
        super().__init__(headers={"WWW-Authenticate": "Bearer"})

class CredentialsDataWrong(NotAuthenticated):
    DETAIL = "Could not validate credentials"
接著我們在 jwt 檔中新增驗證並拿取資料的操作 :
async def decode_jwt(token: str = Depends(oauth2_scheme)) -> dict:
    try:
        payload = jwt.decode(token, SECRET_KEY, algorithms=[ALGORITHM])
        id: str = payload.get("sub")
        if id is None:
            raise exceptions.CredentialsDataWrong()
    except JWTError:
        raise exceptions.CredentialsDataWrong()
    return payload
我們會從 header 中拿取 Bearer 的 token 回來進行處理,若 decode 過程中出現問題便是向前端回傳401 狀態碼。
接著更改 get 顧客的接口進行測試 :
@app.get(
    "/customers",
    response_model=schemas.Customer,
    responses={404: {"description": "Customer not found"}},
)
def get_customer_by_id(
    jwt_data: dict = Depends(jwt.decode_jwt), db: Session = Depends(get_db)
):
    """
    Get a customer by id
    """
    id = jwt_data['sub']
    customer = service.get_customer_by_id(db, id)
    if not customer:
        raise exceptions.CustomerNotFound()
    return customer
我們使用依賴注入的方式拿取到 jwt 解開後的資料,並從 sub 中拿取 id 來接續以往的動作。
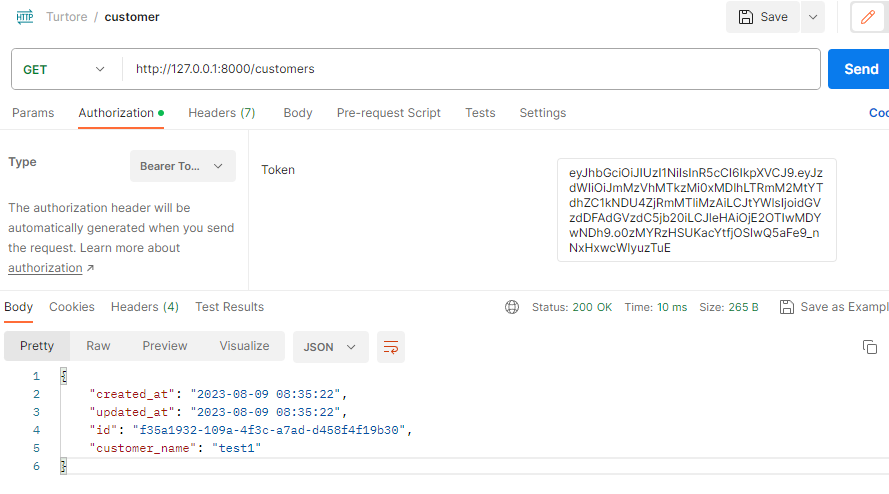
因為我們用自訂的輸入來實作登入接口,所以API文件無法傳遞 Header,你可以使用 Postman 等測試工具來進行測試。

你可以看到我們使用 jwt 成功拿取到資料庫內的資料。
jwt 是一個很方便使用的機制,但在使用的時候也要注意不要在其中塞太多東西,塞得越多,雜湊出來的字串也會越長,會增加你的網路傳輸成本。
