我們會花兩個章節實作有關安全性的操作,我們會將信箱及密碼欄位新增到顧客表上,並實作登入驗證,及核發 JWT。
# src/models.py

class Customer(Base):
    __tablename__ = "customers"

    customer_name = mapped_column(String(30))
    mail = mapped_column(String(100))
    password = mapped_column(String(64))
    orders = relationship("Order", back_populates="customer", lazy="joined")
我們在顧客資料表上新增兩個欄位 mail 和 password。記得新增完要進行資料庫遷移。
# src/schemas.py

from pydantic import BaseModel, Field, validator, EmailStr

class CustomerCreateInput(BaseModel):
    customer_name: str = Field(max_length=30, title="Customer name")
    mail: EmailStr
    password: str = Field(max_length=64, title="Password")
在 schemas 中對新增顧客時的輸入資料多新增 mail 和 password。
EmailStr 的型別可以幫我們自動驗證輸入字串是不是信箱的格式。
「Hash」的意思是:將某些內容(這裡是密碼)轉換成看起來像亂碼的字串。
每次你使用相同內容 Hash 出來的結果都是相同的,但你不能將 Hash 結果轉換回去。
而為甚麼要 Hash 密碼的用意是,如果你的資料庫被駭客盜走了,那他至少不會獲得明文儲存的密碼,以增加危機處理的時間 ( 例如通知顧客重設密碼 )。
我們將使用 passlib 這個套件搭配 bcrypt 算法來 hash 密碼。
首先我們先將套件安裝起來。
pip install passlib[bcrypt]
接著我們在 utils 工具包中新增程式:
# src/utils.py

from passlib.context import CryptContext

pwd_context = CryptContext(schemes=["bcrypt"], deprecated="auto")

def verify_password(plain_password: str, hashed_password: str) -> bool:
    """verify password

    Parameters
    ----------
    plain_password : str
        plain password
    hashed_password : str
        hashed password

    Returns
    -------
    bool
        True if password is correct, False otherwise
    """
    return pwd_context.verify(plain_password, hashed_password)

def get_password_hash(password: str) -> str:
    """get password hash

    Parameters
    ----------
    password : str
        password

    Returns
    -------
    str
        hashed password
    """
    return pwd_context.hash(password)
一個方法用來 Hash 密碼,一個方法用來驗證。
接著我們修改新增顧客的程式碼:
# dependencies.py

from fastapi import Depends
from sqlalchemy.orm import Session

from src import models, schemas, exceptions, utils, service
from src.database import get_db

def check_new_customer(
    customer: schemas.CustomerCreateInput, db: Session = Depends(get_db)
) -> tuple[schemas.CustomerCreateInput, Session]:
    db_customer = service.get_customer_by_mail(db, customer.mail)
    if db_customer:
        raise exceptions.CustomerAlreadyExists()
    return customer, db
我們新增一個 dependencies 的檔案,用來存放依賴注入的程式。我們在建立新資料前,必須先確認資料庫中有沒有相同 mail 的帳號。
# src/service.py

def create_customer(db: Session, customer: schemas.CustomerCreateInput):
    customer.password = utils.get_password_hash(customer.password)
    db_customer = models.Customer(**customer.dict())

    db.add(db_customer)
    try:
        db.commit()
        db.refresh(db_customer)
    except Exception as e:
        db.rollback()
        print(e)
        raise exceptions.ServerError("Error creating customer")

    return db_customer
我們在轉成字典前,先將密碼進行 hash 再儲存到資料庫中。
# src/main.py

@app.post(
    "/customers",
    status_code=status.HTTP_201_CREATED,
    response_model=schemas.Customer,
)
def create_customer(dependency=Depends(dependencies.check_new_customer)):
    """
    Create a customer
    """
    customer, db = dependency
    return service.create_customer(db, customer)
在路徑操作函式中將依賴注入執行的程式更改為我們剛剛新增的 check_new_customer,並將其中的資料輸入到 create_customer 中。
我們在 dependencies 中來新增登入要用到的程式碼來驗證顧客。
# src/dependencies.py

def authenticate_customer(
    data: schemas.LoginInput, db: Session = Depends(get_db)
) -> models.Customer:
    db_customer = service.get_customer_by_mail(db, data.username)
    if not db_customer:
        raise exceptions.CustomerNotFound()
    if not utils.verify_password(data.password, db_customer.password):
        raise exceptions.InvalidPasswordOrEmail()
    return db_customer
我們根據輸入的信箱也就是使用者帳號來去獲取資料庫中的顧客資料,在將輸入的密碼跟其做比對。
若是驗證全數通過便回傳使用者資料。
接著我們新增一個路徑操作函式 :
# src/main.py

@app.post("/login", response_model=schemas.Customer)
def login(
    customer: models.Customer = Depends(dependencies.authenticate_customer),
):
    """
    Login
    """
    return customer
我們用依賴注入的方式,使用剛剛新增的驗證方法來取得顧客資料,並將其回傳給前端。
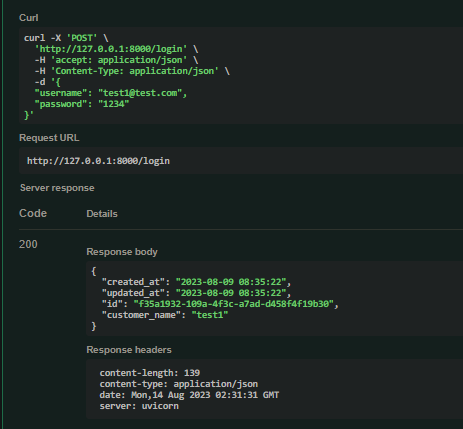
成功如上圖所示,這樣我們就達成了一個登入系統。
今天到這裡我們已經完成了一個簡易的登入系統,並且也有做到基本的防護,接下來我們可以針對這個登入系統再進行擴充,例如 JWT 等等機制。