在上一章中,我們説到關於父組件傳值給子組件,我們可以先在子組件定義好要接收的key和它的型別(type),接下來我們要聊聊如何從子組件傳值給父組件。
在子組件中,我們可以使用$emit來觸發自定義事件,然後在父組件中監聽該事件並執行相應的操作,示範如下:
<!-- ChildComponent.vue -->
<template>
  <div>
    <button @click="sendMessage">Send Message to Parent</button>
  </div>
</template>

<script>
export default {
  methods: {
    sendMessage() {
      this.$emit('message-to-parent', 'Hello from child!');
    }
  }
};
</script>
然後在父組件中,可以使用v-on(或簡寫為@)來監聽子組件觸發的事件,並執行相應的處理函數:
<!-- ParentComponent.vue -->
<template>
  <div>
    <ChildComponent @message-to-parent="handleMessageFromChild" />
    <p>Message from child: {{ childMessage }}</p>
  </div>
</template>

<script>
import ChildComponent from './ChildComponent.vue';

export default {
  components: {
    ChildComponent
  },
  data() {
    return {
      childMessage: ''
    };
  },
  methods: {
    handleMessageFromChild(message) {
      this.childMessage = message;
    }
  }
};
</script>
我們通過在子組件定義了一個@click事件,這個事件會觸發你在子組件定義好的emit,然後你再在父組件監聽這個emit,并且觸發你在父組件自己定義的事件。我們可以再看一個例子:
<!-- ChildComponent.vue -->
<template>
  <div>
    <!-- 這裡是一個字符串 -->
    <v-btn @click="sendString">傳遞字符串</v-btn>

    <!-- 這裡是一個數組 -->
    <v-btn @click="sendArray">傳遞數組</v-btn>

    <!-- 這裡是一個Proxy對象 -->
    <v-btn @click="sendProxy">傳遞Proxy</v-btn>
  </div>
</template>

<script>
export default {
  methods: {
    sendString() {
      // 傳遞一個字符串給父層組件
      this.$emit('string-event', '這是一個字符串');
    },
    sendArray() {
      // 傳遞一個數組給父層組件
      this.$emit('array-event', [1, 2, 3, 4, 5]);
    },
    sendProxy() {
      // 創建一個Proxy對象
      const proxy = new Proxy({ key: 'value' }, {
        get(target, key) {
          console.log(`正在訪問屬性:${key}`);
          return target[key];
        },
        set(target, key, value) {
          console.log(`正在設置屬性:${key},新值為:${value}`);
          target[key] = value;
        },
      });

      // 將Proxy轉換為普通對象
      const proxyObject = Object.assign({}, proxy);

      // 傳遞Proxy對象給父層組件
      this.$emit('proxy-event', proxyObject);
    },
  },
};
</script>
<!-- ParentComponent.vue -->
<template>
  <div>
    <child-component @string-event="handleString" @array-event="handleArray" @proxy-event="handleProxy"></child-component>

    <!-- 顯示從子層組件接收到的數據 -->
    <div>
      <p>接收到的字符串:{{ receivedString }}</p>
      <p>接收到的數組:{{ receivedArray }}</p>
      <p>接收到的Proxy對象:{{ receivedProxy }}</p>
    </div>
  </div>
</template>

<script>
import ChildComponent from './components/ChildComponent.vue';

export default {
  components: {
    ChildComponent,
  },
  data() {
    return {
      receivedString: '',
      receivedArray: [],
      receivedProxy: null,
    };
  },
  methods: {
    handleString(stringData) {
      // 處理接收到的字符串
      this.receivedString = stringData;
    },
    handleArray(arrayData) {
      // 處理接收到的數組
      this.receivedArray = arrayData;
    },
    handleProxy(proxyData) {
      // 處理接收到的Proxy對象
      this.receivedProxy = proxyData;
    },
  },
};
</script>
是不是覺得很複雜?我們來看一下流程圖可能會幫助你瞭解: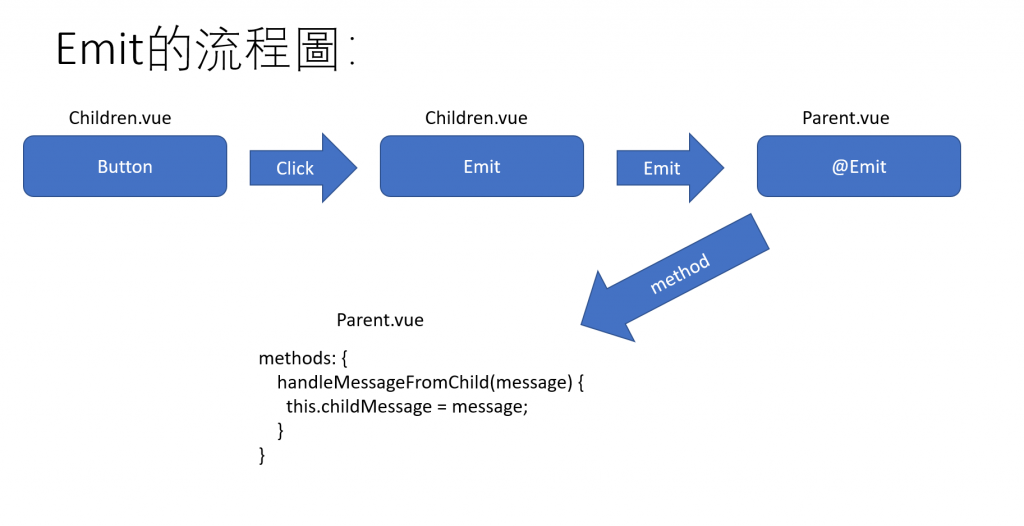
這就是在Vue 3中在子組件傳遞值給父組件的基本方法。我們可以根據自己的需求來擴展和自定義這些emit。
本篇終。


 iThome鐵人賽