本文同步發佈於毛毛的踩坑人生
前面幾天,大致上講了整個專案的大框架
應該對這個專案有了比較基礎的認識
今天總算要開始串券商的 API
待會要介紹的是永豐金證券的 Shioaji
如果各位的券商不是永豐金也無妨
其實經過前幾天的介紹
這個專案其實就是把各種不同的券商 API
包裝成相同的介面、方法
那我們就開始了
首先,Python 使用的版本是 3.6+,本文使用的是 3.11.5
下面的安裝與官方提供的稍有不同
因為我們的架構至少會有 prorobuf, gRPC
除了 shiojai 之外,還需要 grpcio, grpcio-tools
$pip3 install -U \
  shioaji[speed] \
  grpcio \
  grpcio-tools

Collecting shioaji[speed]
  Obtaining dependency information for shioaji[speed] from https://files.pythonhosted.org/packages/c4/66/19d0b591d74eb17482dae8487ef8515038372a3059049e2c164b03fba41f/shioaji-1.1.12-cp311-cp311-macosx_10_9_x86_64.whl.metadata
  Downloading shioaji-1.1.12-cp311-cp311-macosx_10_9_x86_64.whl.metadata (7.4 kB)
Collecting grpcio
  Obtaining dependency information for grpcio from https://files.pythonhosted.org/packages/a1/9c/ef89aae6948949a891a50e19bb951aac2f7ceb9561fdfdcd07c9b890ed6c/grpcio-1.58.0-cp311-cp311-macosx_10_10_universal2.whl.metadata
  Downloading grpcio-1.58.0-cp311-cp311-macosx_10_10_universal2.whl.metadata (4.0 kB)
Collecting grpcio-tools
  Obtaining dependency information for grpcio-tools from https://files.pythonhosted.org/packages/41/58/4b338ff3d46eff8ea77809a83149a8ec05cec84f563908153c0405ef1bc8/grpcio_tools-1.58.0-cp311-cp311-macosx_10_10_universal2.whl.metadata
  Downloading grpcio_tools-1.58.0-cp311-cp311-macosx_10_10_universal2.whl.metadata (6.2 kB)
如果能夠順利跑完,沒有錯誤訊息
那就代表安裝成功
要不要使用各種 virtural python 的技術,就看各位
我自己是習慣使用 venv
使用以下指令創建一個環境
# 創建環境
$python3 -m venv venv

# 啟動環境
source ./venv/bin/activate
再來分享一下我的專案結構
.
├── Dockerfile
├── Makefile
├── README.md
├── data
│   └── ca.pfx
├── logs
├── mypy.ini
├── pyproject.toml
├── requirements.txt
├── scripts
├── src
│   ├── pb
│   │   ├── basic_pb2.py
│   │   ├── basic_pb2.pyi
│   │   ├── basic_pb2_grpc.py
│   │   ├── trade_pb2.py
│   │   ├── trade_pb2.pyi
│   │   └── trade_pb2_grpc.py
│   └── main.py
└── venv
    ├── bin
    ├── include
    ├── lib
    └── pyvenv.cfg
第一步,至少要能夠登入
成功登入,才能夠開啟未來的每一個方法
我這邊使用的是 Shioaji,每個券商不盡相通
也不一定是用 Python
不過可以參考參考
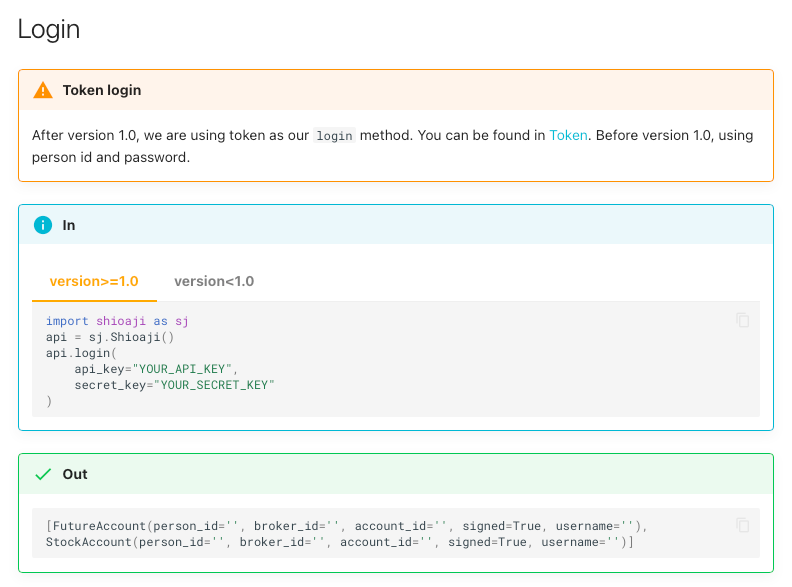
先附上官方說明

無論我們是不是在 Python 這一層寫交易邏輯
還是要將官方給的東西包裝一下
先上 Code
class ShioajiAuth:
    def __init__(self, api_key: str, api_key_secret: str, person_id: str, ca_password: str):
        self.api_key = api_key
        self.api_key_secret = api_key_secret
        self.person_id = person_id
        self.ca_password = ca_password

class Shioaji:
    def __init__(self):
        self.__api = sj.Shioaji()
        self.__login_status_lock = threading.Lock()
        self.__login_progess = int()

    def login(self, user: ShioajiAuth):
        def login_cb(security_type: sc.SecurityType):
            with self.__login_status_lock:
                if security_type.value in [item.value for item in sc.SecurityType]:
                    self.__login_progess += 1
                    logger.info("login progress: %d/4, %s", self.__login_progess, security_type)

        try:
            self.__api.login(
                api_key=user.api_key,
                secret_key=user.api_key_secret,
                contracts_cb=login_cb,
                subscribe_trade=True,
            )

        except SystemMaintenance as exc:
            time.sleep(75)
            raise RuntimeError("login 503 system maintenance") from exc

        except Exception as error:
            time.sleep(30)
            raise RuntimeError("login error") from error

        while True:
            with self.__login_status_lock:
                if self.__login_progess == 4:
                    break

        self.__api.activate_ca(
            ca_path=f"./data/ca.pfx",
            ca_passwd=user.ca_password,
            person_id=user.person_id,
        )

        return self
這邊新增一類,名稱同樣叫做 Shioaji
額外弄一個類,把 API Key, Secret, 憑證密碼給包裝起來
並且也把 login 實作,先包裝一層
有一些比較偏 Shioaji 才需要的邏輯,這邊就不一一講述了
前面不斷在重複,我們今天做的是包裝成 gRPC
讓後面的 Golang 可以使用
這邊定義了 basic.proto
新增了一個 rpc Login
service BasicDataInterface {
    rpc Login(google.protobuf.Empty) returns (google.protobuf.Empty) {}
}
一樣把 Protobuf 編譯過後
完整的合起來看看
# Import the necessary gRPC libraries
import logging
import threading
import time
from concurrent import futures

import google.protobuf.empty_pb2
import grpc
import shioaji as sj
import shioaji.constant as sc
from shioaji.error import SystemMaintenance

from logger import logger
from pb import basic_pb2_grpc

logging.getLogger("shioaji").propagate = False


# Define the gRPC service
class Basic(basic_pb2_grpc.BasicDataInterfaceServicer):
    def __init__(self):
        self.shioaji = Shioaji()

    def Login(self, request, _):
        self.shioaji.login(
            ShioajiAuth(
                api_key="xxxxxxxxx",
                api_key_secret="xxxxxxxxx",
                person_id="xxxxxxxxx",
                ca_password="xxxxxxxxx",
            )
        )
        return google.protobuf.empty_pb2.Empty()


class ShioajiAuth:
    def __init__(self, api_key: str, api_key_secret: str, person_id: str, ca_password: str):
        self.api_key = api_key
        self.api_key_secret = api_key_secret
        self.person_id = person_id
        self.ca_password = ca_password


class Shioaji:
    def __init__(self):
        self.__api = sj.Shioaji()
        self.__login_status_lock = threading.Lock()
        self.__login_progess = int()

    def login(self, user: ShioajiAuth):
        def login_cb(security_type: sc.SecurityType):
            with self.__login_status_lock:
                if security_type.value in [item.value for item in sc.SecurityType]:
                    self.__login_progess += 1
                    logger.info("login progress: %d/4, %s", self.__login_progess, security_type)

        try:
            self.__api.login(
                api_key=user.api_key,
                secret_key=user.api_key_secret,
                contracts_cb=login_cb,
                subscribe_trade=True,
            )

        except SystemMaintenance as exc:
            time.sleep(75)
            raise RuntimeError("login 503 system maintenance") from exc

        except Exception as error:
            time.sleep(30)
            raise RuntimeError("login error") from error

        while True:
            with self.__login_status_lock:
                if self.__login_progess == 4:
                    break

        self.__api.activate_ca(
            ca_path=f"./data/ca.pfx",
            ca_passwd=user.ca_password,
            person_id=user.person_id,
        )

        return self


# Run the gRPC server
def run_server():
    server = grpc.server(futures.ThreadPoolExecutor(max_workers=10))
    basic_pb2_grpc.add_BasicDataInterfaceServicer_to_server(Basic(), server)
    server.add_insecure_port("[::]:50051")
    server.start()
    print("Server started. Listening on port 50051.")
    server.wait_for_termination()


if __name__ == "__main__":
    run_server()
還沒正式進到 Golang
不過可以試試跑下面這段
package main

import (
 "context"
 "log"

 "gop/pb"

 "google.golang.org/grpc"
 "google.golang.org/protobuf/types/known/emptypb"
)

const (
 address = "localhost:50051"
)

func main() {
 conn, err := grpc.Dial(address, grpc.WithInsecure())
 if err != nil {
  log.Fatalf("did not connect: %v", err)
 }
 defer conn.Close()
 c := pb.NewBasicDataInterfaceClient(conn)

 _, err = c.Login(context.Background(), &emptypb.Empty{})
 if err != nil {
  log.Fatalf("could not greet: %v", err)
 }
}
在 Python 這邊應該要已經順利登入
Server started. Listening on port 50051.
Response Code: 0 | Event Code: 0 | Info: host '203.66.91.161:80', hostname '203.66.91.161:80' IP 203.66.91.161:80 (host 1 of 1) (host connection attempt 1 of 1) (total connection attempt 1 of 1) | Event: Session up
INFO[2023-09-20 21:29:28] login progress: 1/4, SecurityType.Index
INFO[2023-09-20 21:29:28] login progress: 2/4, SecurityType.Stock
INFO[2023-09-20 21:29:28] login progress: 3/4, SecurityType.Future
INFO[2023-09-20 21:29:28] login progress: 4/4, SecurityType.Option
今天總算是實作了第一個方法
常常在做專案的各位
一定會知道,基礎建設是非常重要的
這次鐵人賽,可能沒辦法寫到非常詳細
但會儘量分享出我的框架
