
|𝑎𝑏⟩=|𝑎⟩⊗|𝑏⟩或是|𝑎⟩|𝑏⟩
|a>為第一個量子位,|b>為第二個量子位
向量表示法如下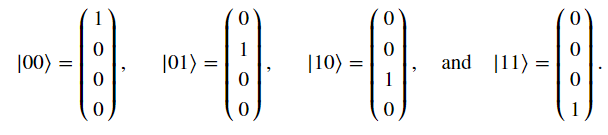
from qiskit import QuantumCircuit
# remark the coincise representation of a quantum circuit
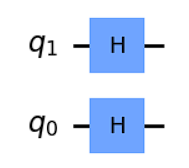
qc = QuantumCircuit(2)
qc.h(0)
qc.h(1)
qc.draw(output='mpl',reverse_bits=True)
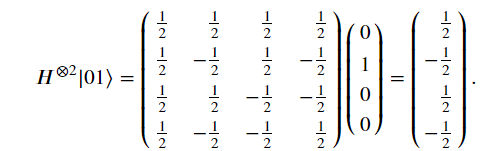
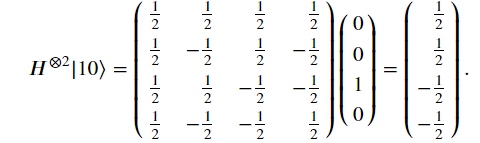
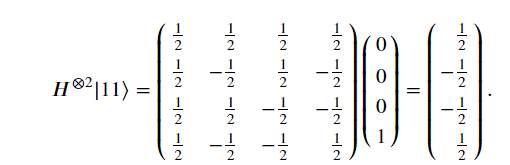
他會形成一個向量運算矩陣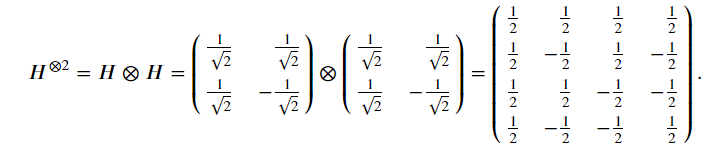
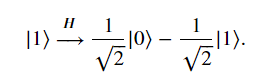
當雙Hadamard Gate使用到不同的量子狀態時,結果如下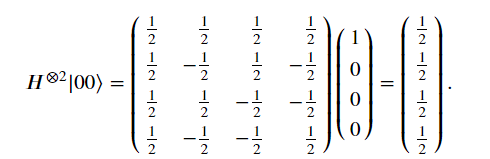
X Gate 就是翻轉量子態
X|0>=|1>
X|1>=|0>
CNOT Gate則是區分成第一個量子位是control位,而第二個量子位則是target位
Target qubit is controlled by control qubit
𝐶𝑁𝑂𝑇|00⟩=|00⟩
𝐶𝑁𝑂𝑇|01⟩=|01⟩
𝐶𝑁𝑂𝑇|10⟩=|11⟩
𝐶𝑁𝑂𝑇|11⟩=|10⟩
大家可以拿下面的程式碼去驗證上面的結果
pairs = ['00','01','10','11']

for pair in pairs:
    from qiskit import QuantumCircuit, execute, Aer
    qc = QuantumCircuit(2,2)
    # initialize the pair
    # we follow the reading order in Qiskit
    # q1-tensor-q0
    if pair[1] == '1':
        qc.x(0)
    if pair[0] =='1':
        qc.x(1)
    qc.cx(1,0)
    qc.measure(0,0)
    qc.measure(1,1)
    display(qc.draw(output='mpl',reverse_bits=True))
    job = execute(qc,Aer.get_backend('qasm_simulator'),shots=1024)
    counts = job.result().get_counts(qc)
    print(pair,"--CNOT->",counts)
有趣的是,在多量子位系統操作時會發生Phase Kickback的現象
# import all necessary objects and methods for quantum circuits
from qiskit import QuantumRegister, ClassicalRegister, QuantumCircuit, execute, Aer

q =  QuantumRegister(2,"q") # quantum register with 2 qubits
c = ClassicalRegister(2,"c") # classical register with 2 bits

qc = QuantumCircuit(q,c) # quantum circuit with quantum and classical registers

# the up qubit is in |0>
#q[0]是右側的量子位,q[1]是左側的量子位
# set the down qubit to |1>
qc.x(q[0]) # apply x-gate (NOT operator)
#因此現在的量子位會是|01>
qc.barrier()

# apply Hadamard to both qubits.
qc.h(q[0])
qc.h(q[1])

# apply CNOT operator, where the controller qubit is the up qubit and the target qubit is the down qubit.
qc.cx(1,0)

# apply Hadamard to both qubits.
qc.h(q[0])
qc.h(q[1])

# measure both qubits
qc.measure(q,c)

# draw the circuit in Qiskit reading order
display(qc.draw(output='mpl',reverse_bits=True))

# execute the circuit 100 times in the local simulator
job = execute(qc,Aer.get_backend('qasm_simulator'),shots=100)
counts = job.result().get_counts(qc)
print(counts)
1.起先我們設定量子位q[1]到|0>,q[0]到|1>
2.加入Hadamard
3.加入CNOT Gate,control qubit是q[1],target qubit是q[0]
4.加入Hadamard
5.量測
測量結果會是|11>,而不是|01>
這是因為受到Hadamard疊加態的影響
從數學方面來看
初始狀態|01>為
可拆分為
當加入CNOT Gate,系統變為
將()內的負號提出來
變成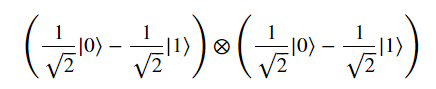
因此最後再施加Hadamard Gate時,兩個量子位變成|11>
這是7量子位系統,大家可以實際去跑跑看,驗證是否有Phase Kickback
# import all necessary objects and methods for quantum circuits
from qiskit import QuantumRegister, ClassicalRegister, QuantumCircuit, execute, Aer

# Create a circuit with 7 qubits.
q =  QuantumRegister(7,"q") # quantum register with 7 qubits
c = ClassicalRegister(7) # classical register with 7 bits

qc = QuantumCircuit(q,c) # quantum circuit with quantum and classical registers

# the top six qubits are already in |0>

# set the bottom qubit to |1>
qc.x(0) # apply x-gate (NOT operator)

# define a barrier
qc.barrier()

# apply Hadamard to all qubits.
for i in range(7):
    qc.h(q[i])

    # define a barrier
qc.barrier()


# apply CNOT operator (q[1],q[0])
# apply CNOT operator (q[4],q[0])
# apply CNOT operator (q[5],q[0])
qc.cx(q[1],q[0])
qc.cx(q[4],q[0])
qc.cx(q[5],q[0])

# define a barrier
qc.barrier()


# apply Hadamard to all qubits.
for i in range(7):
    qc.h(q[i])

# define a barrier
qc.barrier()

# measure all qubits
qc.measure(q,c)

# draw the circuit in Qiskit reading order
display(qc.draw(output='mpl',reverse_bits=True))

# execute the circuit 100 times in the local simulator
job = execute(qc,Aer.get_backend('qasm_simulator'),shots=100)
counts = job.result().get_counts(qc)
print(counts)
參考資料:Qworld教材
