
了解元件的生命週期也是在學習React重要的一環,React建立元件有兩種方法,一種是使用 class 建立,另一種則是用 function component 建立。
(class建立)
import React, { Component } from 'react';

class Counter extends Component {
    constructor(props) {
        super(props);
        this.state = {
            count: 0
        };
    }

    increment = () => {
        this.setState(prevState => ({ count: prevState.count + 1 }));
    }

    render() {
        return (
            <div>
                <p>Count: {this.state.count}</p>
                <button onClick={this.increment}>Increment</button>
            </div>
        );
    }
}

// 元件使用方式:
// <Counter />
(function建立)
import React, { useState } from 'react';

function Counter() {
    const [count, setCount] = useState(0);

    const increment = () => {
        setCount(prevCount => prevCount + 1);
    };

    return (
        <div>
            <p>Count: {count}</p>
            <button onClick={increment}>Increment</button>
        </div>
    );
}

// 元件使用方式:
// <Counter />
可以看到使用這兩種方式建立元件的結果其實差不多,但function的撰寫比較簡潔,在實務上的開發大部分也都轉為使用function來建立,而function component 使用 Hook 的方法控制狀態,相較於 class 也比較不會因為錯誤的操控生命週期的方法而造成不預期的 bug。
從元件被建立到元件被移除的過程,稱為元件的生命週期(LifeCycle)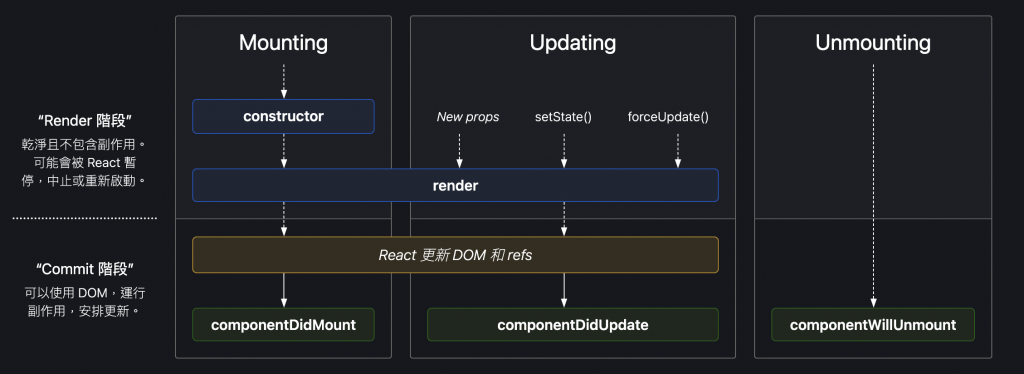
生命週期可以分成三個階段:
1. constructor => 元件進行Mounting的後會先調用constructor,主要用來初始化狀態和綁定。(在constructor中一定要先調用super(props),之後才能夠使用this.props)
2. render => 之後接著執行render方法,只要 state、props 有改變,render將會重新被調用。
class component 會跑元件裡面 render 這個function
function component 會跑元件裡的 return
3. componentDidMount => 當元件已經渲染完成,最後會調用 componentDidMount 方法,在這個狀態下可以開始執行一些副作用的功能,比如使用API
1. trigger update => 在這個階段會根據state或props是否有變動來觸發執行
2. render => 當stste或props要進行更新時,React會用diffing演算法來確定 Virtual DOM(虛擬 DOM) 的哪些部分需要在真實 DOM 中更新,以確保只有真正更改的部分被重新渲染,增加效率。
3. componentDidUpdate => 元件更新完後componentDidUpdate會被調用,如果在componentDidUpdate中直接更新state會造成無限迴圈,瀏覽器會當掉。
但有時我們需要在元件更新後進行某些操作,例如基於 props 的更改去更新 state,為了避免無限迴圈的狀況,就會需要使用條件式來檢查 props 或 state 是否真的改變了,然後再決定是否更新 state。
1.componentWillUnmount => 當一個元件被清除時,則會調用componentWillUnmount的方法,當我們執行一些清除需求時,很適合用在這個步驟進行
例如:
在前篇文章有介紹了react Hook是什麼,在function component中Hook即是用來管理生命狀態的方法。
useEffect提供了我們一種方法來操作副作用,它可以視為 componentDidMount, componentDidUpdate, 和 componentWillUnmount 這幾個生命週期方法的組合。
在這個範例中,當 DataFetchingComponent 元件首次被掛載到 DOM 中,useEffect 會立刻執行,因為其依賴陣列是空的,所以它只會在掛載階段執行一次, useEffect 的內部,會發起一次非同步的請求,從 URL 取得資料,當資料獲取成功後,它會更新元件的 data 狀態,導致元件重新渲染並顯示從 API 取得的資料。如果元件在後續被移除,這個 useEffect 不會進清除動作,因為沒有提供清除函數。
import React, { useState, useEffect } from 'react';

function DataFetchingComponent() {
  const [data, setData] = useState([]);

  useEffect(() => {
    fetch('https://api.example.com/data')
      .then(response => response.json())
      .then(data => setData(data));
  }, []); // 空的依賴陣列,代表著這個 effect 只會在 mount 時跑一次

  return (
    <div>
      {data.map(item => (
        <div key={item.id}>{item.name}</div>
      ))}
    </div>
  );
}
參考文章
React 學習筆記 3 — 聊聊元件的生命週期與 Hooks
React 生命週期?
useEffect 的完整指南
Lifecycle of Reactive Effects