昨天對 coroutine 有了基本的認識後,今天就來實作吧!
google codelab 的範例專案使用了 MVVM 架構,雖然昨天看過了,但我們還是再看一次架構圖吧!
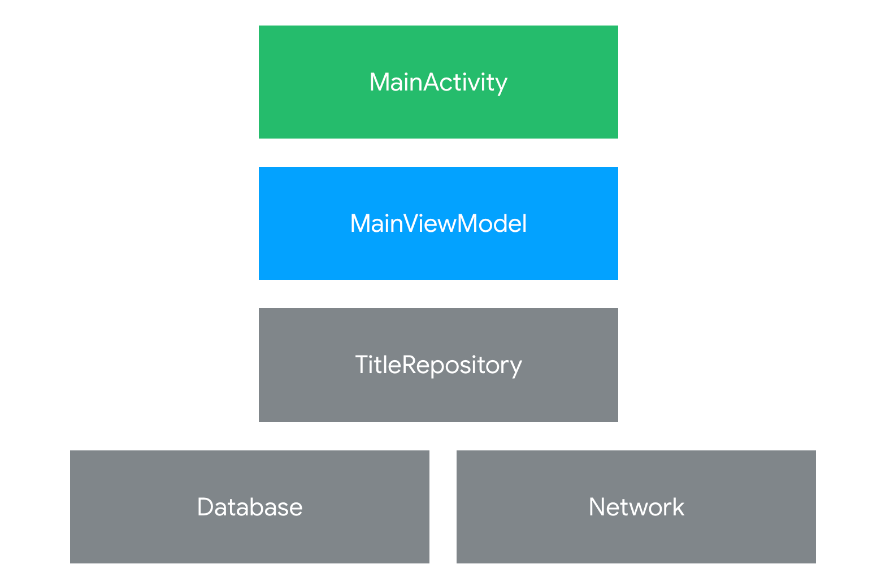
MainActivity : 顯示 UI、註冊監聽器,將事件傳遞給 MainViewModel,使其透過 LiveData 更新畫面。MainViewModel : 負責處理點擊事件,並使用 LiveData 和 MainActivity 溝通。TitleRepository : 向 server 請求資料,並將取回的資料儲存到 Database。解釋完架構,來進入到程式碼 :
因為專案使用的是 MVVM,而 AndroidX 已經將 CoroutineScope 整合至 ViewModel 中,所以我們需要在 build.gradle (Module) 引用其 library :
dependencies {
  ...
  // replace x.x.x with latest version
  implementation "androidx.lifecycle:lifecycle-viewmodel-ktx:x.x.x"
}
此套件將 viewModelScope 作為 ViewModel 的 extension function,目的是讓 scope 綁定到 Dispatchers.Main ,使 coroutine 在主線程被啟動,如此一來也不用在特地切到主線程來更新畫面;最後,在 ViewModel 被清除掉時 coroutine 也會自動被取消,使我們能控制好 coroutine 的生命週期。
範例有個待實作的程式碼 updateTaps(),功能是等待一秒後更新畫面。透過 BACKGROUND ExecutorService 讓程式碼在背景執行緒中運行,當執行到 sleep()時會阻塞當前的執行緒;所以如果我們將BACKGROUND.submit{}拿掉,使其在主執行緒中運行的話,畫面就會被凍結一秒。
/**
* Wait one second then update the tap count.
*/
private fun updateTaps() {
   // TODO: Convert updateTaps to use coroutines
   tapCount++
   BACKGROUND.submit {
       Thread.sleep(1_000)
       _taps.postValue("$tapCount taps")
   }
}
用 coroutine 改寫 :
/**
* Wait one second then display a snackbar.
*/
fun updateTaps() {
   // launch a coroutine in viewModelScope
   viewModelScope.launch {
       tapCount++
       // suspend this coroutine for one second
       delay(1_000)
       // resume in the main dispatcher
       // _snackbar.value can be called directly from main thread
       _taps.postValue("$tapCount taps")
   }
}
這段程式碼做的事情和上面的一樣,但有幾點不同 :
viewModelScope 有自己預設的調度器**Dispatchers.Main**,表示 coroutine 會在主執行緒被啟動。coroutine被 viewModelScope 啟動後,當程式執行到 delay(1_000),時,被啟動的 coroutine 會從當前的主執行緒切換到其他指定的執行緒執行任務 ,因為 delay(1_000) 屬於 suspend 函式
delay() 是 suspend 函式,所以就算 coroutine 是在主執行緒上處理任務,但執行到 delay() 時,並不會阻塞當前的主執行緒,而是透過 Dispatcher 將目前正在做事的 coroutine 切換到其他指定的執行緒去執行 suspend 函式,等到 suspend 結束後會才會恢復 (resume),也就是將切出去的 coroutine 在切回原來的主執行緒,繼續執行他的任務 - 更新畫面。suspend 在 Kotlin 中可視為關鍵字,表示函式必須要在 coroutine 內執行,也需要在此函式內再實現一個 suspend 函式,因此主要是用來提醒此函式是屬於耗時函式,所以需要在 coroutine 內被執行。接著我們要使用 callback / coroutine 的方式向 server 取得 title,並更新畫面。
先看一下使用 callback 的版本 :
/**
* Update title text via this LiveData
*/
val title = repository.title

// ... other code ...

/**
* Refresh the title, showing a loading spinner while it refreshes and errors via snackbar.
*/
fun refreshTitle() {
   // TODO: Convert refreshTitle to use coroutines
   _spinner.value = true
   repository.refreshTitleWithCallbacks(object: TitleRefreshCallback {
       override fun onCompleted() {
           _spinner.postValue(false)
       }

       override fun onError(cause: Throwable) {
           _snackBar.postValue(cause.message)
           _spinner.postValue(false)
       }
   })
}
interface TitleRefreshCallback {
    fun onCompleted()
    fun onError(cause: Throwable)
}
TitleRefreshCallback 有兩個實作的方法,onCompleted() 、onError(),若取得資料失敗會執行 onError() ,並透過 snackBar 顯示錯誤訊息;成功則是會走 onCompleted()
object: TitleRefreshCallback是 Kotlin 中建構匿名類別的方法,在這邊用來建立一個實作TitleRefreshCallback的物件。
接著用 coroutine 改寫 :
suspend fun refreshTitle() {
    // TODO: Refresh from network and write to database
    delay(500)
}
還記得前面提到的 suspend 函式嗎? suspend 函式需要在 coroutine內執行,在此函式內也必須再呼叫另一個 suspend 函式,這樣才能算是一個有意義的 suspend 函式。
我們先在 TitleRepository.kt 內定義一個負責更新 title 的 suspend 函式 :
suspend fun refreshTitle() {
    // TODO: Refresh from network and write to database
    delay(500)
}
先暫時在此函式中延遲 500 毫秒。
接著回到 MainViewModel.kt, 將 refreshTitle() 改為 coroutine 版本 :
/**
 * Refresh the title, showing a loading spinner while it refreshes and errors via snackbar.
 */
fun refreshTitle() {

    viewModelScope.launch {
        try {
            _spinner.value = true
            repository.refreshTitle()
        }
        catch (e: TitleRefreshError) {
            _snackBar.value = e.message
        }
        finally {
            _spinner.value = false
        }
    }
}
來解釋一下上述的程式碼 :
viewModelScope.launch{}
因為我們是透過 viewModelScope.launch 來啟動 coroutine,所以當使用者離開此畫面時, 在此 Scope 涵蓋的所有 coroutine 都會被取消,也就是不會再向 server 或本地資料庫發出請求。
除了使用
launch啟動coroutine之外,也可以透過其他方式像是async來啟動,以下是使用情境 :
launch : 用於執行後不需要返回執行結果async : 用於執行須會有回傳結果的情況
可以依照不同的使用情境來啟動 coroutine,也可以在 coroutine 啟動後再透過 launch 或是 async 啟動子 coroutine。
repository.refreshTitle()
refreshTitle() 是在向 repository 請求資料,還記得這是一個 suspend 函式吧? 所以我們會在 coroutine 內執行,並且在函式恢復 (resume) 前,也就是在函式的執行期間內都不會阻塞主線程。
} catch (error: TitleRefreshError) {
    _snackBar.value = error.message
} finally {
    _spinner.value = false
}
上述程式碼主要是用來處理請求資料時在 suspend 函式內被拋出的錯誤,在 suspend 函式中被拋出的錯誤可以直接使用 try/catch 處理。
今天查了很多關於 coroutine 的資料,因為在不清楚原理的情況下實作起來也是懵懵懂懂的,總覺得雖然做出來了但總有一層霧包著,心裡不太舒服。但也是因為這樣就花了很多時間在找資料,雖然是照著 codelab 實作,但內容都是經過筆者消化後的,希望能一起更加了解 coroutine!
把今日碎念改為今日推推好了~~