Python 在執行時,通常是採用同步的任務處理模式 ( 一個處理完成後才會接下去處理第二個 ),然而 Python 的標準函式「concurrent.futures」,提供了平行任務處理 ( 非同步 ) 的功能,能夠同時處理多個任務,這篇教學會介紹 concurrent.futures 的用法。
本篇使用的 Python 版本為 3.7.12,所有範例可使用 Google Colab 實作,不用安裝任何軟體 ( 參考:使用 Google Colab )
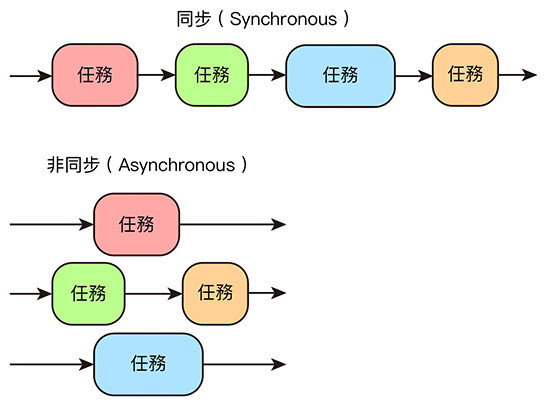
同步和非同步的常見說法是:「同步模式下,每個任務必須按照順序執行,後面的任務必須等待前面的任務執行完成,在非同步模式下,後面的任務不用等前面的,各自執行各自的任務」,也可以想像成「同一個步道 vs 不同步道」,透過步道的方式,會更容易明白同步和非同步。( 因為有時會將同步與非同步的中文字面意思,想成「一起走」或「不要一起走」,很容易搞錯 )
- 同步:「同一個步道」,只能依序排隊前進。
- 非同步:「不 ( 非 ) 同步道」,可以各走各的。

concurrent.futures 提供了 ThreadPoolExecutor 和 ProcessPoolExecutor 兩種可以平行處理任務的實作方法,ThreadPoolExecutor 是針對 Thread ( 執行緒 ),ProcessPoolExecutor 是針對 Process ( 程序 ),下方是 Thread 和 Process 的簡單差異說明:
| 英文 | 中文 | 說明 |
|---|---|---|
| Thread | 執行緒 | 程式執行任務的基本單位。 |
| Process | 程序 | 啟動應用程式時產生的執行實體,需要一定的 CPU 與記憶體資源,Process 由一到多個 Thread 組成,同一個 Process 裡的 Thread 可以共用記憶體資源。 |
要使用 concurrent.futures 必須先 import concurrent.futures 模組,或使用 from 的方式,單獨 import 特定的類型。
更多資訊可以參考 Python 官方文件:concurrent.futures 啟動平行任務
import concurrent.futures
from concurrent.futures import ThreadPoolExecutor
ThreadPoolExecutor 會透過 Thread 的方式建立多個 Executors ( 執行器 ) ,執行並處理多個任務 ( tasks ),ThreadPoolExecutor 有四個參數,最常用的為 max_workers:
| 參數 | 說明 |
|---|---|
| max_workers | Thread 的數量,預設 5 ( CPU number * 5,每個 CPU 可以處理 5 個 Thread),數量越多,運行速度會越快,如果設定小於等於 0 會發生錯誤。 |
| thread_name_prefix | Thread 的名稱,預設 ''。 |
| initializer | 每個 Thread 啟動時調用的可調用對象,預設 None。 |
| initargs | 傳遞給初始化程序的參數,使用 tuple,預設 ()。 |
使用 ThreadPoolExecutor 後,就能使用 Executors 的相關方法:
| 方法 | 參數 | 說明 |
|---|---|---|
| submit | fn, *args, **kwargs | 執行某個函式。 |
| map | func, *iterables | 使用 map 的方式,使用某個函式執行可迭代的內容。 |
| shutdown | wait | 完成執行後回傳信號,釋放正在使用的任何資源,wait 預設 True 會在所有對象完成後才回傳信號,wait 設定 False 則會在執行後立刻回傳。 |
舉例來說,下方的程式碼執行後,會按照順序 ( 同步 ) 顯示出數字,前一個任務尚未處理完,就不會執行後續的工作。
import time
def test(n):
    for i in range(n):
        print(i, end=' ')
        time.sleep(0.2)

test(2)
test(3)
test(4)

# 0 1 0 1 2 0 1 2 3
如果改成 ThreadPoolExecutor 的方式,就會發現三個函式就會一起進行 ( 如果執行的函式大於 5,可再設定 max_workers 的數值 )。
import time
from concurrent.futures import ThreadPoolExecutor

def test(n):
    for i in range(n):
        print(i, end=' ')
        time.sleep(0.2)

executor = ThreadPoolExecutor()  # 設定一個執行 Thread 的啟動器

a = executor.submit(test, 2)     # 啟動第一個 test 函式
b = executor.submit(test, 3)     # 啟動第二個 test 函式
c = executor.submit(test, 4)     # 啟動第三個 test 函式
executor.shutdown()              # 關閉啟動器 ( 如果沒有使用,則啟動器會處在鎖住的狀態而無法繼續 )

# 0 0 0 1 1 1 2 2 3
上述的做法,可以改用 with...as 的方式 ( 有點類似 open 的 with )。
import time
from concurrent.futures import ThreadPoolExecutor

def test(n):
    for i in range(n):
        print(i, end=' ')
        time.sleep(0.2)

with ThreadPoolExecutor() as executor:    # 改用 with...as
    executor.submit(test, 2)
    executor.submit(test ,3)
    executor.submit(test, 4)

# 0 0 0 1 1 1 2 2 3
上述的範例,也可以改用 map 的做法:
import time
from concurrent.futures import ThreadPoolExecutor

def test(n):
    for i in range(n):
        print(i, end=' ')
        time.sleep(0.2)

with ThreadPoolExecutor() as executor:
    executor.map(test, [2,3,4])

# 0 0 0 1 1 1 2 2 3
透過平行任務處理的方法,就能輕鬆做到「輸入文字,停止正在執行的函式」,以下方的例子而言,run 是一個具有「無窮迴圈」的函式,如果不使用平行任務處理,在 run 後方的程式都無法運作 ( 會被無窮迴圈卡住 ),而 keyin 是一個具有「input」指令的函式,如果不使用平行任務處理,在 keyin 後方的程式也無法運作 ( 會被 input 卡住 ),因此如果使用 concurrent.futures,就能讓兩個函式同時運行,搭配全域變數的做法,就能在輸入特定指令時,停止另外函式的運作。
import time
from concurrent.futures import ThreadPoolExecutor

a = True               # 定義 a 為 True

def run():
    global a           # 定義 a 是全域變數
    while a:           # 如果 a 為 True
        print(123)     # 不斷顯示 123
        time.sleep(1)  # 每隔一秒

def keyin():
    global a           # 定義 a 是全域變數
    if input() == 'a':
        a = False      # 如果輸入的是 a,就讓 a 為 False,停止 run 函式中的迴圈

executor = ThreadPoolExecutor()
e1 = executor.submit(run)
e2 = executor.submit(keyin)
executor.shutdown()
ProcessPoolExecutor 會透過 Process 的方式建立多個 Executors ( 執行器 ),執行並處理多個程序,ProcessPoolExecutor 有四個參數,最常用的為 max_workers:
| 參數 | 說明 |
|---|---|
| max_workers | Process 的數量,預設為機器的 CPU 數量,如果 max_workers 小於等於 0 或大於等於 61 會發生錯誤。 |
| thread_name_prefix | Thread 的名稱,預設 ''。 |
| initializer | 每個 Thread 啟動時調用的可調用對象,預設 None。 |
| initargs | 傳遞給初始化程序的參數,使用 tuple,預設 ()。 |
使用 ProcessPoolExecutor 後,就能使用 Executors 的相關方法:
| 方法 | 參數 | 說明 |
|---|---|---|
| submit | fn, *args, **kwargs | 執行某個函式。 |
| map | func, *iterables | 使用 map 的方式,使用某個函式執行可迭代的內容。 |
| shutdown | wait | 完成執行後回傳信號,釋放正在使用的任何資源,wait 預設 True 會在所有對象完成後才回傳信號,wait 設定 False 則會在執行後立刻回傳。 |
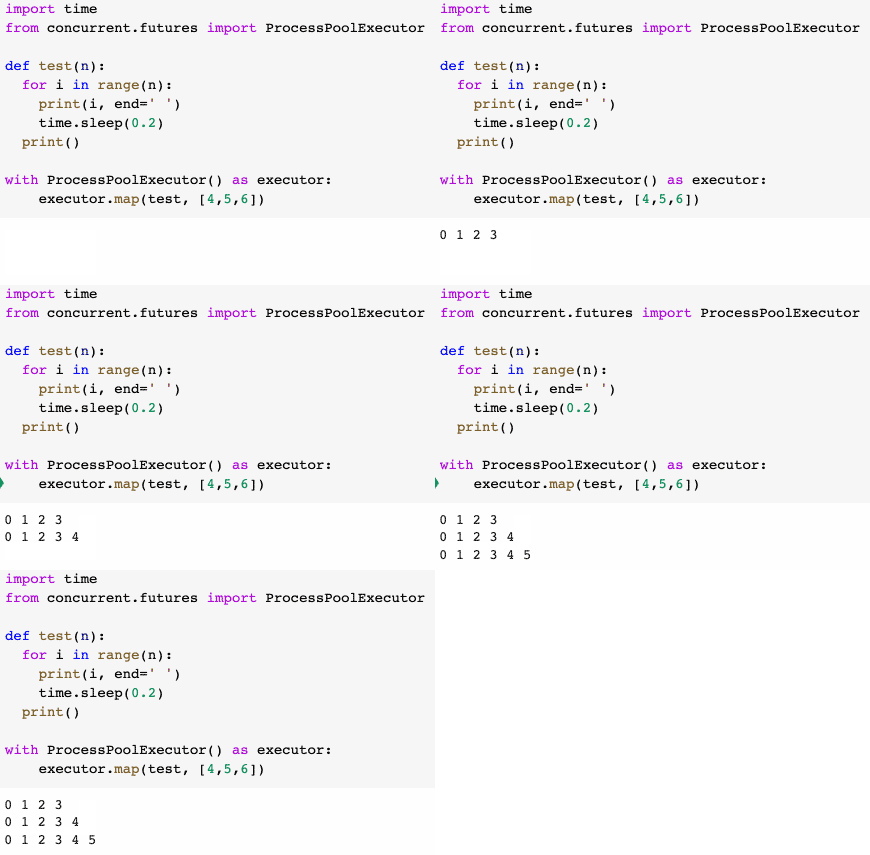
ProcessPoolExecutor 的用法基本上和 ThreadPoolExecutor 很像,但 ProcessPoolExecutor 主要會用做處理比較需要運算的程式,ThreadPoolExecutor 會使用於等待輸入和輸出 ( I/O ) 的程式,兩者執行後也會有些差別,ProcessPoolExecutor 執行後最後是顯示運算結果,而 ThreadPoolExecutor 則是顯示過程。
import time
from concurrent.futures import ProcessPoolExecutor

def test(n):
    for i in range(n):
        print(i, end=' ')
        time.sleep(0.2)
    print()

with ProcessPoolExecutor() as executor:
    executor.map(test, [4,5,6])

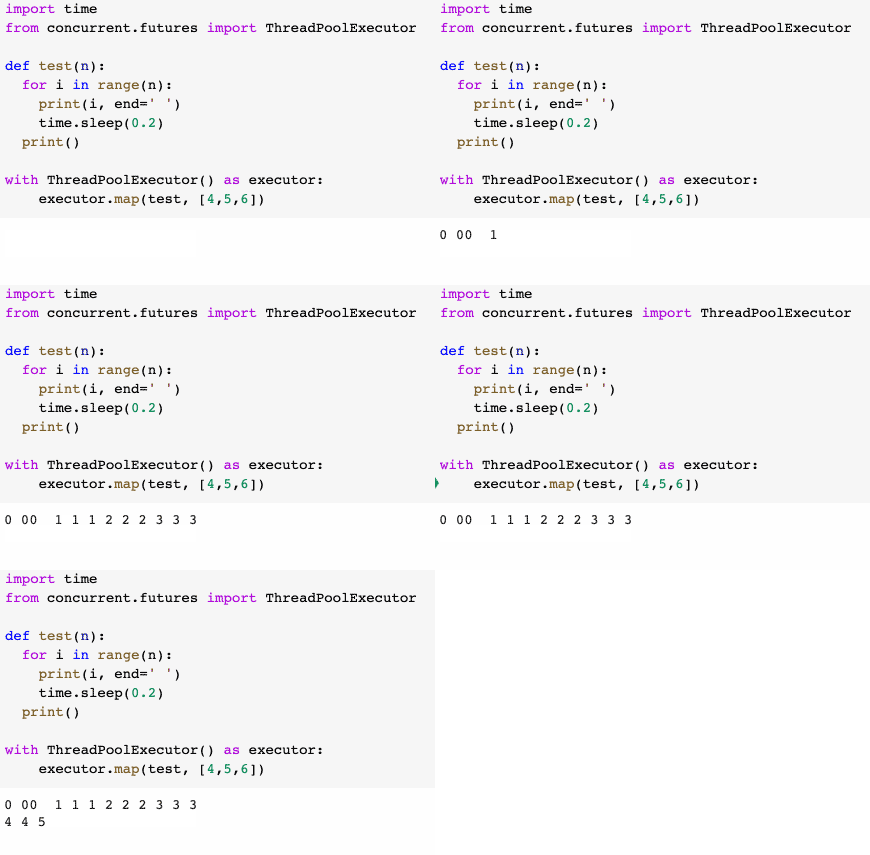
如果是使用 ThreadPoolExecutor 則會如下圖的結果:

此外,Python 3.5 之後 map() 方法多了 chunksize 參數可以使用,該參數只對 ProcessPoolExecutor 有效,可以提升處理大量可迭代物件的執行效能,chunksize 預設 1,數值越大效能越好 ( 以電腦本身 CPU 的效能為主 )。
import time
from concurrent.futures import ProcessPoolExecutor

def test(n):
    for i in range(n):
        print(i, end=' ')
        time.sleep(0.2)
    print()

with ProcessPoolExecutor() as executor:
    executor.map(test, [4,5,6], chunksize=5)  # 設定 chunksize
Python 的 concurrent.futures 內建函式庫是一個相當方便的函式庫,不僅可以讓原本同步的執行變成非同步,大幅減少工作時間,用法上也比使用 multiprocessing、threading、asyncio 容易得多,是相當推薦的內建函式庫。
大家好,我是 OXXO,是個即將邁入中年的斜槓青年,我有個超過一千篇教學的 STEAM 教育學習網,有興趣可以參考下方連結呦~ ^_^
