我們可以繼續使用昨天建立的 Hugging Face 虛擬環境。
加入 FastAPI 和 uvicorn:poetry add fastapi uvicorn。
FastAPI 是一個現代、高性能的 Python Web 框架,用於構建 API。它基於 Starlette 和 Pydantic,有良好的效能與數據的驗證。FastAPI 設計初衷是為了簡單、快速、高性能,並且方便擴展,它是一個非常適合構建 RESTful API 的選項。
Uvicorn 是一個以 ASGI(Asynchronous Server Gateway Interface)為基礎的高效能、非同步的 Web 伺服器,它專為 Python 的非同步網頁應用和框架設計,尤其是最常配合 FastAPI 一起服用。
Hugging Face 還有另一個更簡易的寫法,叫做 pipeline。 pipeline 是一個高階 API,用於快速、簡單地運行一系列自然語言處理(NLP)任務。它隱藏了許多底層詳細資訊,包括昨天做的分詞、模型、數據處理等,從而讓開發者能夠專注於具體的 NLP 任務(也就是說你理解你的任務很重要)
一個 pipeline 通常由一個或多個預訓練模型、一個分詞器和一個特定於某種任務(例如,文本分類、問答、翻譯等)的步驟組成。
建立一個新的 python 檔,叫 hf_pipeline.py,並貼上以下程式碼:
from transformers import pipeline

def get_sentiments_with_pipeline(model_name, tokenizer_name, string_arr):

    sentiment_analyzer = pipeline(task="sentiment-analysis",
                                  model=model_name,
                                  tokenizer=tokenizer_name,
                                  return_all_scores=True
                                  )

    # Get sentiments
    results = sentiment_analyzer(string_arr)

    return results


if __name__ == "__main__":
    model_name = "lxyuan/distilbert-base-multilingual-cased-sentiments-student"

    string_arr = [
        "我會披星戴月的想你,我會奮不顧身的前進,遠方煙火越來越唏噓,凝視前方身後的距離",
        "鯊魚寶寶 doo doo doo doo doo doo, 鯊魚寶寶"
    ]

    # 這裡 model_name 和 tokenizer_name 是用一樣的
    predictions = get_sentiments_with_pipeline(
        model_name, model_name, string_arr)
    print(predictions)
然後會得到下面的結果:
[[{'label': 'positive', 'score': 0.3915075659751892}, {'label': 'neutral', 'score': 0.12451168149709702}, {'label': 'negative', 'score': 0.4839807450771332}], [{'label': 'positive', 'score': 0.6033188700675964}, {'label': 'neutral', 'score': 0.159029021859169}, {'label': 'negative', 'score': 0.23765209317207336}]]
可以看到我們不用再用到 logit 和 softmax ,就可以得到比昨天還要好的結果了,甚至連分類的標簽都幫我們加上了。
downloader.py,並用下面的程式:from transformers import AutoTokenizer, AutoModelForSequenceClassification
from transformers import pipeline
from huggingface_intro import get_sentiments_with_pipeline
name = "lxyuan/distilbert-base-multilingual-cased-sentiments-student"
bert_tokenizer = AutoTokenizer.from_pretrained(name)
bert_tokenizer.save_pretrained("nlp_models/distilbert-base")
model = AutoModelForSequenceClassification.from_pretrained(name)
model.save_pretrained("nlp_models/distilbert-base")
# 這裡我們用剛剛 hf_pipeline.py 的 get_sentiments_with_pipeline
classifier = get_sentiments_with_pipeline(
model="nlp_models/distilbert-base",
tokenizer="nlp_models/distilbert-base",
task="sentiment-analysis",
return_all_scores=True)
print(classifier("I love you"))
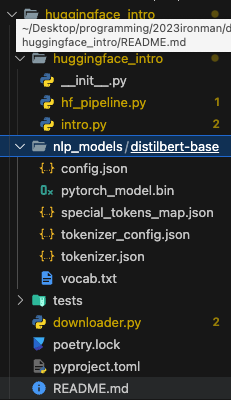
跑完之後,可以看到那句「I love you 」的分類結果,並且專案中會多了一個資料夾如下圖所示,這個資料夾就是下載到本地端的模型和分詞器了:

main.py,貼上以下程式碼:from fastapi import FastAPI
from http.client import HTTPException
from huggingface_intro.hf_pipeline import get_sentiments_with_pipeline
app = FastAPI()
@app.get("/")
async def root():
return {"message": "Hello World"}
@app.get("/predict_sentiment/")
async def predict_sentiment(text: str):
if not text:
raise HTTPException(
status_code=400, detail="Text parameter is required.")
model_name = "lxyuan/distilbert-base-multilingual-cased-sentiments-student"
# 這裡我們用剛剛 hf_pipeline.py 的 get_sentiments_with_pipeline
result = get_sentiments_with_pipeline(
model_name, model_name, text)
return result[0]
這段程式碼是一個使用 FastAPI 和 Hugging Face Transformers 的簡單範例。它設定了一個 FastAPI 應用並提供了兩個 HTTP GET 端點。
@app.get("/") 裝飾器定義了一個 GET 請求端點,該端點會返回一個 `Hello World'
@app.get("/predict_sentiment/") 裝飾器定義了另一個 GET 請求端點。其實用 POST 比較好,方便 demo 我們用 GET。
這裡調用我們剛剛自定義的 get_sentiments_with_pipeline 函數來執行預測,並返回結果。
接著我們這個 fastapi 跑在 uvicorn 上面,使用指令:uvicorn main:app --host 0.0.0.0 --port 5566 --reload
接著我們打開瀏覽器,輸入網址與參數:http://127.0.0.1:5566/predict_sentiment/?text=我肚子好餓好痛苦
就可以看到下面的結果:
[{"label":"positive","score":0.1493491232395172},{"label":"neutral","score":0.10488944500684738},{"label":"negative","score":0.7457614541053772}]
這下子你的 Web API 服務整合 Hugging Face 就完成了!!
這三天 Hugging Face 的進度飆車飆得有點快,更多詳細的 Hugging Face 的用法,可以參考我去年寫的變形金剛與抱臉怪---NLP 應用開發之實戰。
