嗨,大家好
希望今天可以一次講完表單的內容,順利完成HTML的部分,明天開始進入CSS。
噢剛剛打了3個半小時的文章,一不小心關掉網頁,現在得重新打了。如果今天有錯字或不通順的語句,請多多包涵。
讓我們第二次開始吧。
表單是由一個父標籤 <form> </form> ,裡面包了各種子標籤組成。
先從 <form> </form> 的屬性說起(這邊講兩個比較常用的)。
action
瀏覽器當按了送出表單後,要將表格的內容送去哪邊。
action="./form_act.php"
像這樣就代表說會送到同一層目錄底下 (忘記路徑的看Day08) 的 form_act.php 這隻檔案,這檔案裡面會針對這些收到的內容進行處理(例如說要存放到資料庫裡面)
以目前我們在學HTML來說,只需要知道裡面放入正確的路徑就好。
method
用來指定資料傳送的方法,比較常用的是 get 還有 post。method="post"
因為這邊的主題是針對HTML,所以就不針對這部分多做說明,有興趣的同學可以上網查資料哦。
接著讓我們進入表單中會使用到的標籤。
最常用的是(應該說必用) <input>
<input>標籤<input>不用結束標籤
我們用 <input> 的 type 屬性來決定他的用途,讓我們來看看他有什麼type(非常多種,我們舉幾個常見的)
text<input type="text"> 一個文字輸入欄位,通常會搭配 <label></label> 一起使用。
    <label>姓名:</label>
    <input>

是不是感覺很眼熟,我們申請帳號或是填任何表單,都有這種欄位。
目前我們寫得這個欄位不夠人性化,因為我們只能點選輸入框才能開始輸入。有些表單點選旁邊的「姓名:」,輸入框就可以開始輸入了。這是因為他們把這兩個標籤綁定了,如何做呢?
第一種方法:給 label 「for屬性」,給input 「id屬性」,兩個屬性裡面有一樣的值,就會綁定。
    <label for="name">姓名:</label>
    <input id="name">
第二種方法:第一種方法如果記不住哪個標籤給什麼屬性,那我們用第二種吧。用 <label> </label> 包住 <input>
<label>姓名:<input></label>
雖然現在比較人性化了,但希望能在輸入框底下有提示文字。
那就加個 placeholder 吧。
<input id="name" placeholder="請輸入中文名稱">

欄位必須填寫,加 required<input id="name" placeholder="請輸入中文名稱" required>
欄位無法編輯,加 disabled<input id="name" placeholder="請輸入中文名稱" disabled>
唯獨,加readonly<input id="name" placeholder="請輸入中文名稱" readonly>
password
密碼類型,可以用 type="password"
    <label >密碼:</label>
    <input type="password">

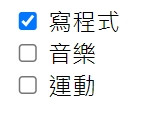
checkbox
多選的欄位 type="checkbox"
    <input type="checkbox" name="hobby" value="coding" checked> 寫程式<br>
    <input type="checkbox" name="hobby" value="music"> 音樂<br>
    <input type="checkbox" name="hobby" value="exercise"> 運動<br>

屬性 name 的值要相同,才會知道屬於同一組選項。
屬性 value 的作用就是當填表人送出表單,可以透過value知道勾選了哪個選項。
屬性 checked 預設會勾選。
radio
單選的欄位 type="radio"
    <input type="radio" name="gender" value="male" checked> 男<br>
    <input type="radio" name="gender" value="female"> 女<br>

屬性 name、value、checked 跟上面的checkbox一樣
submit
送出按鈕 type="submit"
<input type="submit">

value 控制按鈕上面的文字
<input type="submit" value="打什麼就出現什麼">

還有好多好多其他的
除了前面提到的之外,還有許多其他的type,這邊簡單列舉出來(當然也不是全部列出),有興趣可以自己玩玩看。
    <form>
        <div>
            <label>信箱:</label>
            <input type="email">
        </div>
        <div>
            <label>電話:</label>
            <input type="tel" maxlength="10">
        </div>
        <div>
            <label>年齡:</label>
            <input type="number" min="18" max="65">
        </div>
        <div>
            <label>網址:</label>
            <input type="url">
        </div>
        <div>
            <label>檔案:</label>
            <input type="file">
        </div>
        <div>
            <label>搜尋:</label>
            <input type="search">
        </div>
        <div>
            <label>日期:</label>
            <input type="date">
        </div>
        <div>
            <label>時間:</label>
            <input type="time">
        </div>
        <div>
            <label>色彩:</label>
            <input type="color">
        </div>
        <div>
            <label>區間:</label>
            <input type="range" min="0" max="100" step="10">
        </div>
    </form>
上面的提交是用 input 標籤做出來的,可能會有人想說這不應該是個按鈕嗎?
按鈕也可以做到一樣的效果。
按鈕用 <button></button>
我們一樣用type決定按鈕的類型
submit
type="submit"
提交用的按鈕,裡面的文字會顯示在按鈕上。<button type="submit">提交</button>
button
type="button"
這就是一個可以按的按鈕,不會觸發提交功能,至於會有什麼功能,就要看我們幫他寫什麼功能。
    <button type="button">+</button>
    <button type="button">-</button>

是不是很像計算機的+跟-按鈕,當然現在沒有+跟-的功能,要靠程式開發者去寫出這樣的功能(例如用js寫)。
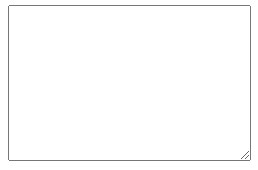
<textarea> 是可以輸入多行文字的輸入框。 ( <input> 只能輸入單行)。<textarea> 欄位的大小由 rows(高度) 及 cols(寬度) 控制。
<textarea cols="30" rows="10"></textarea>

<textarea> 一樣可以加入 placeholder、disabled、readonly、required 屬性。
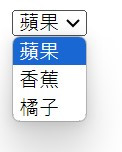
<select></select> 是我們常看到的下拉選單,
裡面的選項用 <option></option> 包起來。
    <select name="fruits">
      <option value="apple">蘋果</option>
      <option value="banana">香蕉</option>
      <option value="orange">橘子</option>
    </select>

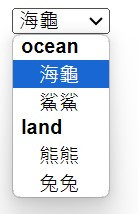
如果下拉選單有很多選項,想把選項進行分類可以用 <optgroup> </optgroup> 把同類型的選項包起來。
    <select name="animals">
        <optgroup label="ocean">
            <option value="seaTurtle">海龜</option>
            <option value="shark">鯊鯊</option>
        </optgroup>
        <optgroup label="land">
            <option value="bear">熊熊</option>
            <option value="rabbit">兔兔</option>
        </optgroup>
    </select>

關於表單有太多可以學習的,或許有人會發現,好像很多屬性能被不同的標籤使用,的確,每個標籤可以使用的屬性有很多,哪個標籤可以使用什麼屬性,除了去查之外,我們還可以去理解每個屬性的原理,再去思考標籤的作用,一旦融會貫通後,其實可以簡單的推論出大部分可以使用在某個標籤上的屬性。
大家不妨自己做個表格,來熟悉各種標籤吧。
我們明天見。
