今天若我們想要讓與用者可以透過line bot連到我們自己寫的額外網站會遇到兩個問題
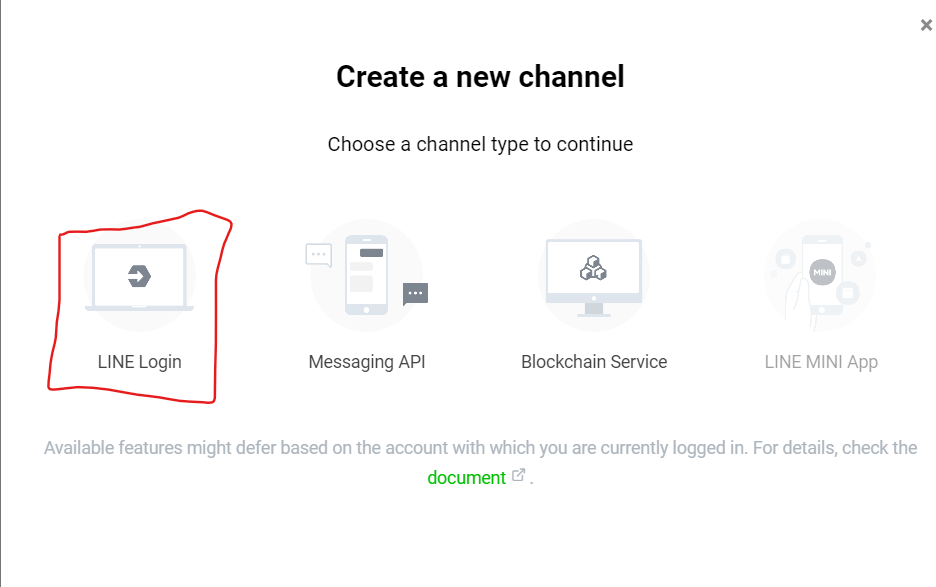
然而Line提供一個功能叫Line Liff App讓我們可以在網頁上取得Line user的資訊以及不用跳轉網頁,今天就來實作一個簡易的Line Liff App吧!
完整code
LINE LIFF (LINE Front-end Framework) 是 LINE 提供的一種開發工具,用於創建具有豐富用戶界面和交互功能的 Web 應用程序,並將它們嵌入到 LINE 應用中。 LIFF 允許開發者構建輕量級的 Web 應用,以與 LINE 用戶進行交互。以下是關於 LINE LIFF App 的一些關鍵信息:
輕量級 Web 應用程序: LIFF App 是輕量級的 Web 應用,可以嵌入到 LINE 應用中。它們使用常見的 Web 技術(HTML、CSS、JavaScript)構建。
與 LINE 集成: LIFF App 可以嵌入到 LINE 應用中,與 LINE 聊天界面無縫集成。用戶可以在 LINE 中使用這些應用程序,而不必離開聊天。
使用 LINE 登錄: 開發者可以利用 LINE 登錄功能,使用戶能夠使用他們的 LINE 帳戶登錄 LIFF 應用程序,這樣就不需要單獨的帳戶管理。
實時通信: 開發者可以使用 LIFF App 與用戶進行實時通信,例如發送消息、接收消息、處理事件等。
自定義功能: 開發者可以根據需要創建各種自定義功能,如查詢天氣、接收支付、創建任務清單等。
數據存儲: LIFF App 可以使用 Web 存儲或與後端服務器交互來存儲和檢索數據。
跨平台: LIFF App 可以在多個平台上運行,包括 iOS、Android 和 Web。
總的來說,LINE LIFF App 是一種非常靈活的方式,供開發者擴展 LINE 平台的功能,提供更多個性化的用戶體驗和服務。它適用於各種用例,包括社交、娛樂、商務、新聞和生產力工具等。開發者可以使用 LIFF 框架創建適用於 LINE 用戶的創新應用程序。
Size- 意思是在Line bot要顯示多大,Full為全螢幕顯示、Tall 為 70% 顯示、Compact 為 50% 顯示Endpoint URL-你要讓user跳轉的page url,這裡我們要填寫自己flask web的URLScopes- LIFF App 內可以搜集的資訊,我們選擇profile和openid就好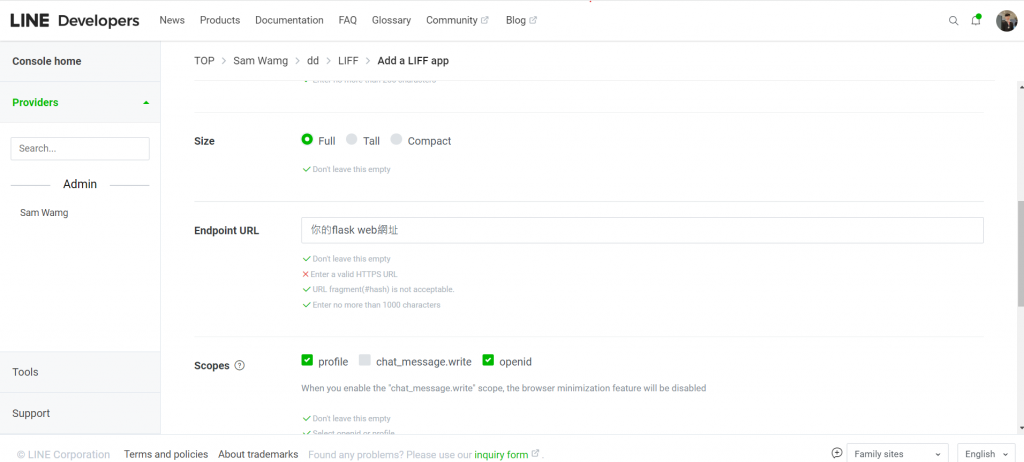
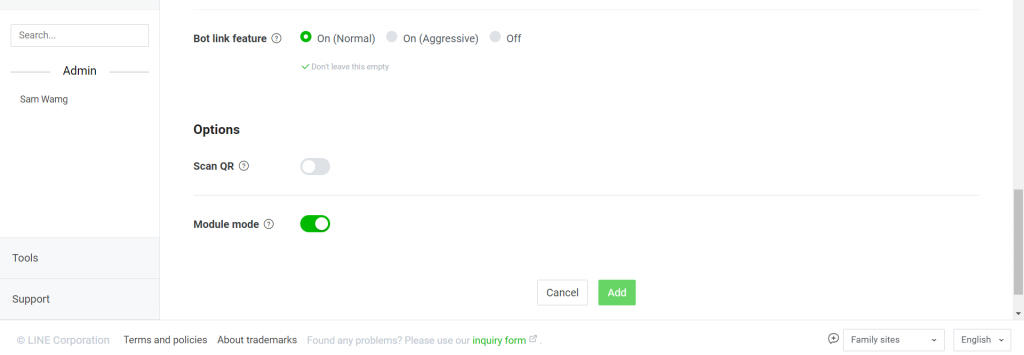
最後按下Add就好LIFF ID - 為你的認證碼要加在web裡面LIFF URL - 為你的跳轉網頁URL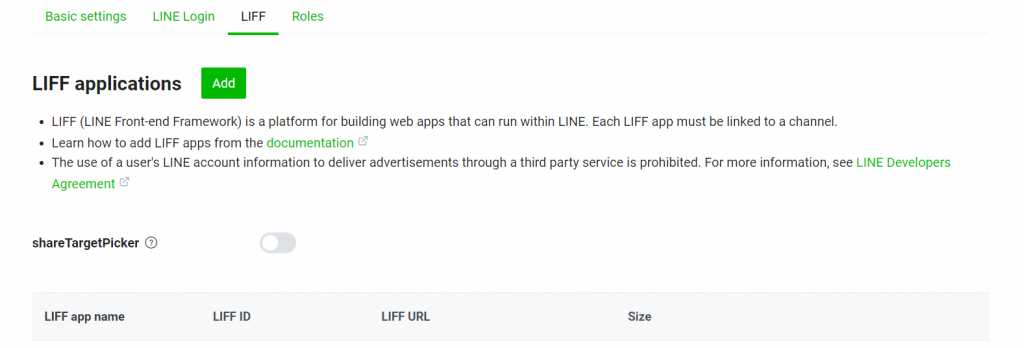
from flask import Flask, request, abort,render_template
from linebot import (
LineBotApi, WebhookHandler
)
from linebot.exceptions import (
InvalidSignatureError
)
from linebot.models import *
import os
from urllib.parse import parse_qsl
#======python的函數庫==========
app = Flask(__name__)
info=[]
with open(os.path.join('..','key.txt'), 'r') as f:
for line in f:
info.append(line.strip())
LINE_CHANNEL_SECRET = info[0]
LINE_CHANNEL_ACCESS_TOKEN = info[1]
LIFF_ID = info[2]
LIFF_URL = info[3]
line_bot_api = LineBotApi(LINE_CHANNEL_ACCESS_TOKEN)
handler = WebhookHandler(LINE_CHANNEL_SECRET)
# 監聽所有來自 /callback 的 Post Request
@app.route('/page')
def page():
return render_template('index.html', liffid = LIFF_ID)
@app.route("/callback", methods=['POST'])
def callback():
# get X-Line-Signature header value
signature = request.headers['X-Line-Signature']
# get request body as text
body = request.get_data(as_text=True)
app.logger.info("Request body: " + body)
# handle webhook body
try:
handler.handle(body, signature)
except InvalidSignatureError:
abort(400)
return 'OK'
# 處理訊息
@handler.add(MessageEvent, message=TextMessage)
def handle_message(event):
mtext = event.message.text
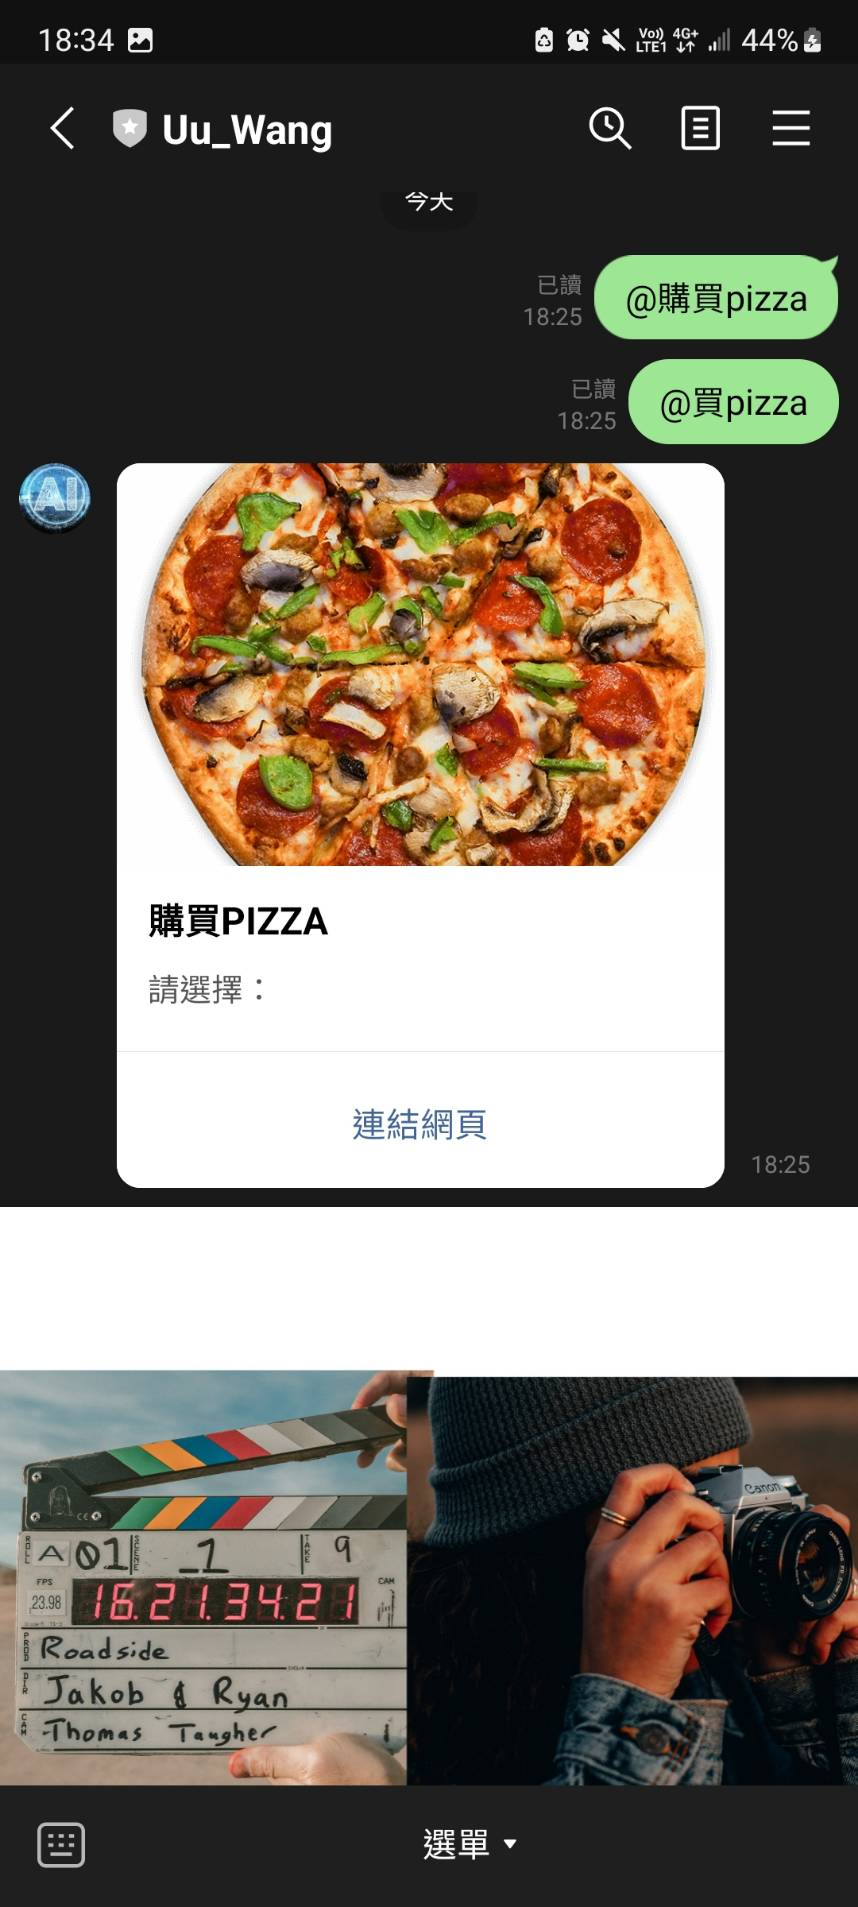
if mtext == '@買pizza':
message = TemplateSendMessage(
alt_text='按鈕樣板',
template=ButtonsTemplate(
thumbnail_image_url='https://i.imgur.com/4QfKuz1.png', #顯示的圖片
title='購買PIZZA', #主標題
text='請選擇:', #副標題
actions=[
URITemplateAction( #開啟網頁
label='連結網頁',
uri=LIFF_URL,
),
]
)
)
try:
line_bot_api.reply_message(event.reply_token, message)
except:
line_bot_api.reply_message(event.reply_token,TextSendMessage(text='發生錯誤!'))
@handler.add(MemberJoinedEvent)
def welcome(event):
uid = event.joined.members[0].user_id
gid = event.source.group_id
profile = line_bot_api.get_group_member_profile(gid, uid)
name = profile.display_name
message = TextSendMessage(text=f'{name}歡迎加入')
line_bot_api.reply_message(event.reply_token, message)
if __name__ == "__main__":
port = int(os.environ.get('PORT', 5000))
app.run(port=port,debug=True)
首先,導入了必要的模塊和庫,包括 Flask、LineBot SDK 相關的模塊,以及處理文件操作和 URL 解析的庫。
創建 Flask 應用程序實例 app。
為了不要把ID透漏使用,我們將這些資訊放入key.txt裡接著用 with open 讀取 key.txt 得到 LINE_CHANNEL_SECRET、LINE_CHANNEL_ACCESS_TOKEN、LIFF_ID 和 LIFF_URL。
初始化 LineBotApi 和 WebhookHandler,使用讀取的 LINE_CHANNEL_SECRET 和 LINE_CHANNEL_ACCESS_TOKEN。
設置了一個路由 /page,用於渲染名為 index.html 的頁面,將 LIFF_ID 傳遞給頁面。
設置了一個路由 /callback,用於接收 LINE 的 Webhook 請求。當收到請求時,會驗證請求的簽名,然後使用 handler.handle 處理請求的內容。
在 /callback 路由下,定義了處理不同事件的函數。 handle_message 處理文本消息,如果用戶發送 @買pizza,則會回復一個包含按鈕的消息模板,點擊按鈕可以打開一個鏈接。
welcome 函數處理成員加入群組的事件,獲取新成員的用戶名並發送歡迎消息。
在 if __name__ == "__main__": 中,啟動 Flask 應用,可以監聽指定的端口,以便可以接收 LINE 的 Webhook 請求。
Line Liff API需使用js進行串接以下為串接code
<script src="https://cdnjs.cloudflare.com/ajax/libs/jquery/3.0.0/jquery.min.js"></script>
<script src="https://static.line-scdn.net/liff/edge/2.1/sdk.js"></script>
    <script>
        var user_id;
        var name;
        var picUrl;
        function initializeLiff(myLiffId) {
            liff.init({
                liffId: myLiffId
            }).then(() => {
                if (!liff.isLoggedIn()) {
                    alert("用戶未登入");
                    liff.login();
                } else {
                    // alert("用戶已登入");
                    liff.getProfile()
                        .then(profile => {
                            name = profile.displayName;
                            userId = profile.userId;
                            picUrl = profile.pictureUrl;
                            const imgElement = document.getElementById("myImage");
                            document.getElementById("name").innerHTML = name;
                            imgElement.src = picUrl;
                        })
                        .catch((err) => {
                            console.log('error', err);
                        });
                }
            }).catch((err) => {
                console.log('初始化失敗', err);
            });
        }


        function pushMsg(pname, pdatatime, proom) {
            if (pname == '' || pdatatime == '' || proom == '') {  //資料檢查
                alert('每個項目都必須輸入!');
                return;
            }
        }


        $(document).ready(function () {
            initializeLiff('{{ liffid }}');  //接收傳遞的 liffid 參數
            $('#sure').click(function (e) {  //按下確定鈕
                pushMsg($('#name').val(), $('#datetime').val(), $('#sel_room').val());
            });
        });
    </script>
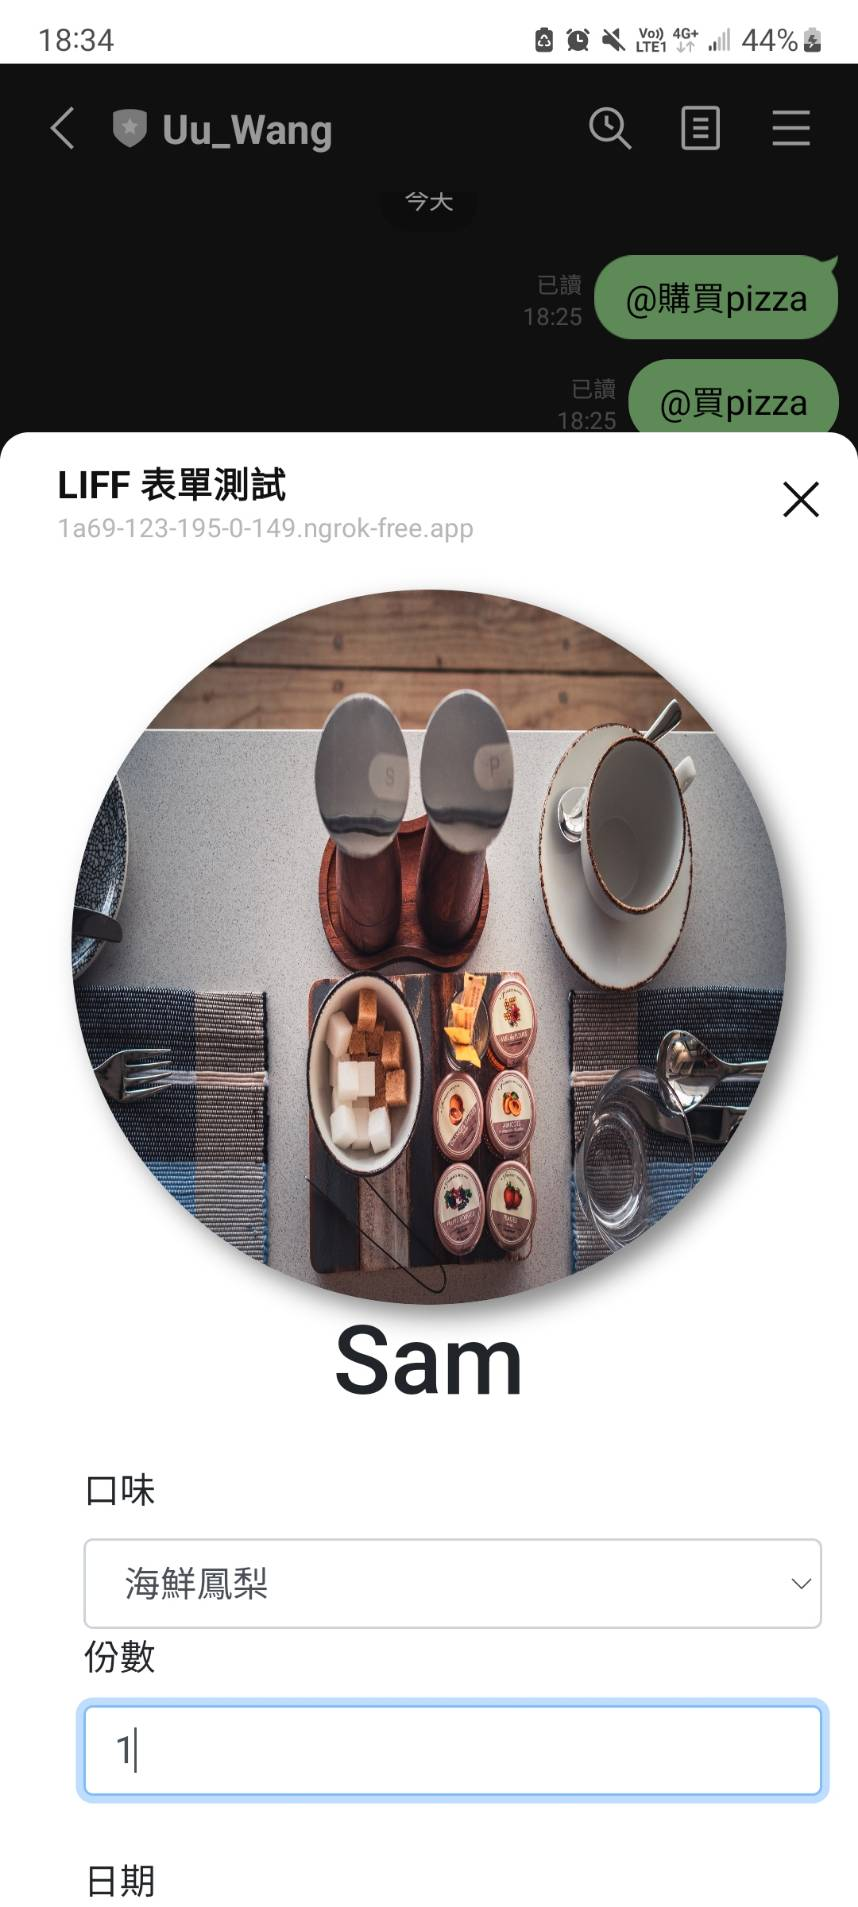
<script src="https://static.line-scdn.net/liff/edge/2.1/sdk.js"></script>:導入LINE Front-end Framework(LIFF)的JavaScript SDK,以便在網頁中使用LIFF 功能。initializeLiff(myLiffId) 函數中,使用 liff.init() 初始化 LIFF,傳遞了 myLiffId,這是 LIFF 應用的 ID。在初始化後,檢查用戶是否已登錄,如果未登錄,則彈出警告消息,並使用 liff.login() 方法引導用戶登錄。liff.getProfile() 方法獲取用戶的基本資料,包括姓名、用戶 ID 和頭像 URL。然後,將用戶姓名顯示在 HTML 頁面中的 name 元素中,並設置頭像圖片的 URL,以便顯示用戶頭像。pushMsg(pname, pdatatime, proom) 函數中,對用戶輸入的內容進行檢查,確保每個項目都已輸入。如果有任何一個項目為空,將彈出警告消息。$(document).ready(function () { ... });:這是 jQuery 代碼,用於在頁面加載完成後執行初始化操作。在這裡,initializeLiff('{{ liffid }}') 用於初始化LIFF,$('#sure').click(function (e) { ... }); 用於監聽"確定" 按鈕的點擊事件,當用戶點擊按鈕時,將觸發pushMsg 函數進行數據檢查。<style>
/* 在<style>标签中添加 CSS 样式 */
.rounded-image {
border-radius: 50%;
}
.center-image {
margin: 0 auto;
display: block;
}
.shadowed-image {
display: block;
margin: 0 auto;
box-shadow: 5px 5px 10px #888888; /* 阴影效果 */
}
</style>
</head>
<body>
<div class="row" style="margin: 10px">
<div class="center-image">
<img id="myImage" src="" alt="图片" class="rounded-image shadowed-image" width="300px" height="300px">
<h1 id="name" style="text-align: center;"> </h1>
</div>
<div id="output"></div>
<div class="col-12" style="margin: 10px">
<label>口味</label>
<select id="sel_room" class="form-control">
<option selected>海鮮鳳梨</option>
<option>墨西哥</option>
<option>龍蝦沙拉</option>
</select>
<label>份數</label>
<input type="text" id="name" class="form-control" />
<br />
<label>日期</label>
<input type="date" id="datetime" value="" class="form-control" />
<br />
<button class="btn btn-success btn-block" id="sure">確定</button>
</div>
</div>
</body>
這應該就不用多說明了
今天教導大家如何創建Liff app且透過Liff取得user的資訊,最後剩餘的五天我將實作一個可以辨識使用者所上傳的mp3 file是什麼歌。