前幾天我們已經介紹了許多line message API的基本功能,接下來我將帶大家實作一個能辨識你所上傳的音檔是哪首歌的簡易專案,首先我們必須先實作出上傳檔案的功能。
首先讓我們來看看流程圖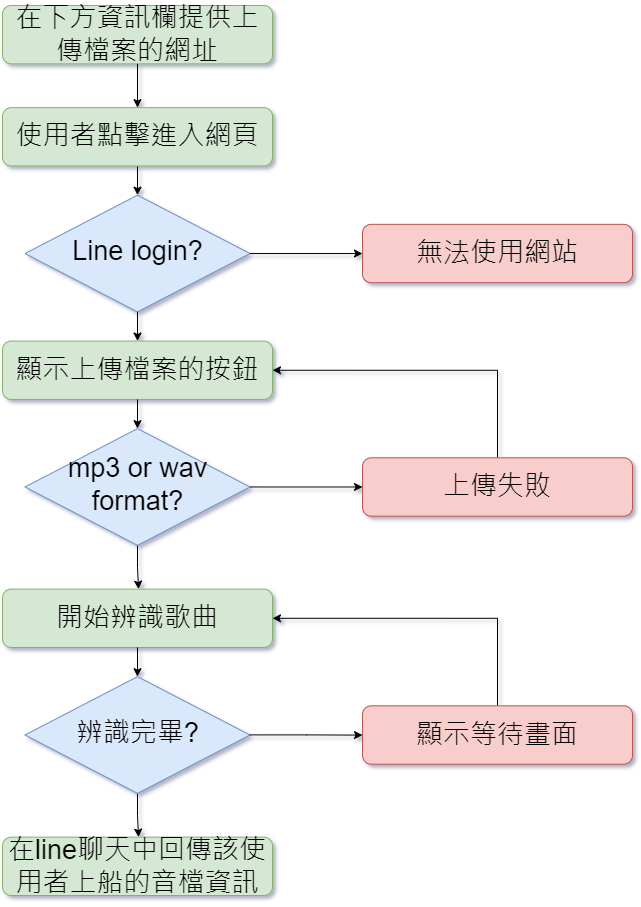
相信這幾個功能除了辨識歌曲外大家都已經有辦法實作了,讓我來依序講述以下細節:
與Day6、Day7教導的大致上一樣,只是我們必須結合Day25的Line Liff APP來去取得user的資訊才可以將每個user的資料分割以及回傳資訊給指定user。
我們將使用ShazamAPI來達成至於具體使用會在明天教導大家
透過line_bot_api.push_message(user_id, message)達成
user_id - 每個user都有對應的ID由Line Liff取得message - 要傳達的訊息在實作前請先根據day25、day24的功能自行設定。
這部分大致上跟day6、day7一樣,但多了
ALLOWED_EXTENSIONS = {'wav','mp3'}

def allowed_file(filename):
    return '.' in filename and filename.rsplit('.', 1)[1].lower() in  ALLOWED_EXTENSIONS
def get_filename(filename):
    return filename.split('.')[1]
@app.route('/upload', methods=['get'])
def uploads_page():
     user_id= request.form.get('ID')
     return render_template('index.html', liffid = LIFF_ID , user_id=user_id)
@app.route('/upload', methods=['POST'])
def upload_file():
    errorMsg=''
    musicname=''
    user_id= request.form.get('ID')
    upload_folder = os.path.join("static","upload",user_id)
    file = request.files['filename']    # 取得上傳的檔案
    if get_filename(file.filename) == 'mp3' or get_filename(file.filename) == 'wav':
        musicname=file.filename
        # return redirect(url_for('index'))   # 令瀏覽器跳回首頁
    if file and allowed_file(file.filename):   # 確認有檔案且副檔名在允許之列'
        os.makedirs(upload_folder ,exist_ok=True)
        file.save(os.path.join(upload_folder, file.filename))
    else:
        errorMsg='僅允許上傳mp3、wav音檔'
    return render_template('index.html',errorMsg=errorMsg,filename=file.filename,img_name=musicname,liffid = LIFF_ID,user_id=user_id)
算是把day25、day7做一個整合
<form method="POST" enctype="multipart/form-data" action="{{ url_for('upload_file') }}"
onsubmit="return checkSubmit(this)">
<div id="wait" style="display:none">
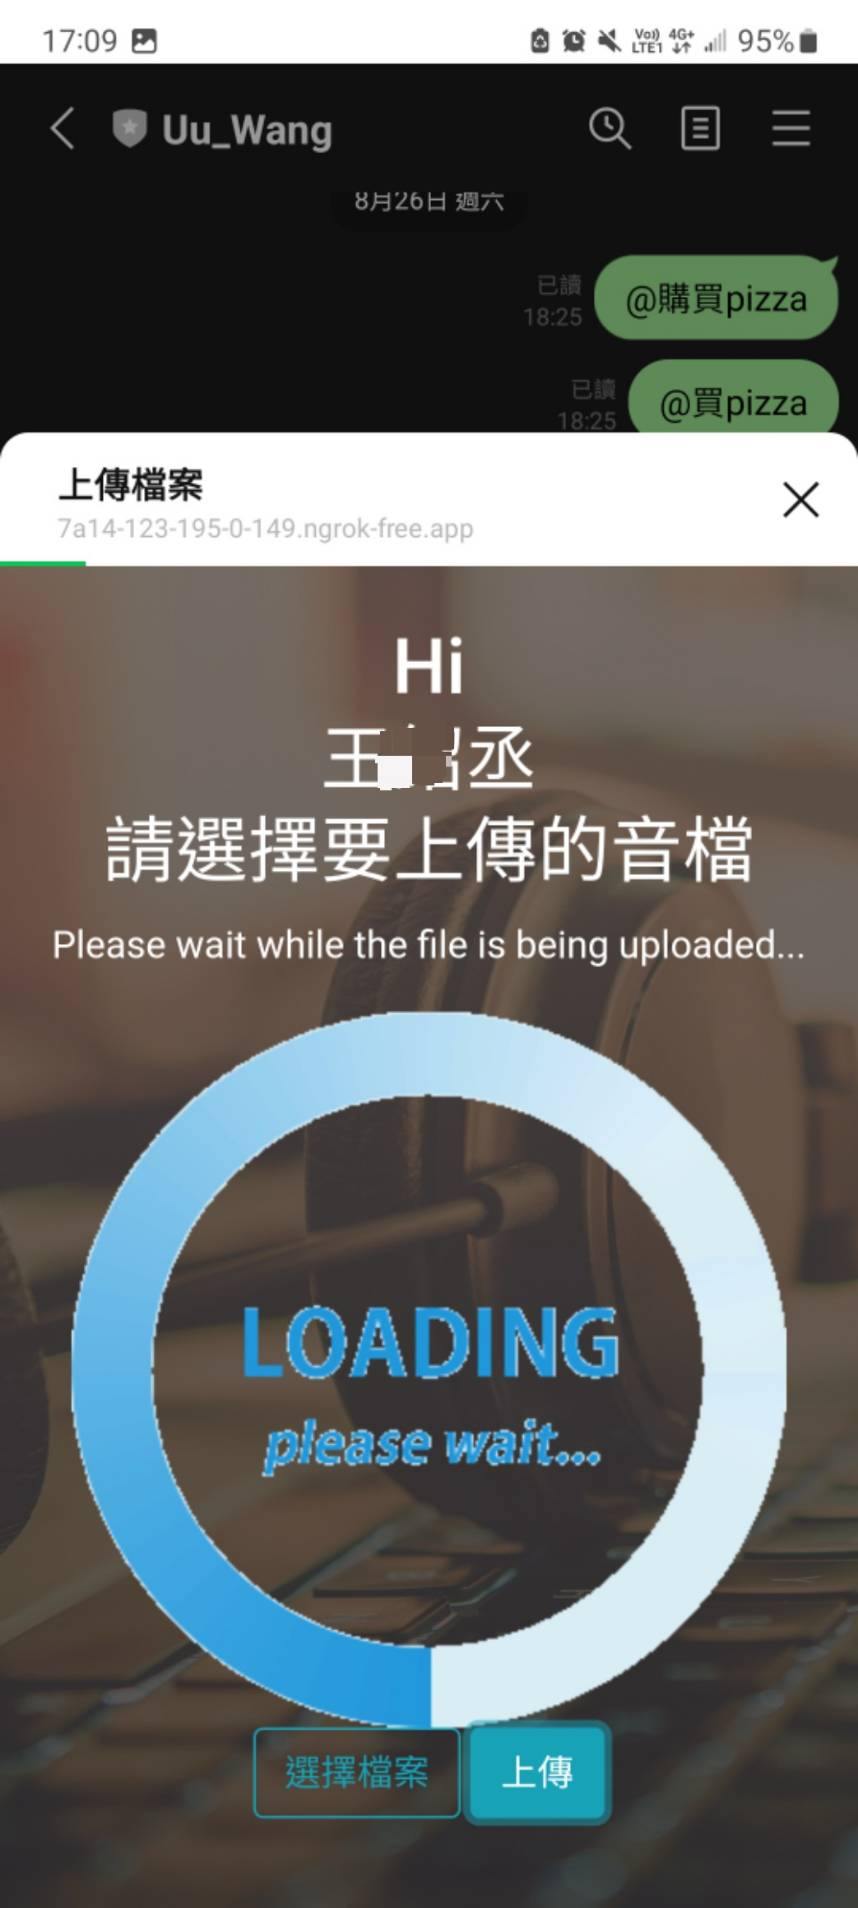
<p style="color: white;">Please wait while the file is being uploaded...</p>
<img src="{{ url_for('static', filename='gif/test.gif') }}" width="300px" height="300px">
</div>
<button class="btn btn-outline-info" onclick="document.getElementById('getFile').click()"value="select" name="select">選擇檔案</button>
<input type="file" id="getFile" style="display:none" name="filename" required>
<input type="text" id="user_id" name="ID" style="display: none;" >
<input type="submit" class="btn btn-outline-info" value="上傳" onclick="onUploadButton()">
<h1><label id="file-name"></label></h1>
</form>
<script>
liff.getProfile()
.then(profile => {
name = profile.displayName;
user_id = profile.userId;
picUrl = profile.pictureUrl;
const imgElement = document.getElementById("myImage");
document.getElementById("name").innerHTML = name;
var inputElement = document.getElementById('user_id');
// 設置 input 元素的值
inputElement.value = user_id;
imgElement.src = picUrl;
})
.catch((err) => {
console.log('error', err);
});
</script>
input type="text" id="user_id" name="ID" style="display: none;":用於存儲用戶的 Liff ID(user_id),並將其傳遞給flask創建專屬資料夾,但為了不要讓使用者看到 使用style="display: none;" 使其看不見,此外是透過 JavaScript 將用戶的 ID 設置為該輸入框的值。
 <button class="btn btn-outline-info" onclick="document.getElementById('getFile').click()"value="select" name="select">選擇檔案</button>
<input type="file" id="getFile" style="display:none" name="filename"  required>`
預設的上傳檔案扭很醜,但是又沒辦法直接對input file tag做太大改動,於是我將其隱藏,並賦予其他button點擊同等於啟動該input file tag。
為了讓專案好看一點有額外調整
header.upload {
    padding-top: 10rm;
    padding-bottom: calc(10rem - 4.5rem);
    background: linear-gradient(to bottom, rgba(92, 77, 66, 0.8) 0%, rgba(39, 34, 32, 0.8) 100%), url("../back.jpg");
    background-position: center;
    background-repeat: no-repeat;
    background-attachment: scroll;
    background-size: cover;
    /* height: 85vh; */
  }


我們在今天教導大家先實現了上傳音檔的功能,至於明天就讓我介紹ShazamAPI以及如何使用吧!
請問這個檔案是傳去哪裡?有沒有大小的限制?
謝謝!
會上傳到你架的server 且每個user的檔案都會分開存 大小限制可以自己設可以參考我的day-8
謝謝,我誤會了,以為Line有地方讓我們上傳