一款APP往往包含多個頁面,所以頁面間的導航管理相當重要。RN官方未提供內建導航工具,目前社區主流是React Navigation,本篇將會介紹React Navigation。
npm install @react-navigation/native
npm install react-native-screens react-native-safe-area-context
npm install @react-navigation/native-stack
cd ios && pod install
創建導航地圖
為了實現導航功能,我們首先需建立一個導航地圖,這概念有點像網站地圖。
@react-navigation/native庫中引入NavigationContainer。它是一個容器組件,要放在最外層包裹整個App的JSX元素。@react-navigation/native-stack庫中引入createNativeStackNavigator。這個方法允許我們建立一個原生的堆疊導航結構。Stack.Screen組件定義每一頁,而Stack.Navigator組件則負責彙整和管理所有這些頁面。AppNavigator.js
import React from 'react';
import { View, Text, Button } from 'react-native';
import { NavigationContainer } from '@react-navigation/native';
import { createNativeStackNavigator } from '@react-navigation/native-stack';

import HomePage from './HomePage';
import LoginPage from './LoginPage';
import ProductPage from './ProductPage';


const Stack = createNativeStackNavigator();

function AppNavigator() {
  return (
    <NavigationContainer>
      <Stack.Navigator initialRouteName="Home">
        <Stack.Screen name="Home" component={HomePage} />
        <Stack.Screen name="Login" component={LoginPage} />
        <Stack.Screen name="Products" component={ProductPage} />
      </Stack.Navigator>
    </NavigationContainer>
  );
}

export default AppNavigator;
Stack.Navigator中的initialRouteName屬性指定了初始頁面為Home。Stack.Screen有兩基本的屬性:
name屬性:表示該頁的名稱。在後續的頁面跳轉中,都會使用這個name來指定目標頁面。component屬性:指定該頁面所使用的組件。跳轉頁面
頁面間的跳轉,我們主要使用navigation.navigate()方法。當進行跳轉時,該方法的參數即為我們在導航地圖中為目標頁面設定的name。
Home.js
 function HomePage({ navigation }) {
  return (
    <View style={styles.container}>
      <Text style={styles.title}>Welcome to the Home Page!</Text>

      <Button
        title="Go to Login Page"
        onPress={() => navigation.navigate('Login')}
        style={styles.button}
      />

      <Button
        title="Go to Product Page"
        onPress={() => navigation.navigate('Products')}
        style={styles.button}
      />
    </View>
  );
}

以上就是一個簡單的跳轉頁面範例了。你可能會好奇,HomePage組件的navigation物件哪裡來的?其實,當組件用Stack.Screen定義時,它就會自動獲得navigate物件。這個navigate物件提供了多種用於控制導航的方法。
攜帶自定義參數
例如我們想從HomePage傳id到Product頁面,以利Product頁展示詳細資訊。
只要在navigation.navigate方法中,傳上第二個參數即可。
<Button
    title="Go to Product Page"
    onPress={() => navigation.navigate('Products', { productName: "BMW" })}
    style={styles.button}
  />
function ProductPage({ route, navigation }) {
    const { productName } = route.params;

    return (
      <View style={styles.container}>
        <Text style={styles.title}>Products</Text>
        <Text>Product Name: {productName}</Text>

        <Button
          title="Back to Home"
          onPress={() => navigation.goBack()}
          style={styles.button}
        />
      </View>
    );
  }
initialParams 設置默認數據
雖然我們可以在 navigation.navigate 跳轉頁面時傳遞參數,但有時我們需要一進去就有某個參數,或是想要預設某個參數值,這時就可以用 Stack.Screen 上的 initialParams 屬性來設置。
<Stack.Screen name="Products" component={ProductPage} initialParams={ productName: "BMW" } />
optionsStack.Screen 的 options 屬性提供多種客製化的選項。以下列舉一些常用的選項。:
headerShown:決定是否顯示 header。
fullScreenGestureEnabled:決定是否啟用全螢幕手勢。
headerStyle:定義 header 的自訂樣式。
headerTintColor:設定 header 文字的顏色。
title:設定 header 的標題。
headerTitleStyle:定義標題的自訂樣式。
範例
<Stack.Screen name="Login" component={LoginPage}
    options={{
        title: 'My home',
        headerStyle: {
            backgroundColor: '#f4511e', //橘色
        },
        headerTintColor: '#fff',
        headerTitleStyle: {
            fontWeight: 'bold',
        },
        fullScreenGestureEnabled: true
    }}
/>
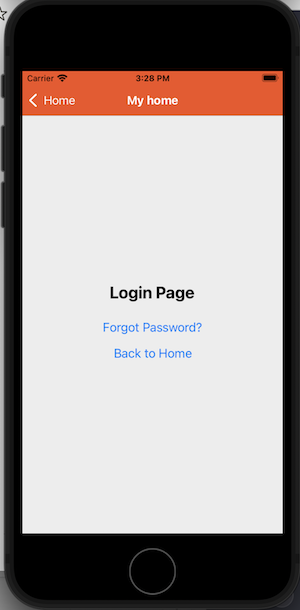
這樣我們就把標題改為My home,並且背景是橘色

當組件用 Stack.Screen 定義時,它們可以透過 props 接收 navigation 物件,該物件包含多種方法以控制導航行為。以下是一些常用的方法:
setOptions:更改導航選項,如標題、按鈕等。
this.props.navigation.setOptions({
	title: '新標題',
});
setParams:更改路由參數
this.props.navigation.setParams({
  itemId: newId,
});
setOptions 和 setParams 通常用於同一組件被用於不同的場景,需動態修改導航設定或參數的情境。
跳轉方法:
在講Navigation跳轉方法之前,首先需要暸解一下堆疊(Stack)的概念。
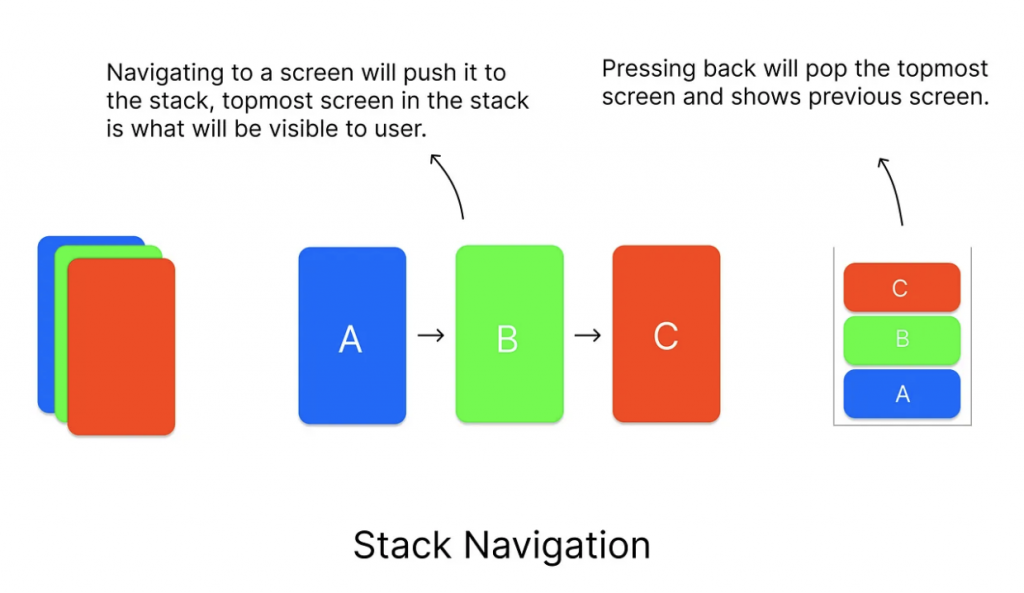
你可以將堆疊想像成一疊盤子。洗完的盤子總是放在頂端,而取用時也是從頂端開始。有學過資料結構應該不陌生,這就是典型的「先進後出」模式。
Navigation路由也是這樣的模式,打開一個新的頁面,這個頁面就會被push至堆疊的頂部。而當你決定返回,這個頁面則會從堆疊頂部被pop移除。
source
Navigation.pop():從堆疊的頂部移除一個或多個畫面。Navigation.goBack():回上一頁Navigation.navigate():你可以移動到堆疊中的任何畫面,如果該畫面已經在堆疊中,它會直接切換到該畫面;如果不在,它會將新的畫面添加到堆疊的頂部。Navigation.push():將一個新的畫面添加到堆疊的頂部。Navigation.replace():替換當前頁面,不會改變Stack的大小綜合比較:
| 方法 | 描述 | 使用場景 |
|---|---|---|
push() |
總是將新路由添加至堆疊的最上方。 | 想要添加相同或不同的頁面,例如打開多個不同商品的詳情頁 |
goBack() |
返回至堆疊的前一頁,僅移除堆疊最上方的當前頁面。 | 當用戶想返回上一頁時 |
replace() |
替換當前頁面,而不增加或減少堆疊的大小。 | 當需要更新當前頁面而不想改變堆疊歷史,如更新用戶資料 |
pop() |
從堆疊中移除最上方的一頁或多頁。 | 當需要返回到某一頁或多頁前,例如從深層導航結構中直接返回到首頁 |
navigate() |
跳轉到指定的頁面。如果該頁面已在堆疊中,將其設置為當前頁面;如果該頁面不在堆疊中,則將其添加到堆疊的最上方。 | 當需要跳轉到一個特定的頁面,如從首頁直接跳轉到設置頁面 |
除了基本的導航外,也可以做APP上常見的抽屜、底部導航
Drawer:抽屜導航,通常是從螢幕側邊滑出的菜單。
import { createDrawerNavigator } from '@react-navigation/drawer';

const Drawer = createDrawerNavigator();

function DrawerNavigator() {
  return (
    <Drawer.Navigator>
      <Drawer.Screen name="Home" component={LoginPage} />
      <Drawer.Screen name="Products" component={ForgotPasswordPage} />
    </Drawer.Navigator>
  );
}
Bottom Tabs Navigator:底部導航。
import { createBottomTabNavigator } from '@react-navigation/bottom-tabs';

const Tab = createBottomTabNavigator();

function BottomTabs() {
  return (
    <Tab.Navigator>
      <Tab.Screen name="Home" component={HomePage} />
      <Tab.Screen name="Products" component={ProductPage} />
    </Tab.Navigator>
  );
}
根據狀態顯示不同導航
例如沒登入時顯示登入、註冊,登入後才顯示HomeScreen
{isSignedIn ? (
  <>
    <Stack.Screen name="Home" component={HomeScreen} />
  </>
) : (
  <>
    <Stack.Screen name="SignIn" component={SignInScreen} />
    <Stack.Screen name="SignUp" component={SignUpScreen} />
  </>
)}
使用navigationKey來觸發組件的重新渲染
如果希望根據某些條件(例如用戶的登入狀態)來改變特定頁面的內容,您可以指定一個navigationKey給Stack.Screen。當此鍵值改變時,相應的組件會被重新渲染。
  <>
  {isSignedIn ? (
    <>
      <Stack.Screen name="Home" component={HomeScreen} />
      <Stack.Screen name="Profile" component={ProfileScreen} />
    </>
  ) : (
    <>
      <Stack.Screen name="SignIn" component={SignInScreen} />
      <Stack.Screen name="SignUp" component={SignUpScreen} />
    </>
  )}
  <Stack.Screen navigationKey={isSignedIn ? 'user' : 'guest'} name="Help" component={HelpScreen} />
</>
今天介紹了React Navigation的用法。除了React Navigation,React Native社區內還有另一個受歡迎的導航套件:react-native-router-flux。此套件基於React Navigation進行高級封裝,讓開發者能用提供更簡潔、更直觀的API操作導航。如果想找更簡單的操作方式,react-native-router-flux是個不錯的選擇。不過畢竟是封裝,所以react-native-router-flux在某些情況下不如React Navigation靈活。如想要更高靈活性,React Navigation仍是首選。
