隨著科技的進步,生物辨識技術已經是日常生活的一部分。現今,越來越多的APP提供Face ID辨識登入選項,用戶不再需要記住繁瑣的密碼,只需要短暫的掃描就能快速登入。這大大提高了用戶的操作效率,也減少了因忘記密碼所造成的許多麻煩。這種便捷性和安全性的完美結合,使其成為智慧裝置中最受歡迎的功能之一。
今天這篇文章將介紹如何利用react-native-biometrics實現生物辨識認證。過去社群中還有另一個受歡迎的庫react-native-touch-id,但目前已停止維護。所以我們會使用react-native-biometrics。
安裝 react-native-biometrics
npm install react-native-biometrics --save
cd ios && pod install
配置
我們需要設定NSFaceIDUsageDescription,當應用試圖使用Face ID進行身份驗證時,此描述會作為彈出提示。
在 Info.plist 中加入以下程式碼,<string> 文字即是你想要顯示給用戶的描述:
<key>NSFaceIDUsageDescription</key>
<string>此應用需要使用您的臉部資訊來進行身份驗證。</string>
isSensorAvailable(): 檢測裝置上是否具有生物辨識功能以及其類型。返回的Promise為物件,該物件包含以下屬性:
simplePrompt(options): 提示用戶提供他們的指紋或Face ID。
createSignature(options): 提示用戶提供指紋或Face ID,然後使用私鑰從密鑰存儲中獲取來生成簽名。
createKeys(): 生成公鑰和私鑰。
biometricKeysExist(): 檢查密鑰是否已經在密鑰存儲中生成和存在。
deleteKeys(): 從設備的密鑰存儲中刪除生成的鑰匙。
import ReactNativeBiometrics, { BiometryTypes } from 'react-native-biometrics';
const [isBiometricsSupported, setIsBiometricsSupported] = useState(false);
const [biometryType, setBiometryType] = useState(null);
useEffect(() => {
  const rnBiometrics = new ReactNativeBiometrics();

  rnBiometrics.isSensorAvailable()
    .then(resultObject => {
      const { available, biometryType } = resultObject;
      if (available) {
        setIsBiometricsSupported(true); // 如果支援,則更新狀態變數
        setBiometryType(biometryType); // 儲存支援的狀態類型
      }
    })
    .catch(error => {
      console.log('Biometrics not supported', error);
    });
}, []);
  const handleBiometric = () => {
  const rnBiometrics = new ReactNativeBiometrics();

  rnBiometrics.simplePrompt({ promptMessage: 'Confirm biometrics' })
    .then(resultObject => {
      const { success } = resultObject;

      if (success) {
        console.log('Authentication successful!');
      } else {
        console.log('User cancelled biometric prompt');
      }
    })
    .catch(() => {
      console.log('Biometrics failed');
    });
};
現在我們已成功實現了基本的生物辨識功能。但若要用於登入等等需要高安全性的認證功能,我們可以進一步增強其安全性。
我們先看一下這個Flow圖,它基本上說明了整個流程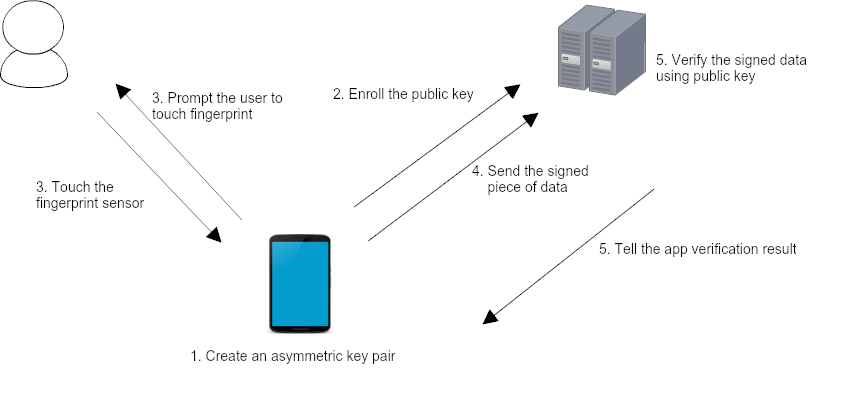
source
創建非對稱密鑰對(create an Asymmetric key pair)
非對稱密鑰,包括公鑰和私鑰。這裡的「非對稱」意味著兩把密鑰的功能和特性是不同的:公鑰用於加密或驗證數據,而私鑰用於解密或簽名數據。
註冊公鑰(Enroll the public key)
將生成的公鑰傳送到伺服器上註冊。此步驟確保伺服器知道與哪個用戶設備的對應公鑰,以便之後的驗證過程。
用戶進行指紋認證(prompt the user to touch fingerprint)
當需要進行某種認證操作時(例如登入),提示用戶使用其已註冊的生物辨識資料,如Face ID,來進行身份驗證。
用戶觸碰指紋傳感器(user touch the fingerprint sensor),用戶根據系統的提示將手指放在指紋傳感器上。成功匹配後,私鑰將被解鎖。
發送已簽名的數據(send the signed piece of data)
一旦私鑰解鎖,系統會使用這把私鑰對某一特定的數據(例如交易詳情或時間戳)進行簽名,然後將這個已簽名的數據發送到伺服器。
使用公鑰驗證已簽名的數據(verify the signed data using public key.)
伺服器接收到已簽名的數據後,會使用之前註冊的公鑰進行驗證。
將驗證結果返回給APP(tell the app verification result)
整個流程需要前端和後端的配合,前端處理密鑰生成、簽名數據等操作。後端負責身份驗證和數據驗證角色。
具體來說,我們在前端要做這幾件事情
生成公私鑰
當用戶首次設定生物辨識時,我們生成一對公私鑰。公鑰會被發送到伺服器儲存,而私鑰會儲存在用戶的裝置上。
const generateKeyPair = () => {
    const rnBiometrics = new ReactNativeBiometrics();

    //用createKeys建立公私鑰
    rnBiometrics.createKeys()
    .then((resultObject) =>
      const { publicKey } = resultObject
      console.log(publicKey)
      sendPublicKeyToServer(publicKey) //發送公鑰給伺服器
    })
    .catch(error => {
      console.log('Key creation failed', error);
    });
};
你可能會注意到,在這段程式碼中,我們只處理了公鑰,這是因為私鑰是由ReactNativeBiometrics負責管理的,以確保安全性。所以我們只需要處理公鑰和與伺服器的交互。
使用私鑰生成簽名
當用戶需要執行驗證操作時,我們將使用私鑰對相關數據(例如時間戳)進行簽名。
const signDataWithPrivateKey = (payload) => {
  const rnBiometrics = new ReactNativeBiometrics();
  let epochTimeSeconds = Math.round((new Date()).getTime() / 1000).toString()
  let payload = epochTimeSeconds + 'some message'

  //用createSignature生成簽名,觸發生物辨識
  rnBiometrics.createSignature({
    promptMessage: 'Sign in',
    payload: payload
  })
  .then(result => {
    const { success, signature } = resultObject

    if (success) {
      console.log(signature)
      sendSignatureToServer(signature, payload) //傳到伺服器驗證
    }
  })
  .catch(error => {
    console.log('Signature creation failed', error);
  });
};
發送簽名到伺服器
將簽名發送到伺服器,並根據伺服器返回結果進行適當操作。
import axios from 'axios';

const sendSignatureToServer = (signature, payload) => {
  axios.post('YOUR_SERVER_ENDPOINT_FOR_VERIFICATION', { signature: signature, payload: payload })
    .then(response => {
      // Handle server response. For example:
      if (response.data.verificationSuccess) {
        console.log('login');
      } else {
        console.log('verification failed');
      }
    })
    .catch(error => {
      console.log('Error sending signature to server:', error);
    });
};


 iThome鐵人賽