以下是使用 Autodistill標記資料並訓練模型的官方案例
要使用的人可以修改資料集(就改 load 資料集那部分就可以了),標記資料的大模型(ontology那邊),微調的目標模型(target model那部分的程式碼)以符合自己的需求。
不過假如訓練(微調時)要修改超參數的話(除了epoch),可能還是要看下官方文件,然後修改,測試直到符合需求。

Autodistill利用大型、較慢的基礎模型來訓練小型、更快的監督模型。使用autodistill,您可以從未標記的圖像開始,無需人工干預,直接在邊緣運行自定義模型進行推理。
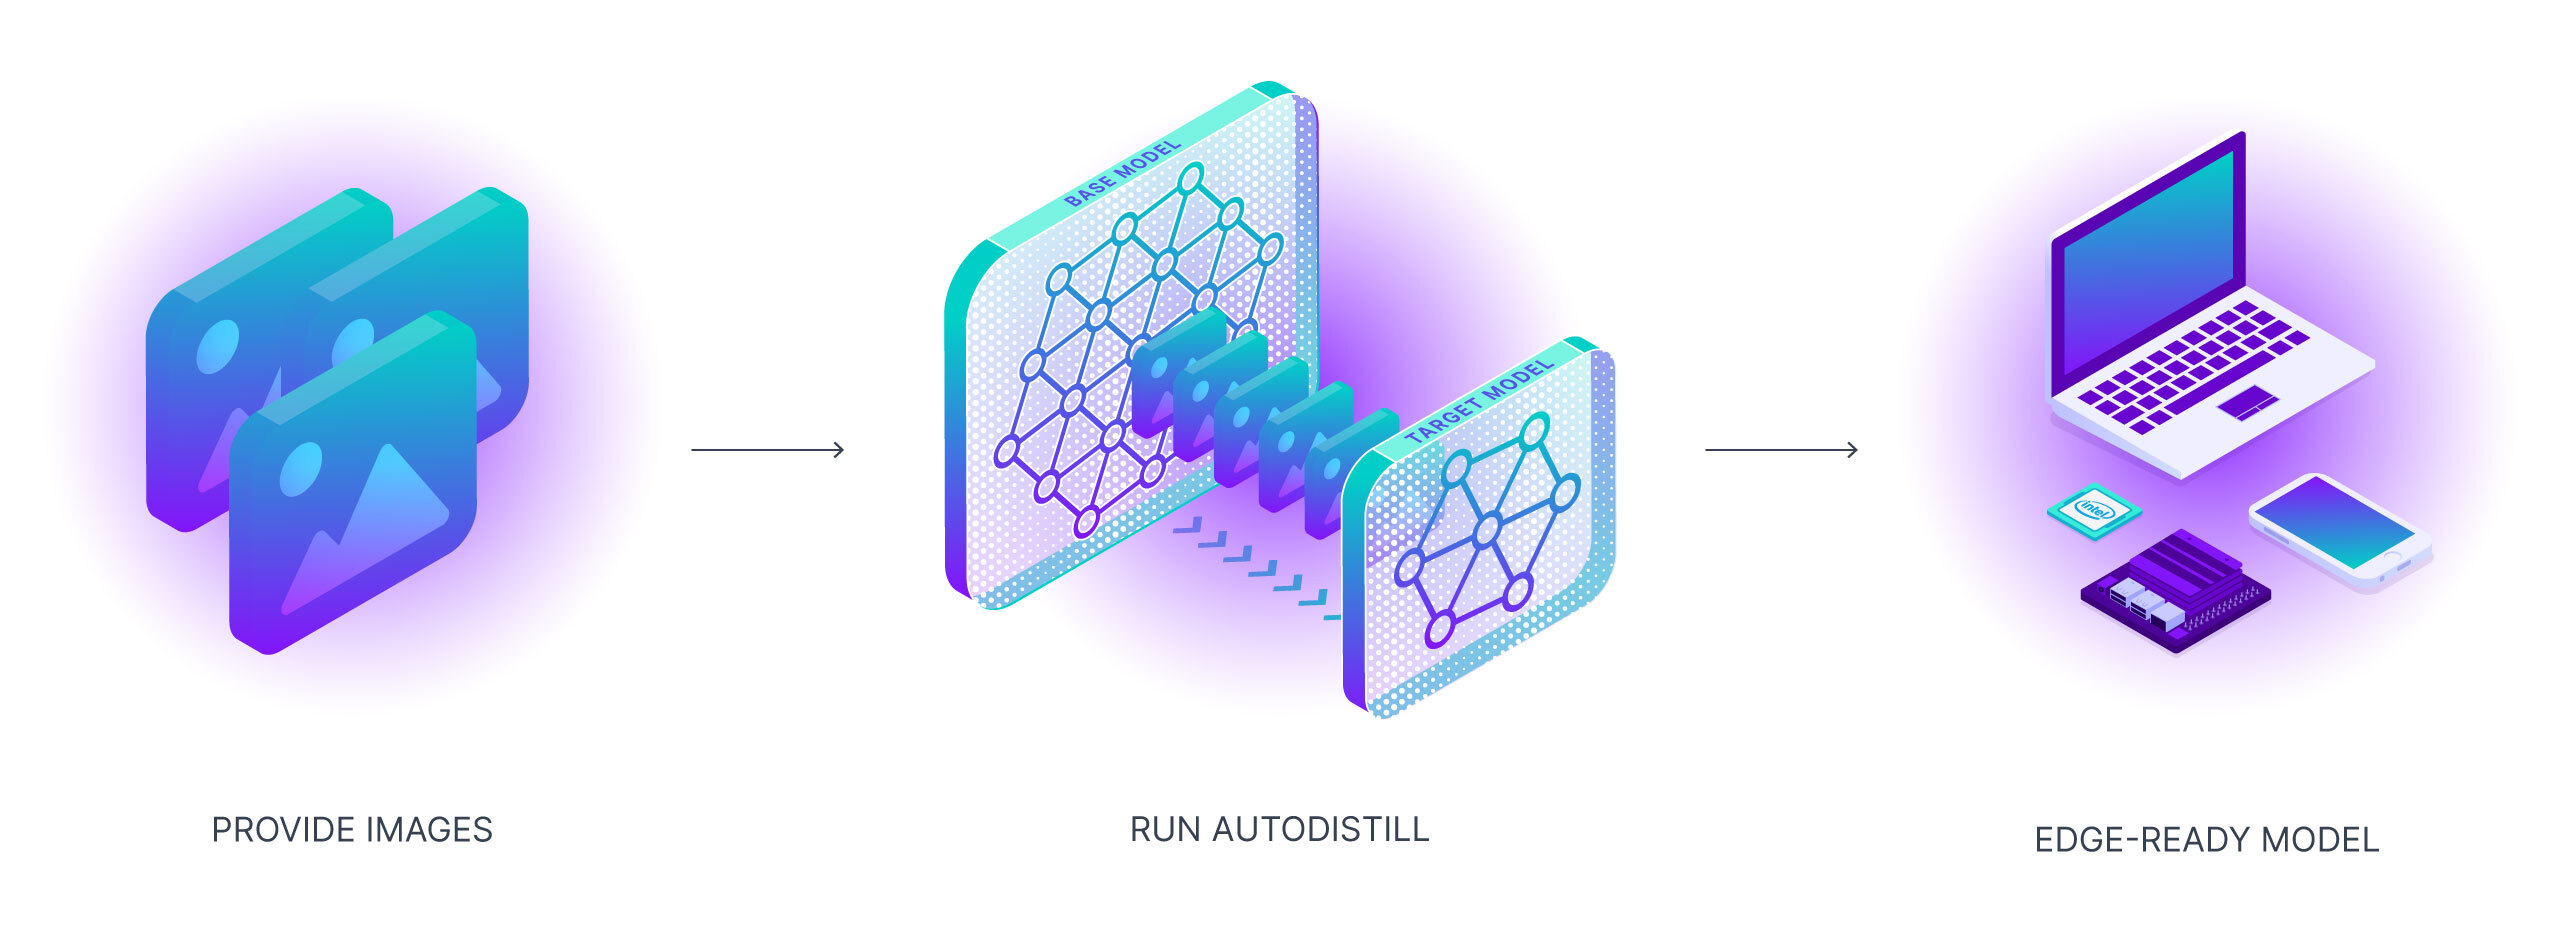
隨著基礎模型(大模型)越來越優秀,它們將越來越能夠在標記過程中輔助或替代人類。我們需要工具來引導、利用和比較這些模型。此外,這些基礎模型很大、昂貴,並且經常被私有API所控制。對於許多生產用例(製造端的應用場景),我們需要的是能夠在邊緣以低成本和實時運行的模型。
在本教學中,我們將涵蓋:
讓我們確保我們有訪問GPU的權限。我們可以使用nvidia-smi命令來做到這一點。如果遇到任何問題,請導航到Edit -> Notebook settings -> Hardware accelerator,將其設置為GPU,然後點擊Save。
!nvidia-smi
注意: Autodistill是一個生態系統,用於使用大型、較慢的基礎模型來訓練小型、更快的監督模型。每個基礎模型(Base)以及目標模型(Target model)都有其自己獨立的代碼庫和pip包。
!pip install -q \
autodistill \
autodistill-grounded-sam \
autodistill-yolov8 \
supervision==0.9.0
注意: 為了方便管理數據集、圖像和模型,這邊創建了一個HOME常量。
import os
HOME = os.getcwd()
print(HOME)
注意: 使用Autodistill所需要的就是一組你希望自動標註並用於目標模型訓練的圖像。
!mkdir {HOME}/images
注意: 如果您想要在您的資料上構建YOLOv8,請確保將其上傳到我們剛剛建立的images目錄中。☝️
注意: 在本教程中,我們將從包含影片文件的目錄開始,我將向您展示如何將其轉換為一組可立即使用的圖像。如果您正在使用您自己的圖像,則可以跳過此部分。
!mkdir {HOME}/videos
%cd {HOME}/videos

# download zip file containing videos
!wget --load-cookies /tmp/cookies.txt "https://docs.google.com/uc?export=download&confirm=$(wget --quiet --save-cookies /tmp/cookies.txt --keep-session-cookies --no-check-certificate 'https://docs.google.com/uc?export=download&id=1wnW7v6UTJZTAcOQj0416ZbQF8b7yO6Pt' -O- | sed -rn 's/.*confirm=([0-9A-Za-z_]+).*/\1\n/p')&id=1wnW7v6UTJZTAcOQj0416ZbQF8b7yO6Pt" -O milk.zip && rm -rf /tmp/cookies.txt

# unzip videos
!unzip milk.zip
注意: 現在,讓我們將視頻轉換為圖片。默認情況下,下面的程式碼會從每個影片中保存每個10th第十幀。您可以通過調整FRAME_STRIDE參數的值來更改這一點。
VIDEO_DIR_PATH = f"{HOME}/videos"
IMAGE_DIR_PATH = f"{HOME}/images"
FRAME_STRIDE = 3
注意: 請注意,我們將兩個影片放在一旁,以便在筆記本的末尾使用它們來評估模型。
import supervision as sv
from tqdm.notebook import tqdm

video_paths = sv.list_files_with_extensions(
    directory=VIDEO_DIR_PATH,
    extensions=["mov", "mp4"])

print(video_paths)

for video_path in tqdm(video_paths):
    video_name = video_path.stem
    image_name_pattern = video_name + "-{:05d}.png"
    with sv.ImageSink(target_dir_path=IMAGE_DIR_PATH, image_name_pattern=image_name_pattern) as sink:
        for image in sv.get_video_frames_generator(source_path=str(video_path), stride=FRAME_STRIDE):
            sink.save_image(image=image)
注意: 在開始使用autodistill構建模型之前,先檢查下所需的資料。
import supervision as sv

image_paths = sv.list_files_with_extensions(
    directory=IMAGE_DIR_PATH,
    extensions=["png", "jpg", "jpg"])

print('image count:', len(image_paths))
注意: 我們也可以繪製我們的圖片數據集的幾個樣本。
IMAGE_DIR_PATH = f"{HOME}/images"
SAMPLE_SIZE = 16
SAMPLE_GRID_SIZE = (4, 4)
SAMPLE_PLOT_SIZE = (16, 16)
import cv2
import supervision as sv

titles = [
    image_path.stem
    for image_path
    in image_paths[:SAMPLE_SIZE]]
images = [
    cv2.imread(str(image_path))
    for image_path
    in image_paths[:SAMPLE_SIZE]]

sv.plot_images_grid(images=images, titles=titles, grid_size=SAMPLE_GRID_SIZE, size=SAMPLE_PLOT_SIZE)
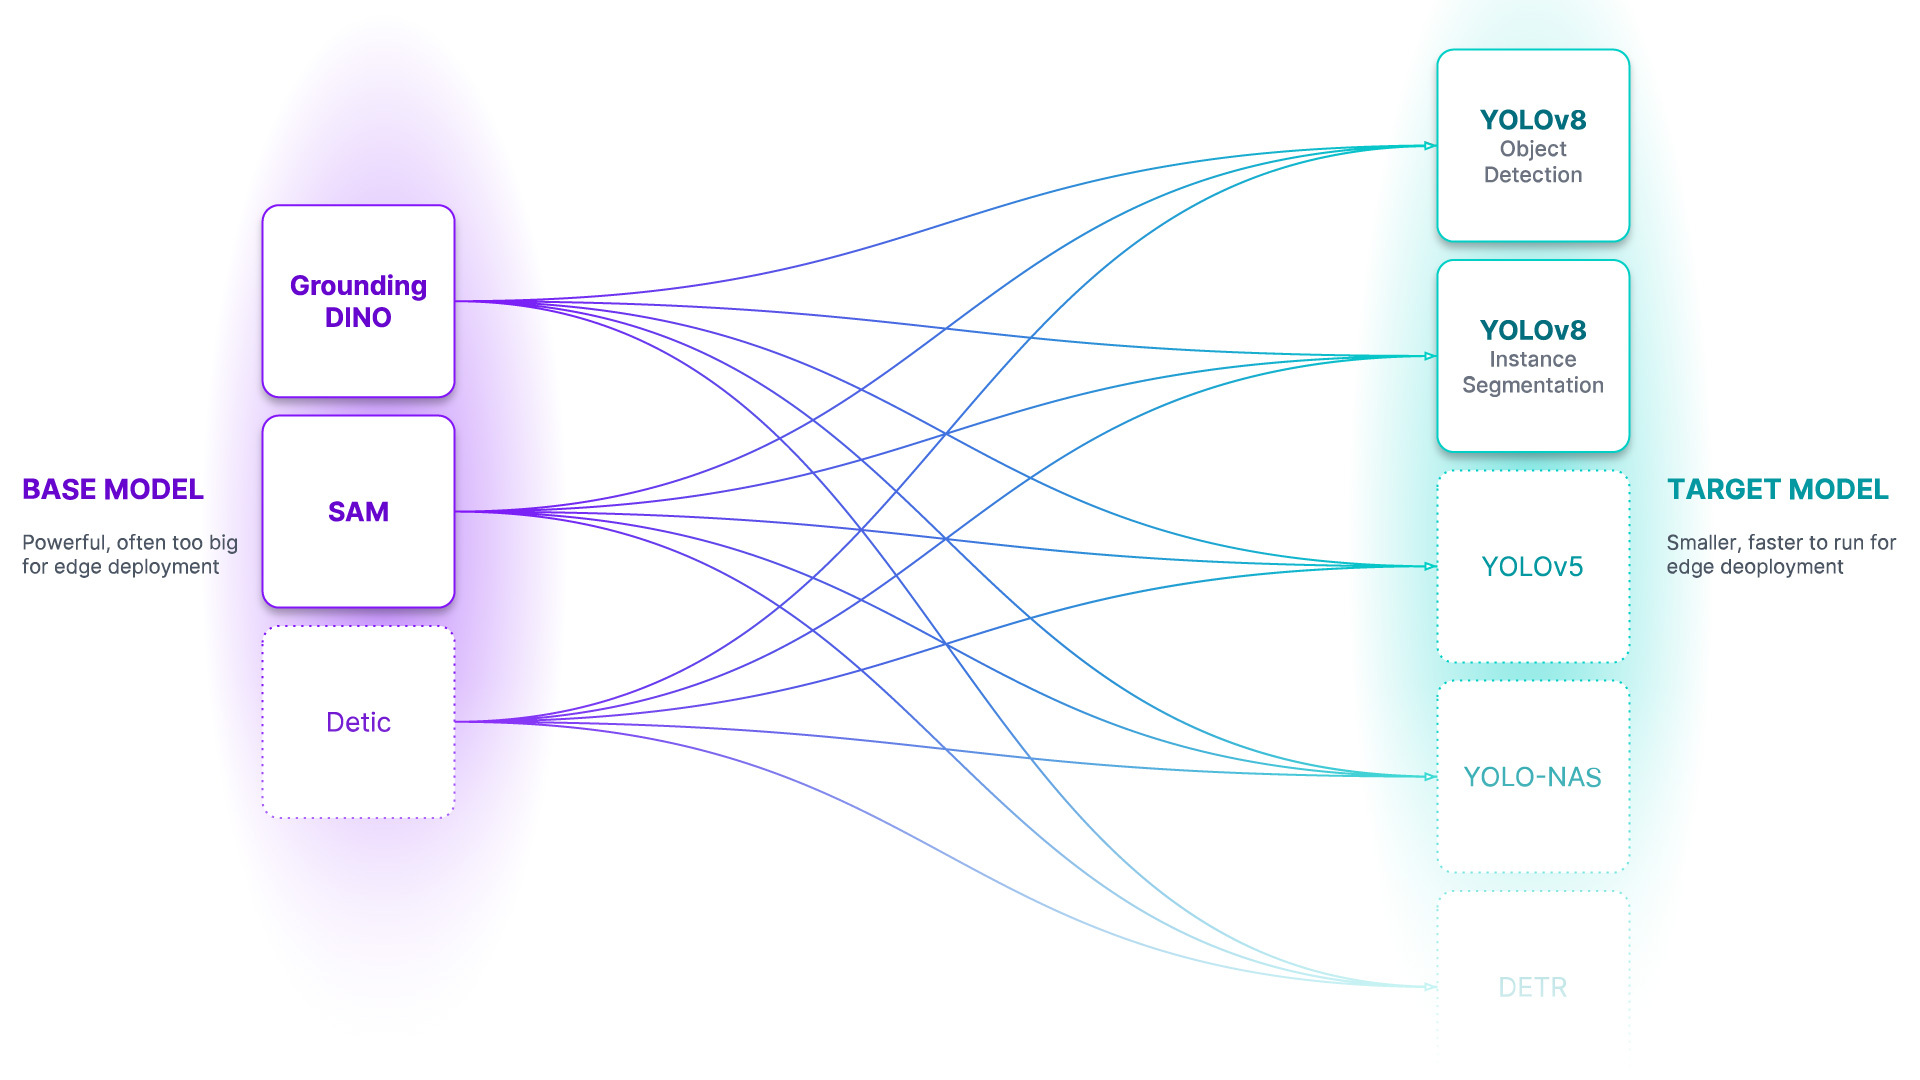
Ontology 本體 - 本體論定義了你的基礎模型如何被提示(prompt),你的資料集將描述什麼,以及你的目標模型將預測什麼。CaptionOntology 是個較簡單的本體設定,它用文本標題(Caption)提示基礎模型並將它們映射到類名。其他本體可能會使用CLIP向量或示例圖像,而不是文本標題。
from autodistill.detection import CaptionOntology

ontology=CaptionOntology({
    "car": "car",
    "building": "building"
})
基礎模型 - 基礎模型是一個大型的基礎模型,對很多事物都有很多了解。基礎模型通常是多模態的,能夠執行許多任務。它們體積大、速度慢、成本高。基礎模型的例子包括GroundedSAM和即將推出的GPT-4多模態變體。我們使用基礎模型(以及未標記的輸入數據和本體設定)來創建資料集。
DATASET_DIR_PATH = f"{HOME}/dataset"
注意:: 基礎模型運行緩慢... 為自己泡杯咖啡,自動標記可能需要一段時間。☕
from autodistill_grounded_sam import GroundedSAM

base_model = GroundedSAM(ontology=ontology)
dataset = base_model.label(
    input_folder=IMAGE_DIR_PATH,
    extension=".png",
    output_folder=DATASET_DIR_PATH)
資料集 - 資料集是一組可以用來訓練目標模型的自動標記數據。它是由基礎模型生成的輸出。
ANNOTATIONS_DIRECTORY_PATH = f"{HOME}/dataset/train/labels"
IMAGES_DIRECTORY_PATH = f"{HOME}/dataset/train/images"
DATA_YAML_PATH = f"{HOME}/dataset/data.yaml"

import supervision as sv

dataset = sv.DetectionDataset.from_yolo(
    images_directory_path=IMAGES_DIRECTORY_PATH,
    annotations_directory_path=ANNOTATIONS_DIRECTORY_PATH,
    data_yaml_path=DATA_YAML_PATH)

len(dataset)

import supervision as sv

image_names = list(dataset.images.keys())[:SAMPLE_SIZE]

mask_annotator = sv.MaskAnnotator()
box_annotator = sv.BoxAnnotator()

images = []
for image_name in image_names:
    image = dataset.images[image_name]
    annotations = dataset.annotations[image_name]
    labels = [
        dataset.classes[class_id]
        for class_id
        in annotations.class_id]
    annotates_image = mask_annotator.annotate(
        scene=image.copy(),
        detections=annotations)
    annotates_image = box_annotator.annotate(
        scene=annotates_image,
        detections=annotations,
        labels=labels)
    images.append(annotates_image)

sv.plot_images_grid(
    images=images,
    titles=image_names,
    grid_size=SAMPLE_GRID_SIZE,
    size=SAMPLE_PLOT_SIZE)
目標模型 - 目標模型是一種監督模型,它消耗一個資料集並輸出一個經過提煉、準備好部署的模型。目標模型通常小巧、快速,並經過微調,以便非常好地執行特定任務(但它們不會很好地泛化到資料集中描述的信息之外)。目標模型的例子包括YOLOv8和DETR。
%cd {HOME}

from autodistill_yolov8 import YOLOv8

target_model = YOLOv8("yolov8l.pt")
target_model.train(DATA_YAML_PATH, epochs=100)
注意: 就像常規的YOLOv8訓練一樣,我們現在可以查看存儲在runs 目錄中的產物。
%cd {HOME}

from IPython.display import Image

Image(filename=f'{HOME}/runs/detect/train/confusion_matrix.png', width=600)
%cd {HOME}

from IPython.display import Image

Image(filename=f'{HOME}/runs/detect/train/results.png', width=600)
%cd {HOME}

from IPython.display import Image

Image(filename=f'{HOME}/runs/detect/train/val_batch0_pred.jpg', width=600)
import locale
locale.getpreferredencoding = lambda: "UTF-8"
INPUT_VIDEO_PATH = TEST_VIDEO_PATHS[0]
OUTPUT_VIDEO_PATH = f"{HOME}/output.mp4"
TRAINED_MODEL_PATH = f"{HOME}/runs/detect/train/weights/best.pt"
!yolo predict model={TRAINED_MODEL_PATH} source={INPUT_VIDEO_PATH}
yolo export model=yolov8n.pt


 iThome鐵人賽